> ## Documentation Index
> Fetch the complete documentation index at: https://orgo.space/docs/llms.txt
> Use this file to discover all available pages before exploring further.
# Event Ticketing
> Sell tickets with multiple price tiers, member discounts, and Stripe checkout
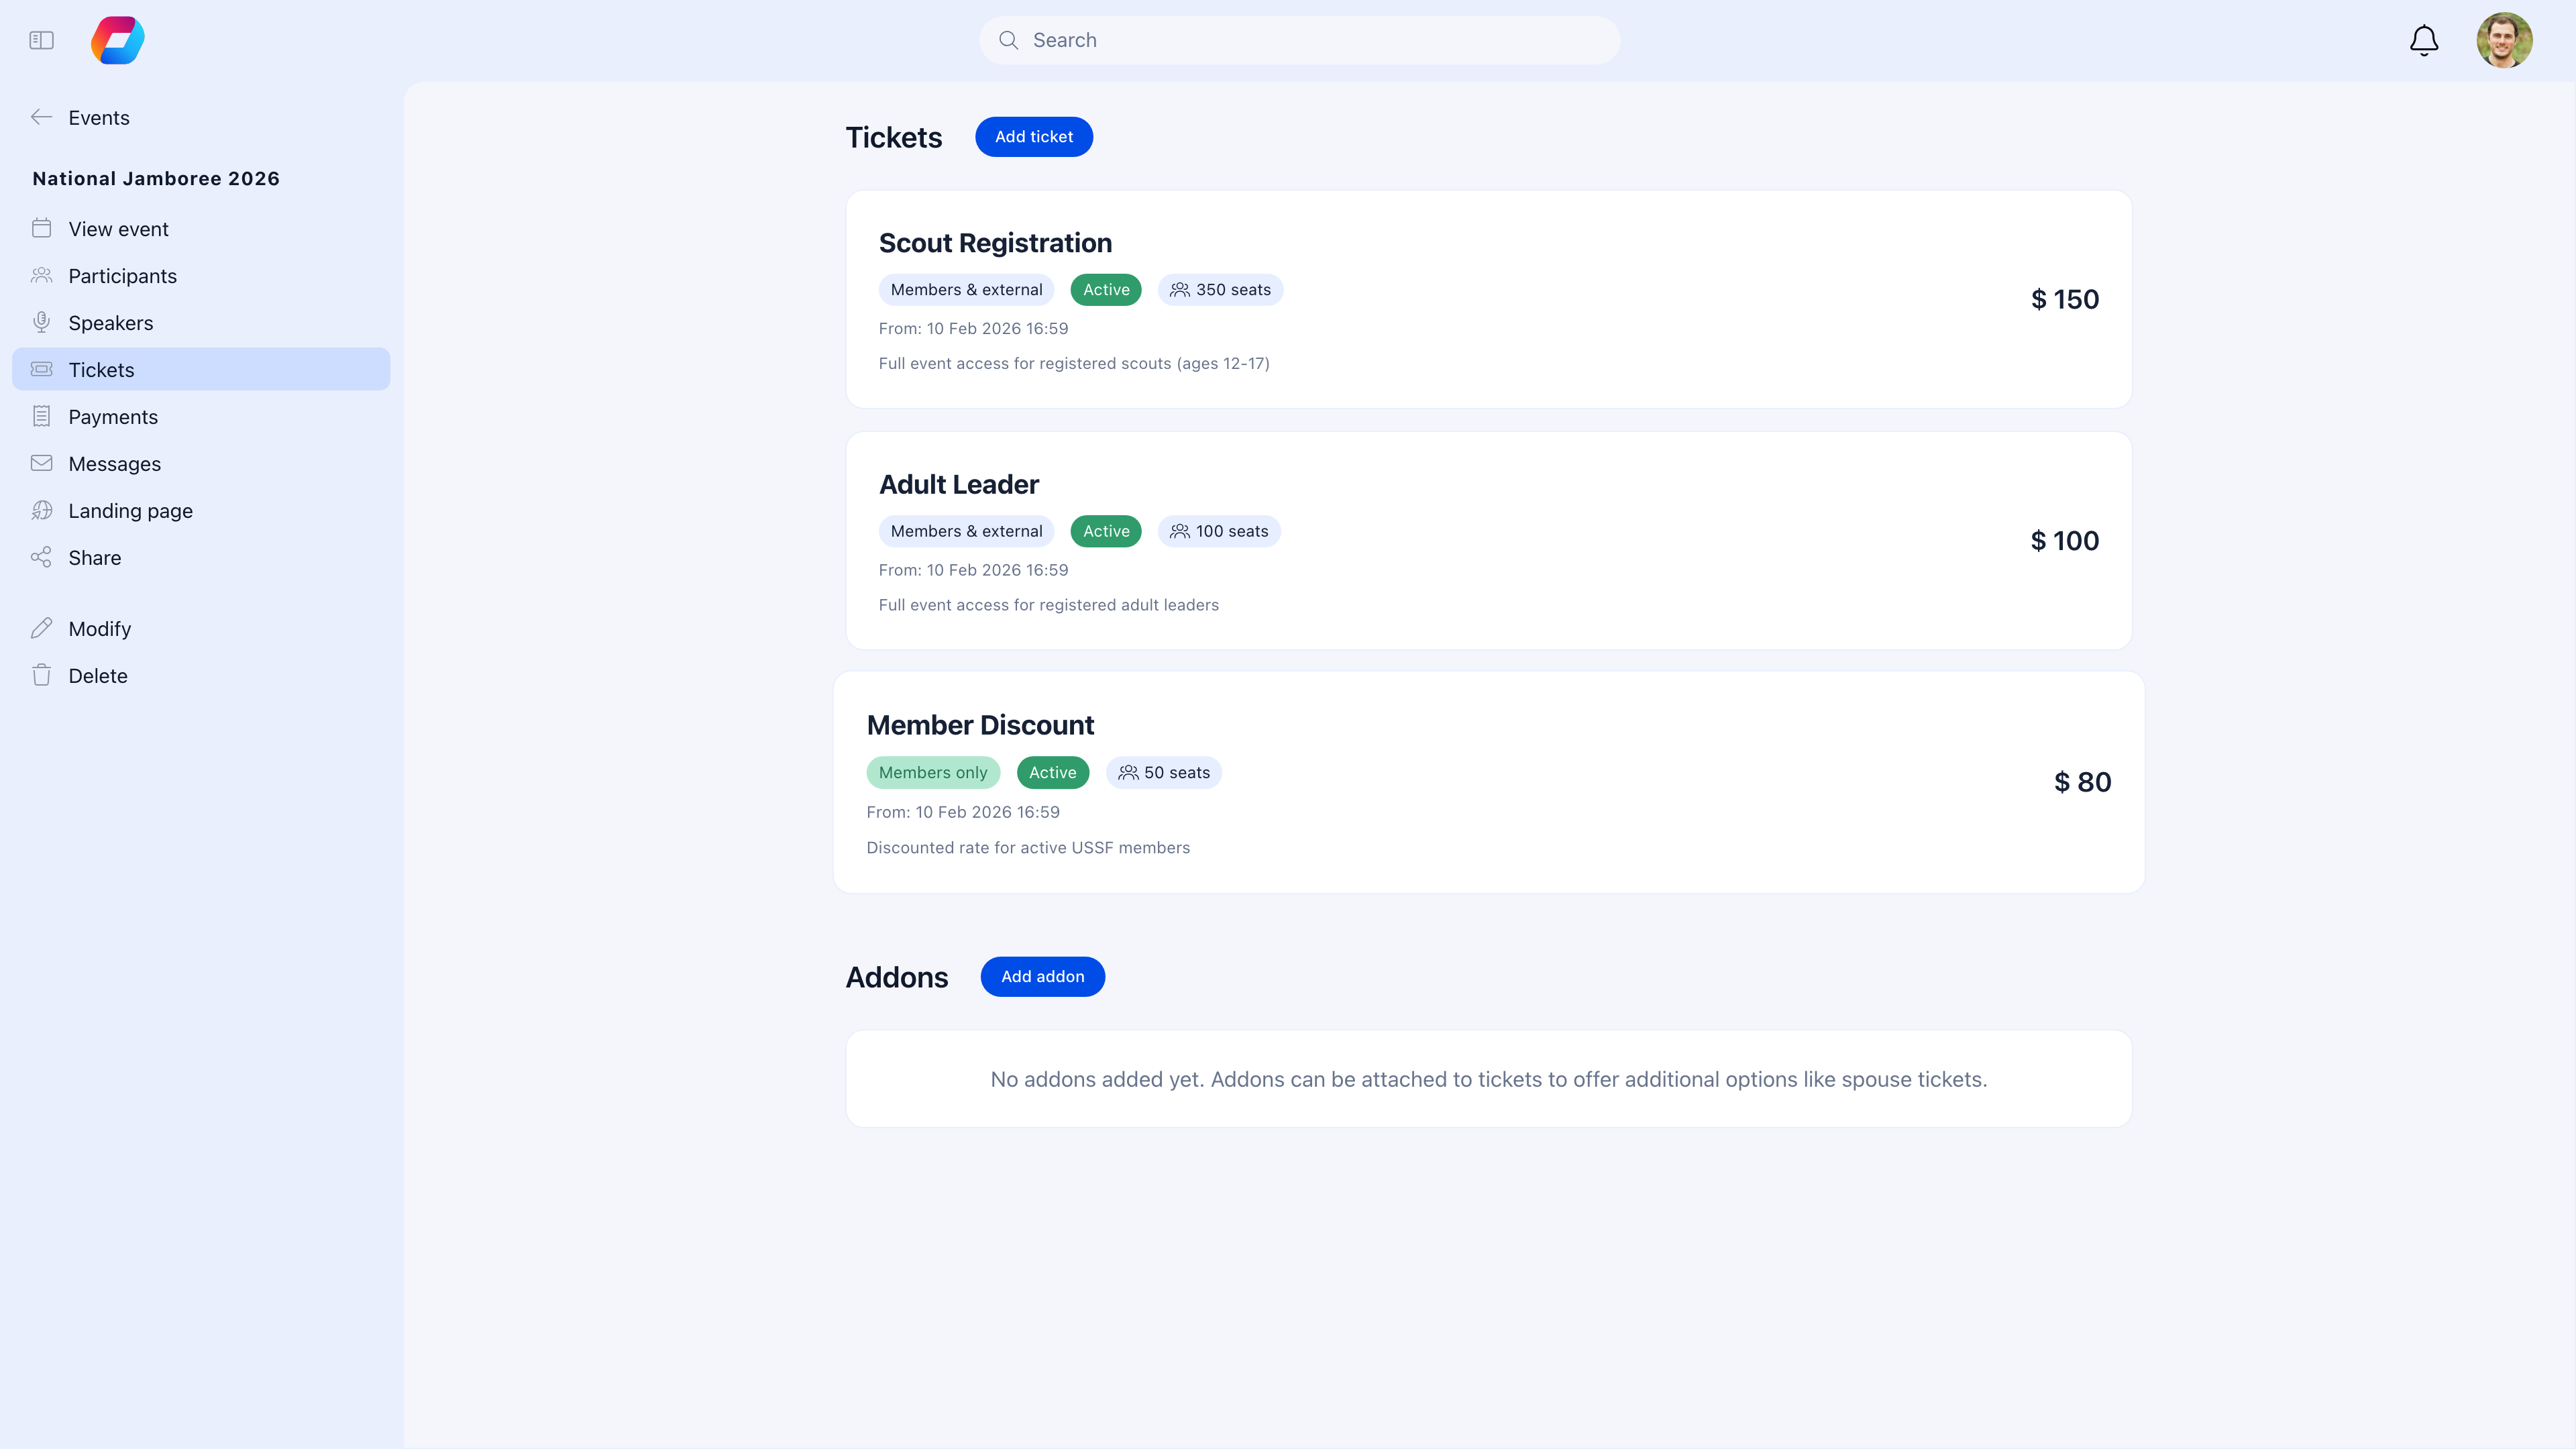
Ticketing lets you charge for events, offer multiple price tiers, and manage capacity per ticket type. Attendees pay via Stripe, receive a QR code ticket by email, and check in at the door by scanning it.
Even for free events, ticketing is useful when you need different registration categories (e.g., "Member" vs "Guest" vs "Speaker").
 ***
## Prerequisites
Paid tickets require Stripe. Set up your payment integration first at **Settings** → **Payments** → **Online Payments**. See [Stripe Setup](/platform/fees/stripe-integration).
Also ensure:
* **Online Payments** module is enabled
* **Event Ticket Payments** is enabled in **Settings** → **Events**
For free-only ticketing (multiple registration categories without payment), you don't need Stripe.
***
## Setting up tickets
When creating or editing an event, go to the **Ticket Settings** tab.
Toggle on "Enable Ticket Payment" in the event settings.
Add one or more ticket types with name, price, and optional quantity limits.
Set start/end dates for each ticket type to control when they're purchasable.
Tickets appear on the event page immediately.
***
## Ticket type settings
Each ticket type has these options:
| Setting | What it does |
| ---------------- | -------------------------------------------------------------------------------------------------------------------------------------------------- |
| **Name** | What attendees see: "General Admission", "Early Bird", "VIP" |
| **Description** | What's included: "Includes lunch and networking session" |
| **Price** | Amount in your currency. Set to 0 for free registration categories. |
| **Max seats** | Maximum tickets available for this type. Leave empty for unlimited. When sold out, the ticket shows "Sold Out" while other types remain available. |
| **Members only** | Only logged-in members can purchase. Non-members won't see this ticket. |
| **Start date** | When this ticket becomes available for purchase. |
| **End date** | When this ticket stops being available. |
***
## Common pricing strategies
### Early bird + regular pricing
Create two tickets with overlapping availability:
| Ticket | Price | Available |
| ---------- | ----- | -------------------- |
| Early Bird | \$50 | Now → March 1 |
| Regular | \$75 | March 1 → Event date |
The early bird sells out or expires, then regular pricing kicks in. This creates urgency and rewards early commitment.
### Member vs. non-member pricing
| Ticket | Price | Members only? |
| ---------- | ----- | ------------- |
| Member | \$40 | Yes |
| Non-Member | \$60 | No |
Members see both options but the member price is clearly a benefit. Non-members only see the public price.
### Tiered access
| Ticket | Price | Quantity | Includes |
| ------- | ----- | --------- | --------------------------------- |
| General | \$50 | Unlimited | Standard entry |
| VIP | \$100 | 50 | Front row, meet & greet, swag bag |
| Speaker | \$0 | 20 | Complimentary for speakers |
### Free event with categories
| Ticket | Price | Members only? |
| ------ | ----- | ------------- |
| Member | \$0 | Yes |
| Guest | \$0 | No |
No money changes hands, but you track who's a member and who's an external guest. Useful for networking events.
***
## Managing capacity
### Per-ticket limits
Limit individual ticket types independently:
* VIP: 50 available
* General: Unlimited
When a ticket type sells out, it shows "Sold Out" on the event page. Other types remain available.
### Event-level capacity
Set an overall maximum in the event settings. This caps total registrations across all ticket types combined. When the event is full:
* All tickets show "Sold Out"
* If waitlist is enabled, new registrants join the waitlist
* When someone cancels, the next waitlisted person is notified
***
## Orders and payments
Once tickets start selling, track all orders from the event sidebar → **Payments**.
***
## Prerequisites
Paid tickets require Stripe. Set up your payment integration first at **Settings** → **Payments** → **Online Payments**. See [Stripe Setup](/platform/fees/stripe-integration).
Also ensure:
* **Online Payments** module is enabled
* **Event Ticket Payments** is enabled in **Settings** → **Events**
For free-only ticketing (multiple registration categories without payment), you don't need Stripe.
***
## Setting up tickets
When creating or editing an event, go to the **Ticket Settings** tab.
Toggle on "Enable Ticket Payment" in the event settings.
Add one or more ticket types with name, price, and optional quantity limits.
Set start/end dates for each ticket type to control when they're purchasable.
Tickets appear on the event page immediately.
***
## Ticket type settings
Each ticket type has these options:
| Setting | What it does |
| ---------------- | -------------------------------------------------------------------------------------------------------------------------------------------------- |
| **Name** | What attendees see: "General Admission", "Early Bird", "VIP" |
| **Description** | What's included: "Includes lunch and networking session" |
| **Price** | Amount in your currency. Set to 0 for free registration categories. |
| **Max seats** | Maximum tickets available for this type. Leave empty for unlimited. When sold out, the ticket shows "Sold Out" while other types remain available. |
| **Members only** | Only logged-in members can purchase. Non-members won't see this ticket. |
| **Start date** | When this ticket becomes available for purchase. |
| **End date** | When this ticket stops being available. |
***
## Common pricing strategies
### Early bird + regular pricing
Create two tickets with overlapping availability:
| Ticket | Price | Available |
| ---------- | ----- | -------------------- |
| Early Bird | \$50 | Now → March 1 |
| Regular | \$75 | March 1 → Event date |
The early bird sells out or expires, then regular pricing kicks in. This creates urgency and rewards early commitment.
### Member vs. non-member pricing
| Ticket | Price | Members only? |
| ---------- | ----- | ------------- |
| Member | \$40 | Yes |
| Non-Member | \$60 | No |
Members see both options but the member price is clearly a benefit. Non-members only see the public price.
### Tiered access
| Ticket | Price | Quantity | Includes |
| ------- | ----- | --------- | --------------------------------- |
| General | \$50 | Unlimited | Standard entry |
| VIP | \$100 | 50 | Front row, meet & greet, swag bag |
| Speaker | \$0 | 20 | Complimentary for speakers |
### Free event with categories
| Ticket | Price | Members only? |
| ------ | ----- | ------------- |
| Member | \$0 | Yes |
| Guest | \$0 | No |
No money changes hands, but you track who's a member and who's an external guest. Useful for networking events.
***
## Managing capacity
### Per-ticket limits
Limit individual ticket types independently:
* VIP: 50 available
* General: Unlimited
When a ticket type sells out, it shows "Sold Out" on the event page. Other types remain available.
### Event-level capacity
Set an overall maximum in the event settings. This caps total registrations across all ticket types combined. When the event is full:
* All tickets show "Sold Out"
* If waitlist is enabled, new registrants join the waitlist
* When someone cancels, the next waitlisted person is notified
***
## Orders and payments
Once tickets start selling, track all orders from the event sidebar → **Payments**.
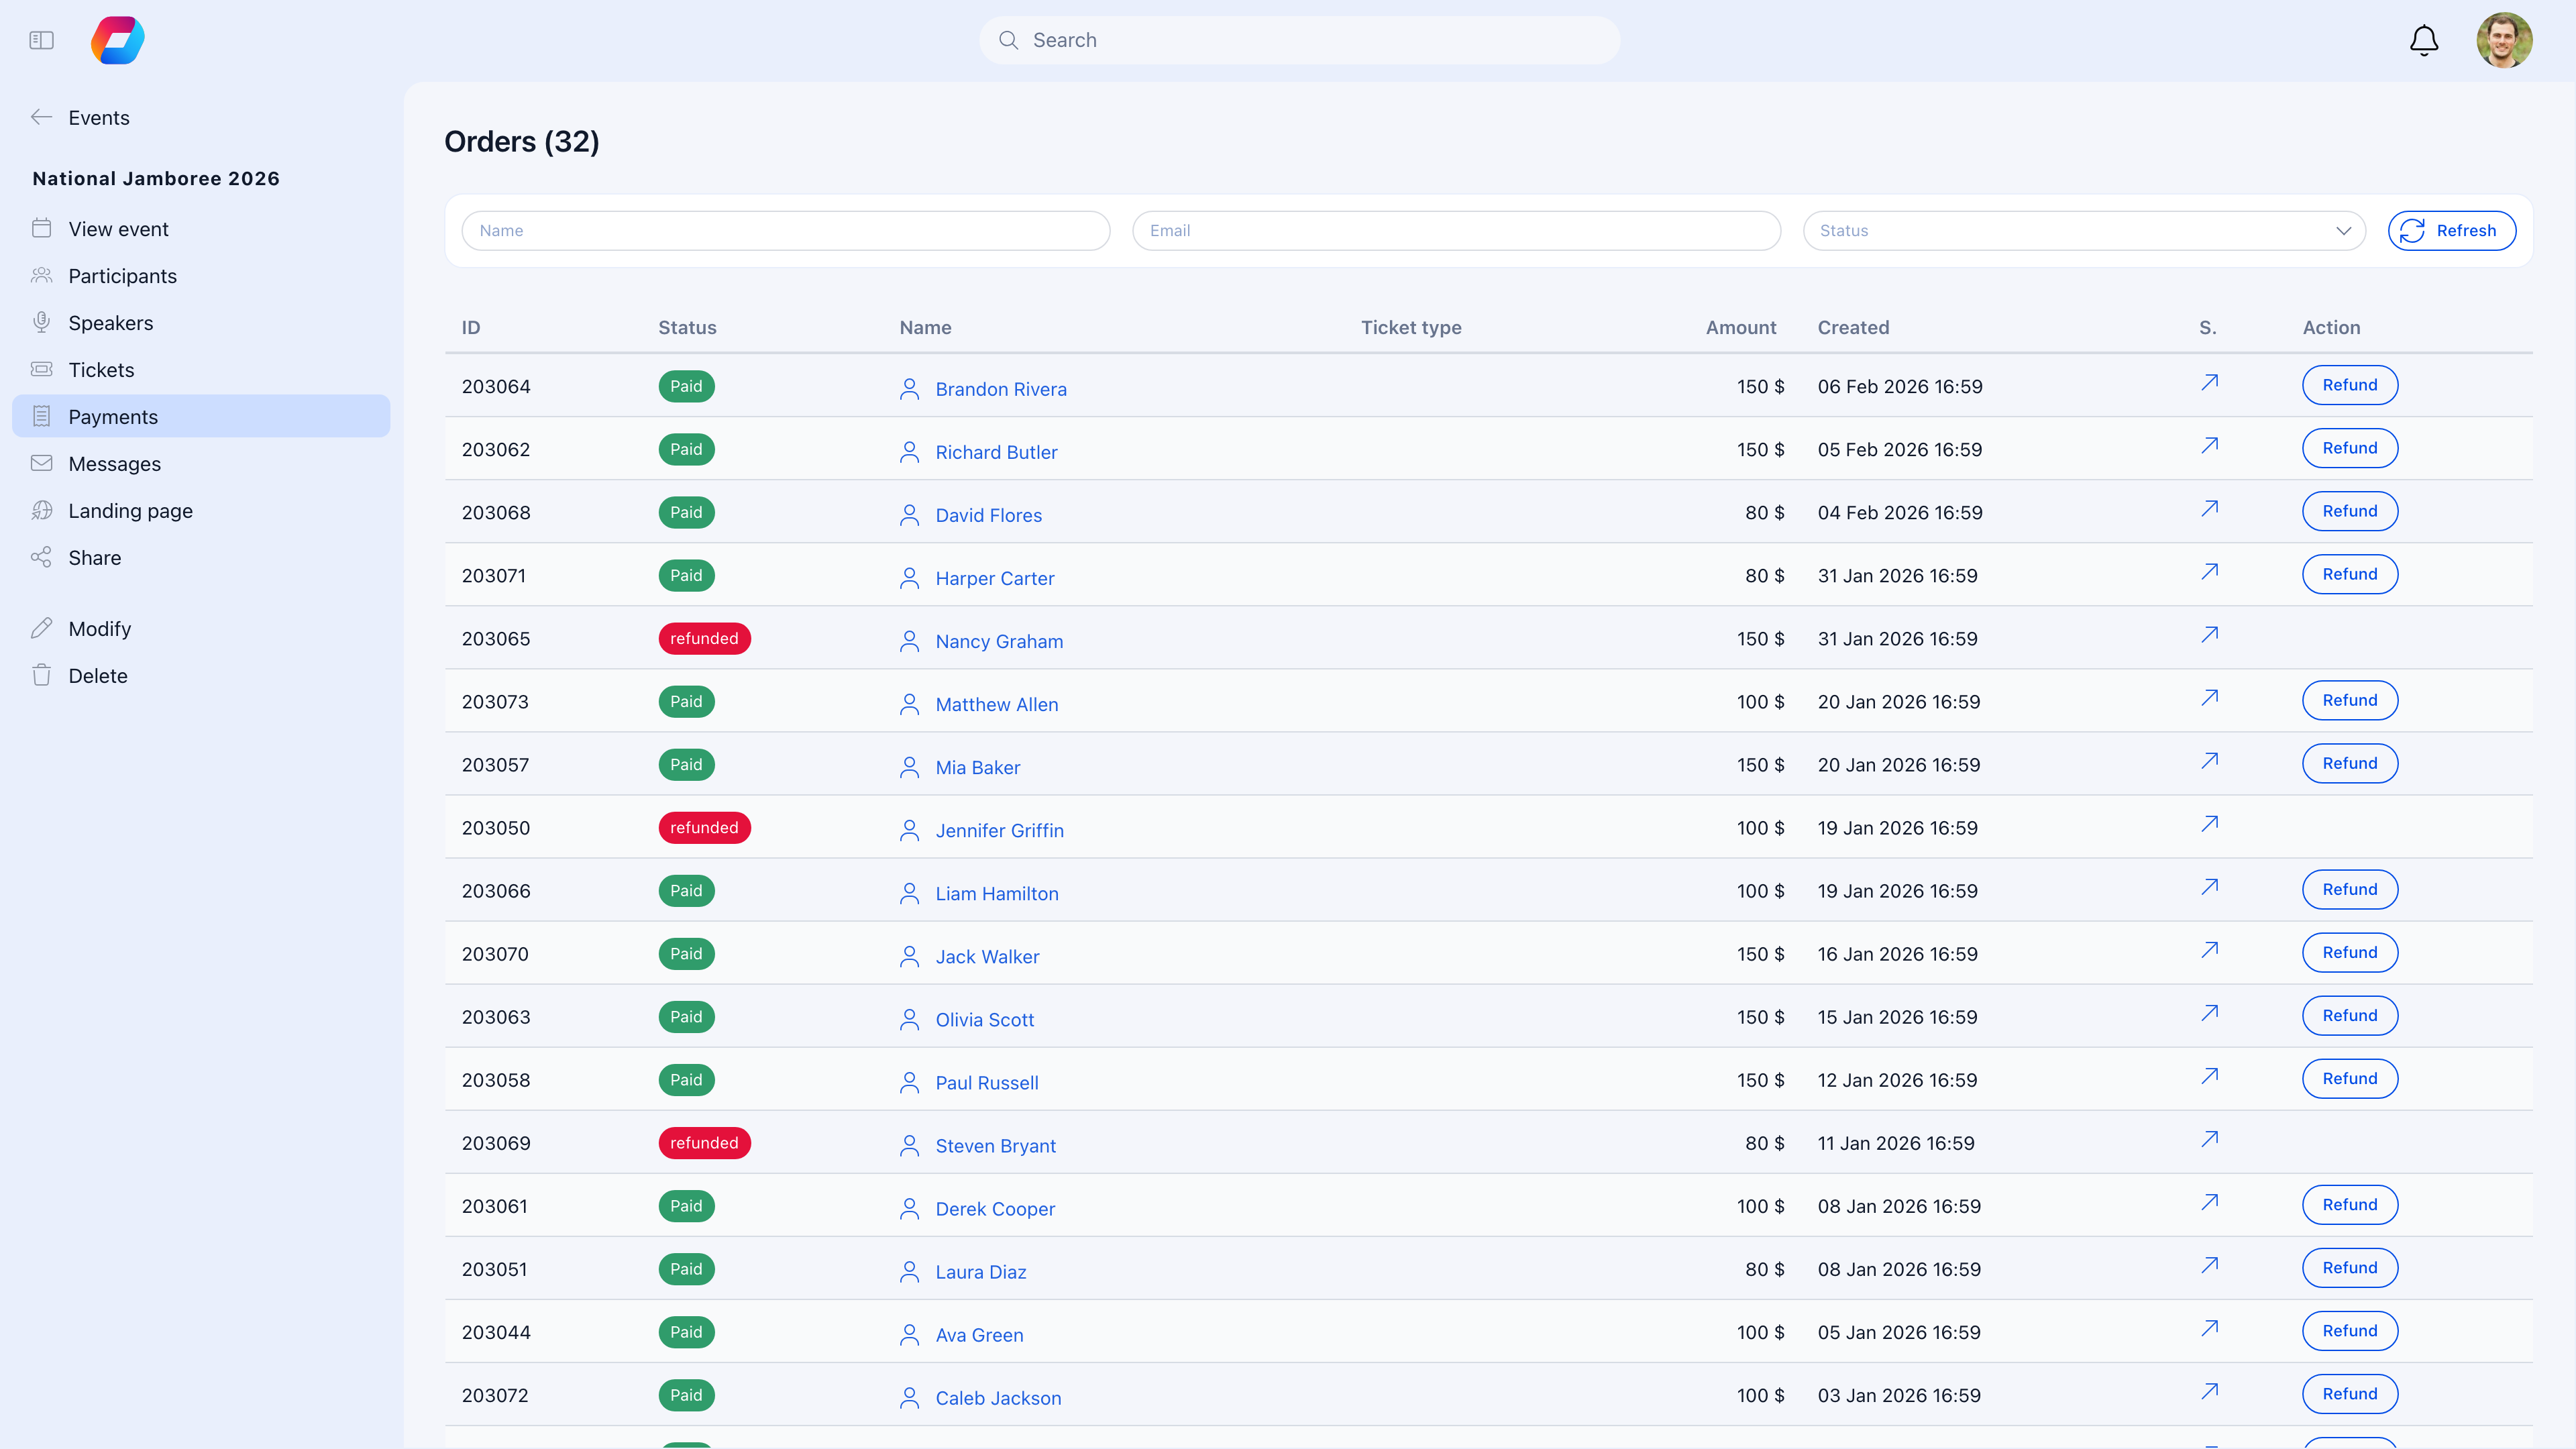 Each order shows the attendee's name, status (Paid, Refunded), ticket type, amount, and date. Filter by name, email, or status to find specific orders. Refunds can be processed directly from this view.
***
## The purchase flow
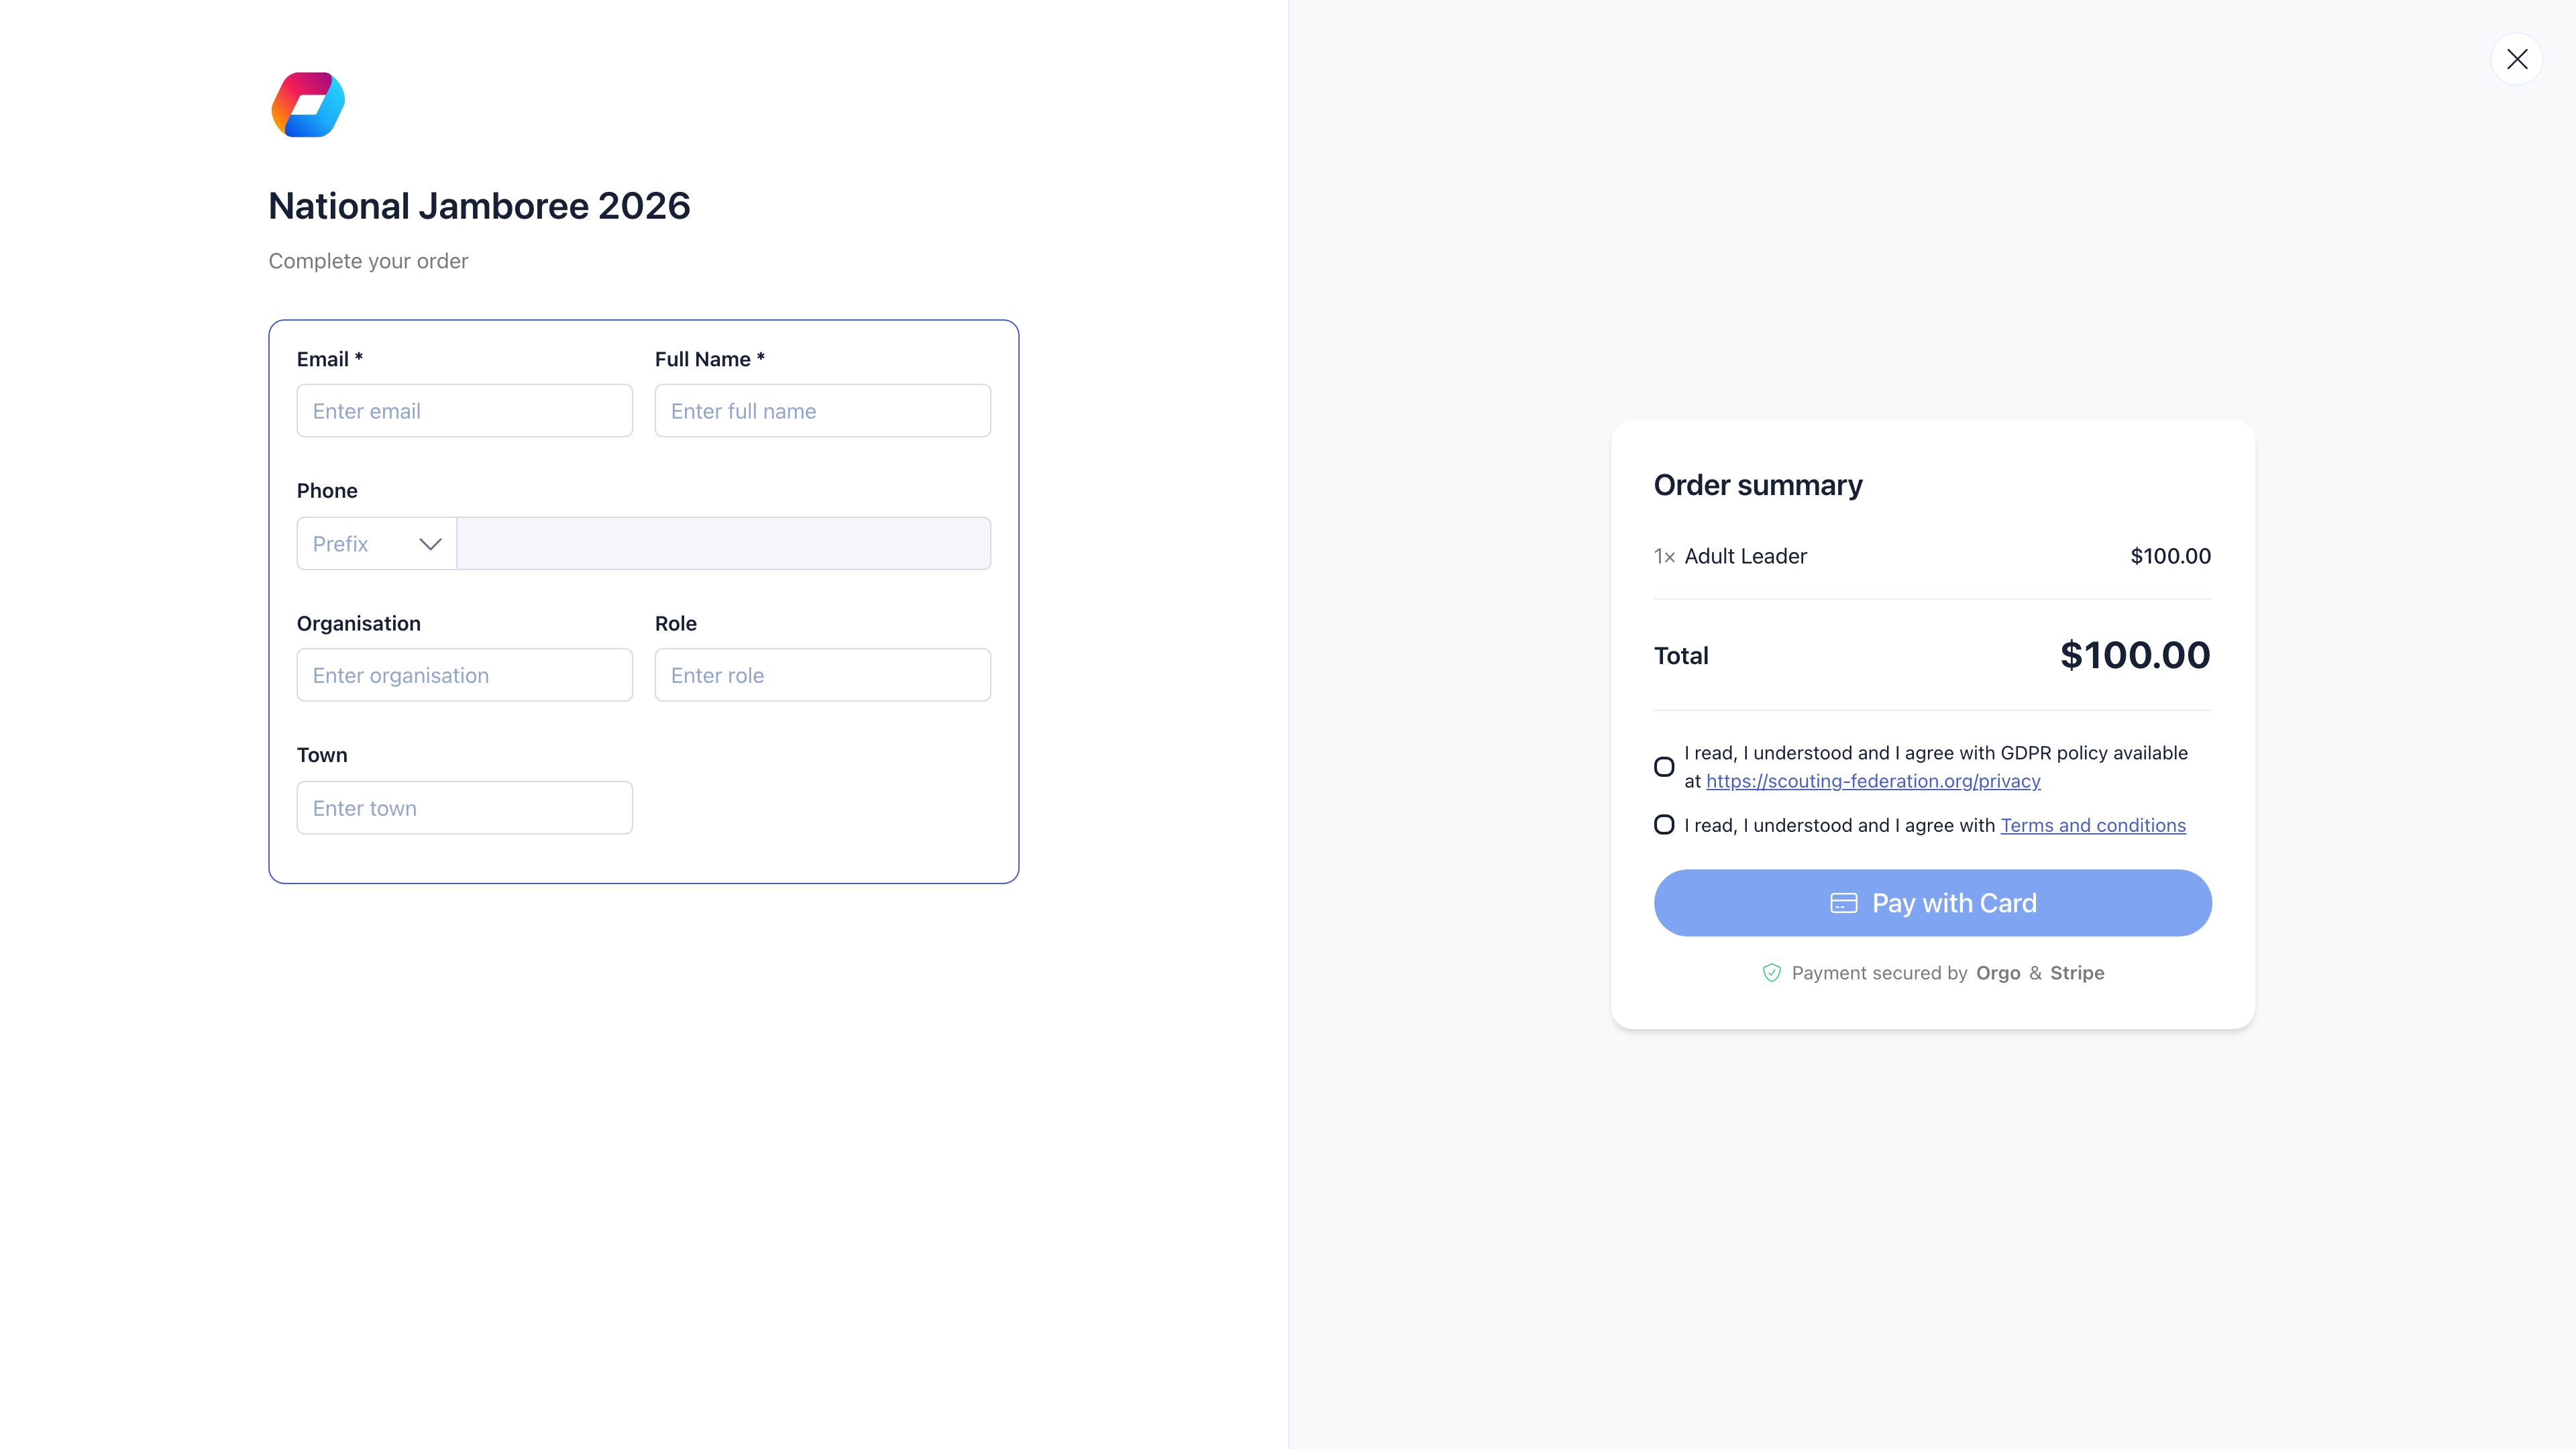
What your attendees experience:
Choose ticket type and quantity on the event page.
Provide name, email, and any required registration fields.
Secure checkout via Stripe — credit/debit cards, Apple Pay, Google Pay, and local payment methods depending on your Stripe configuration.
Confirmation email with event details and a QR code for check-in.
Each order shows the attendee's name, status (Paid, Refunded), ticket type, amount, and date. Filter by name, email, or status to find specific orders. Refunds can be processed directly from this view.
***
## The purchase flow
What your attendees experience:
Choose ticket type and quantity on the event page.
Provide name, email, and any required registration fields.
Secure checkout via Stripe — credit/debit cards, Apple Pay, Google Pay, and local payment methods depending on your Stripe configuration.
Confirmation email with event details and a QR code for check-in.
 ***
## Addons
Addons are optional extras that attendees can purchase alongside their ticket — lunch, a workshop session, parking, a +1 guest, merchandise. Each addon has its own price and capacity, independent of the ticket.
| Setting | What it does |
| --------------------------- | ------------------------------------------------------------------------------------------------------------------------------------------------------------- |
| **Name** | What attendees see: "Lunch Package", "Workshop: Advanced Track", "Parking Pass" |
| **Description** | What's included |
| **Price** | Cost per unit. Set to 0 for free extras. |
| **Max quantity per ticket** | How many of this addon a single attendee can buy (default: 10) |
| **Max total** | Overall capacity for this addon across all attendees. When sold out, it's no longer available. Leave empty for unlimited. |
| **Creates attendee** | If enabled, purchasing this addon creates a child attendee record — useful for "+1 Guest" addons where the extra person needs their own QR code and check-in. |
Addons are linked to specific ticket types, so you can offer different extras for VIP vs. General Admission.
### Example: Conference with addons
| Addon | Price | Max per ticket | Max total | Creates attendee? |
| -------------------- | ----- | -------------- | --------- | ----------------- |
| Lunch (Day 1) | \$25 | 1 | 200 | No |
| Lunch (Day 2) | \$25 | 1 | 200 | No |
| Workshop: AI Track | \$50 | 1 | 40 | No |
| Workshop: Leadership | \$50 | 1 | 40 | No |
| +1 Guest | \$30 | 1 | 100 | Yes |
| Parking Pass | \$15 | 1 | 50 | No |
| Event T-Shirt | \$20 | 3 | — | No |
The workshop addons have a max total of 40, so once 40 people across all ticket types select that workshop, it shows as sold out.
***
## QR code check-in
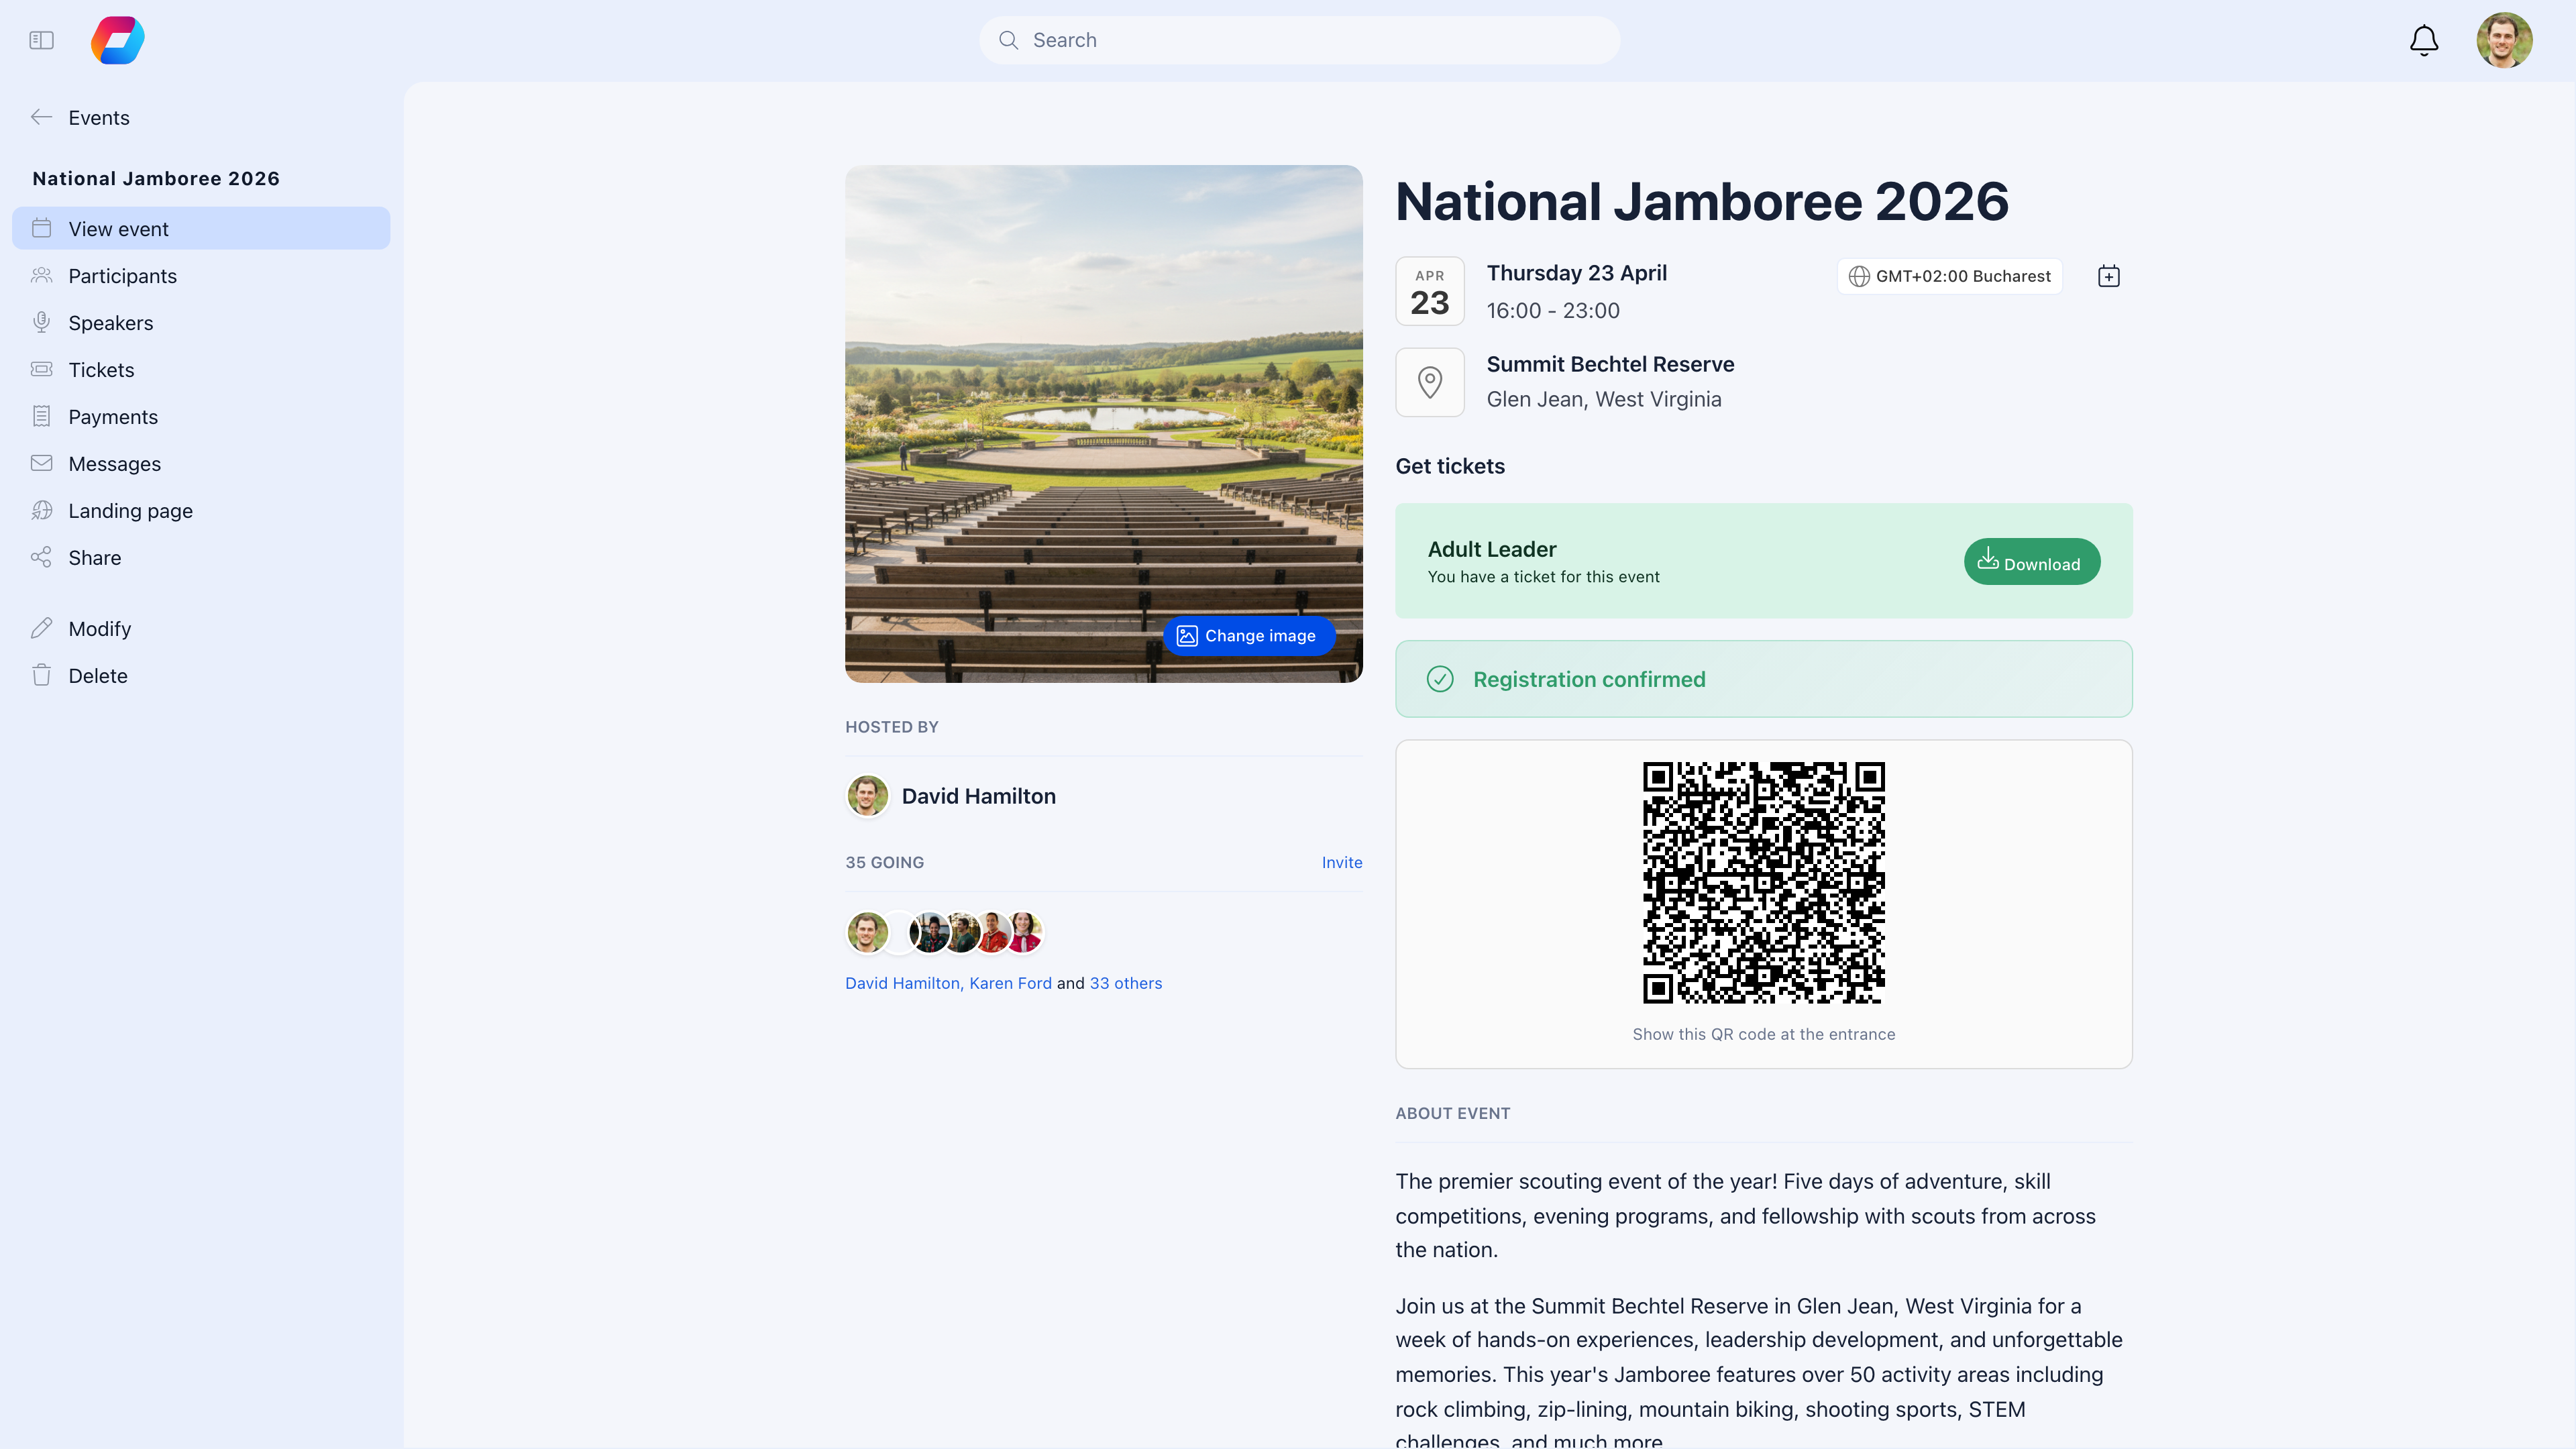
Every registered attendee receives a unique QR code — visible on their event page and sent in their confirmation email. On event day, check people in by scanning it.
***
## Addons
Addons are optional extras that attendees can purchase alongside their ticket — lunch, a workshop session, parking, a +1 guest, merchandise. Each addon has its own price and capacity, independent of the ticket.
| Setting | What it does |
| --------------------------- | ------------------------------------------------------------------------------------------------------------------------------------------------------------- |
| **Name** | What attendees see: "Lunch Package", "Workshop: Advanced Track", "Parking Pass" |
| **Description** | What's included |
| **Price** | Cost per unit. Set to 0 for free extras. |
| **Max quantity per ticket** | How many of this addon a single attendee can buy (default: 10) |
| **Max total** | Overall capacity for this addon across all attendees. When sold out, it's no longer available. Leave empty for unlimited. |
| **Creates attendee** | If enabled, purchasing this addon creates a child attendee record — useful for "+1 Guest" addons where the extra person needs their own QR code and check-in. |
Addons are linked to specific ticket types, so you can offer different extras for VIP vs. General Admission.
### Example: Conference with addons
| Addon | Price | Max per ticket | Max total | Creates attendee? |
| -------------------- | ----- | -------------- | --------- | ----------------- |
| Lunch (Day 1) | \$25 | 1 | 200 | No |
| Lunch (Day 2) | \$25 | 1 | 200 | No |
| Workshop: AI Track | \$50 | 1 | 40 | No |
| Workshop: Leadership | \$50 | 1 | 40 | No |
| +1 Guest | \$30 | 1 | 100 | Yes |
| Parking Pass | \$15 | 1 | 50 | No |
| Event T-Shirt | \$20 | 3 | — | No |
The workshop addons have a max total of 40, so once 40 people across all ticket types select that workshop, it shows as sold out.
***
## QR code check-in
Every registered attendee receives a unique QR code — visible on their event page and sent in their confirmation email. On event day, check people in by scanning it.
 ### How it works
1. Attendee shows their QR code (on phone or printed)
2. An admin opens the **QR Scanner** from the event's participant list
3. Scan the code — the system instantly shows:
* Attendee name and profile photo
* Ticket type and price paid
* Payment status (paid, pending, invited)
* Addon purchases
* Whether they've already checked in
4. Confirm check-in with one tap
The QR code is a SHA-256 hash unique to each registration — it can't be guessed or duplicated.
QR scanning requires **HR Tenant** permissions or higher. Any admin with event management access can check people in.
### Manual check-in
For walk-ins or when QR scanning isn't practical, open the **Participants** tab and mark attendees as "Attended" manually. You can also record walk-ins who weren't pre-registered.
***
## Ticket holds
When an attendee starts the checkout process, their seats are temporarily held for **8 minutes**. This prevents overselling — if someone is filling in payment details, those seats aren't available to others.
* Holds expire automatically if checkout isn't completed
* Maximum 10 holds per session to prevent abuse
***
## Speakers
Add speakers to your event to display them on the event page. Speakers can be existing members or external contacts.
### How it works
1. Attendee shows their QR code (on phone or printed)
2. An admin opens the **QR Scanner** from the event's participant list
3. Scan the code — the system instantly shows:
* Attendee name and profile photo
* Ticket type and price paid
* Payment status (paid, pending, invited)
* Addon purchases
* Whether they've already checked in
4. Confirm check-in with one tap
The QR code is a SHA-256 hash unique to each registration — it can't be guessed or duplicated.
QR scanning requires **HR Tenant** permissions or higher. Any admin with event management access can check people in.
### Manual check-in
For walk-ins or when QR scanning isn't practical, open the **Participants** tab and mark attendees as "Attended" manually. You can also record walk-ins who weren't pre-registered.
***
## Ticket holds
When an attendee starts the checkout process, their seats are temporarily held for **8 minutes**. This prevents overselling — if someone is filling in payment details, those seats aren't available to others.
* Holds expire automatically if checkout isn't completed
* Maximum 10 holds per session to prevent abuse
***
## Speakers
Add speakers to your event to display them on the event page. Speakers can be existing members or external contacts.
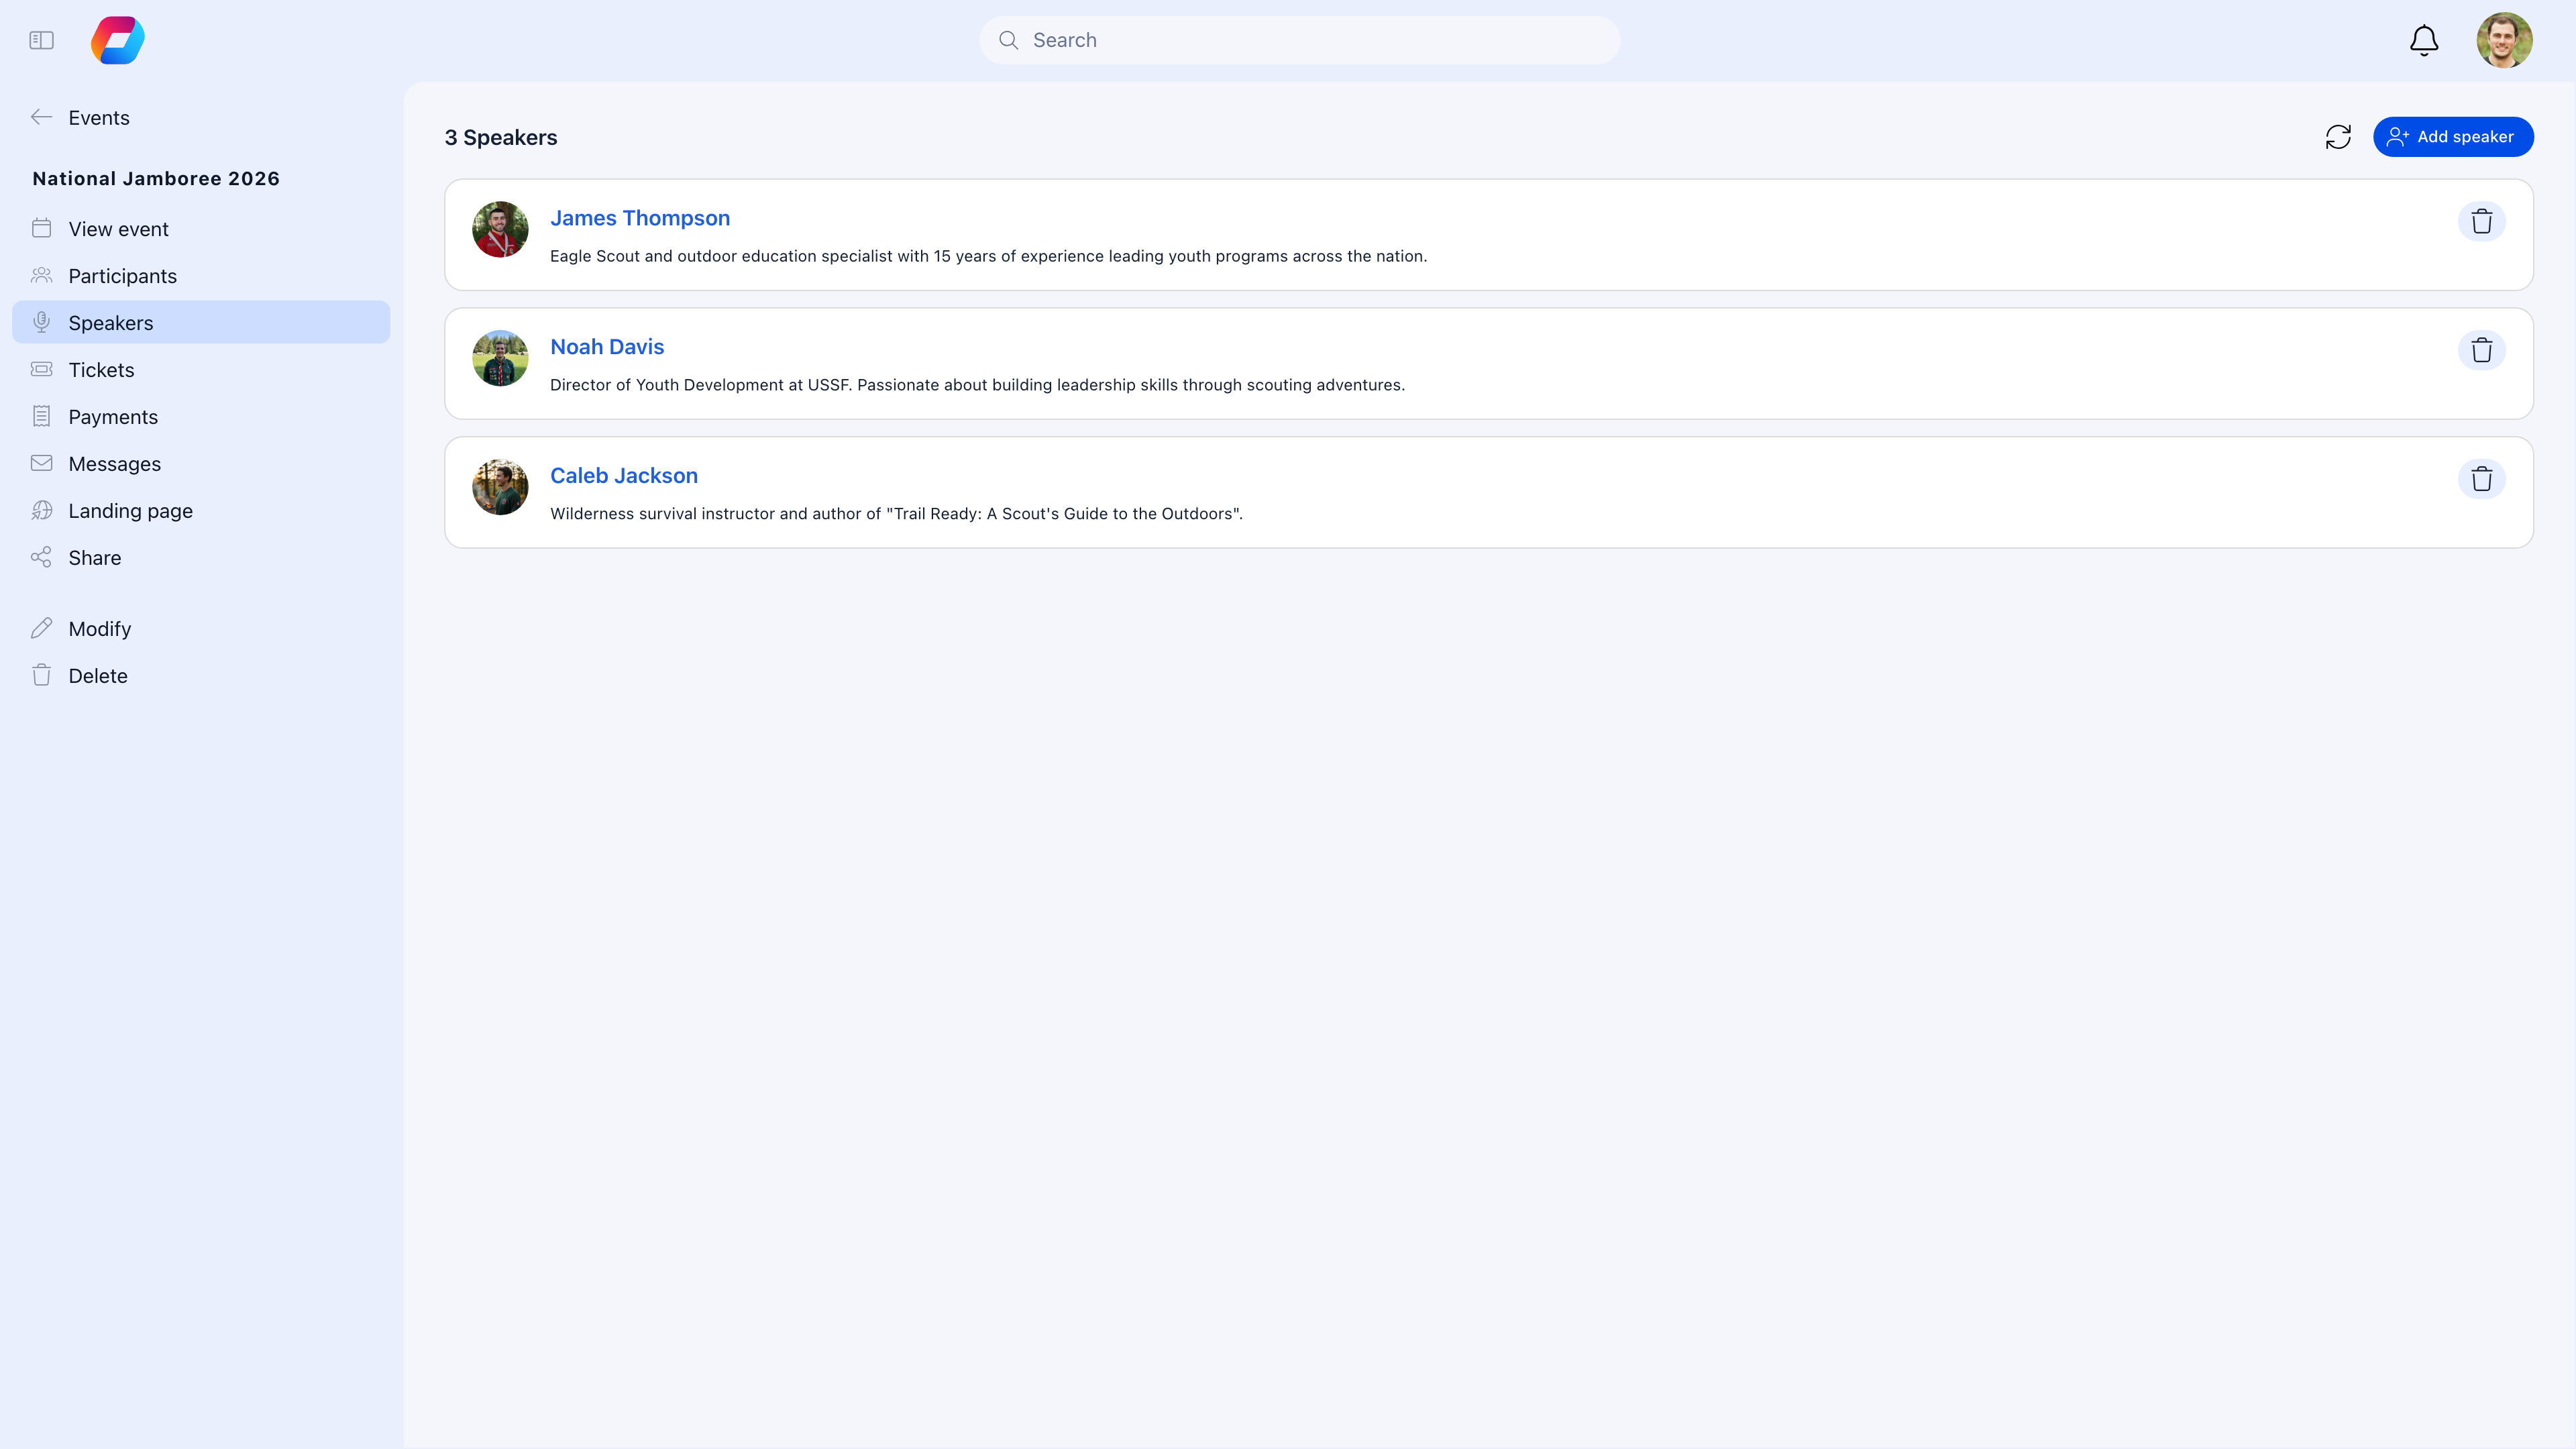 | Setting | What it does |
| -------------------- | ----------------------------------------------------------------------------------------- |
| **Internal speaker** | Select an existing Orgo member — their name, bio, and photo are pulled from their profile |
| **External speaker** | Select from your contacts list — name and bio from the contact record |
Speakers appear on the public event page with their photo, name, and headline. This is useful for conferences, webinars, and panel events.
***
## Invitations and complimentary tickets
Not everyone pays. For speakers, sponsors, VIPs, or staff:
1. Go to the event → **Participants** tab
2. Click **Invite Member** (for Orgo members) or **Invite External** (for non-members)
3. Select people or enter email addresses
4. They receive an invitation email with an RSVP link
5. Invited guests bypass ticket purchase entirely
Invited attendees are marked as "Invited" in the participant list — easy to distinguish from paying attendees.
***
## Refunds
Process refunds through:
* **Event participant management** — find the attendee and process a refund
* **Stripe dashboard** — for more complex refund scenarios
Refunded attendees have their registration cancelled and the spot opens up (or goes to the waitlist).
***
## Common scenarios
Create separate ticket types for each price tier. Use the "Members only" toggle if some tiers should only be visible to logged-in members. For honor-system tiers (like "Student"), add a note in the description saying verification may be required at check-in.
Orgo doesn't have built-in group discount pricing. Workarounds: (1) create a "Group of 5" ticket at a discounted total, (2) share a promo code manually, or (3) handle group registrations offline and invite the group as complimentary attendees.
There's no self-service transfer. An admin can cancel the original registration (and refund if needed), then invite the replacement person as a complimentary attendee or have them purchase a new ticket.
Create the event as a draft, enable ticketing, and test using Stripe's test mode. Once you've verified everything works, switch Stripe to live mode and publish the event.
Share the public event URL on social media and in newsletters. Consider extending the early bird deadline. Send reminders to members who haven't registered. Ask group admins to promote the event in their Local Center discussions.
***
## Related
* [Create Event](/platform/events/create-event) — Event creation basics
* [Public Event Pages](/platform/events/public-page) — The page where tickets are sold
* [Attendance](/platform/events/attendance) — QR code check-in at the event
* [Stripe Setup](/platform/fees/stripe-integration) — Payment configuration
| Setting | What it does |
| -------------------- | ----------------------------------------------------------------------------------------- |
| **Internal speaker** | Select an existing Orgo member — their name, bio, and photo are pulled from their profile |
| **External speaker** | Select from your contacts list — name and bio from the contact record |
Speakers appear on the public event page with their photo, name, and headline. This is useful for conferences, webinars, and panel events.
***
## Invitations and complimentary tickets
Not everyone pays. For speakers, sponsors, VIPs, or staff:
1. Go to the event → **Participants** tab
2. Click **Invite Member** (for Orgo members) or **Invite External** (for non-members)
3. Select people or enter email addresses
4. They receive an invitation email with an RSVP link
5. Invited guests bypass ticket purchase entirely
Invited attendees are marked as "Invited" in the participant list — easy to distinguish from paying attendees.
***
## Refunds
Process refunds through:
* **Event participant management** — find the attendee and process a refund
* **Stripe dashboard** — for more complex refund scenarios
Refunded attendees have their registration cancelled and the spot opens up (or goes to the waitlist).
***
## Common scenarios
Create separate ticket types for each price tier. Use the "Members only" toggle if some tiers should only be visible to logged-in members. For honor-system tiers (like "Student"), add a note in the description saying verification may be required at check-in.
Orgo doesn't have built-in group discount pricing. Workarounds: (1) create a "Group of 5" ticket at a discounted total, (2) share a promo code manually, or (3) handle group registrations offline and invite the group as complimentary attendees.
There's no self-service transfer. An admin can cancel the original registration (and refund if needed), then invite the replacement person as a complimentary attendee or have them purchase a new ticket.
Create the event as a draft, enable ticketing, and test using Stripe's test mode. Once you've verified everything works, switch Stripe to live mode and publish the event.
Share the public event URL on social media and in newsletters. Consider extending the early bird deadline. Send reminders to members who haven't registered. Ask group admins to promote the event in their Local Center discussions.
***
## Related
* [Create Event](/platform/events/create-event) — Event creation basics
* [Public Event Pages](/platform/events/public-page) — The page where tickets are sold
* [Attendance](/platform/events/attendance) — QR code check-in at the event
* [Stripe Setup](/platform/fees/stripe-integration) — Payment configuration