
Save each sheet as its own CSV, put your old system’s identifier in a user_legacy_id column, and upload it on the Users step of the import page. Nothing is written until the header row passes validation, you get per-row errors for anything that fails, and a completed import can be rolled back once.
This is the most support-heavy job in the product, and almost all of the difficulty is in the file rather than the platform. Get the file right and the import itself takes a few minutes.
The import page lives under Customization in your settings, and every import endpoint requires ADMIN_TENANT. The sidebar is configured per workspace, so the entry may be named differently in yours.
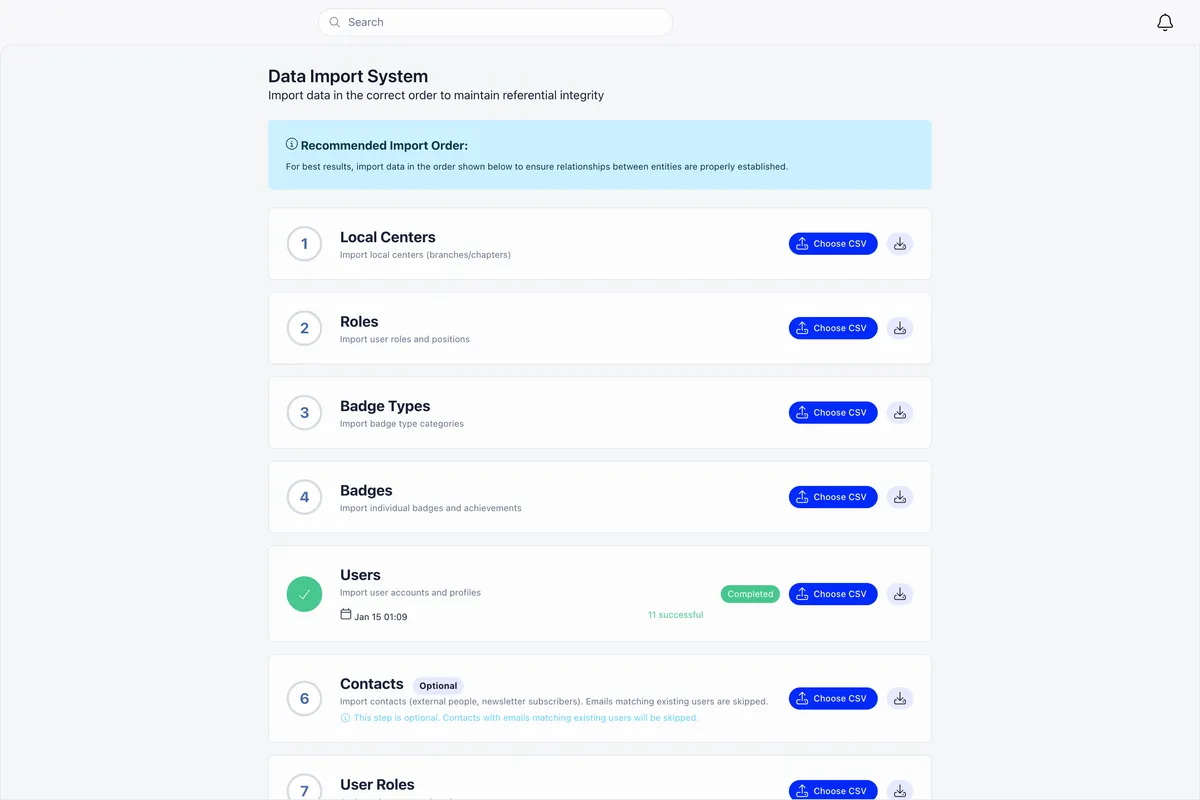
The page is a numbered list, not a wizard. Each entry is one import type. There is no column-mapping screen, no options dialog and no dry run. The file you upload is the instruction, which is why the columns matter so much.
1. One sheet, one CSV
Import reads one CSV at a time, and a CSV file holds exactly one sheet. If your data lives in a workbook with tabs for members, chapters and payments, that is three separate CSV files and three separate uploads.
Run the steps in the order the page lists them. Each one can reference records the earlier ones created, so chapters and roles go in before members, and payments go in after.
File rules. .csv and .txt, up to 50 MB. Comma, semicolon and tab are detected automatically, and a UTF-8 byte order mark is stripped. A larger file is refused on the spot, so split it and run the parts one after another.
2. What the Users file needs
Only one column is required: user_legacy_id. Everything else is optional, and any column Orgo does not recognise becomes a profile custom field rather than an error.
The Users columns Orgo recognises
| Column | What it sets |
|---|---|
user_legacy_id | Your old system’s identifier for this person. Required |
email | The member’s email address |
first_name, last_name | Name |
phone_number | Phone |
birth_date | Date of birth |
gender | Gender |
address, postal_code | Address |
town_residence | Town of residence |
local_center_legacy_id | Chapter. Accepts the chapter’s legacy id, or its name |
user_type_legacy_id | User type. Accepts the role’s legacy id, or its name |
status | Member status |
member_id | Card or member ID |
is_full_member | Full member flag |
date_joined | Joined date |
date_joined_full_member | Full member since |
profession_headline | Profession headline |
company_name | Company name |
website | Website |
tags | Profile tags |
fee_tenant_product_price_legacy_id | Which membership fee tier the member is on |
Two more headers, date_created and is_newsletter_subscribed, are accepted by the header check but not written to the profile, so do not use date_created to carry a joined date. Use date_joined.
Write user_legacy_id exactly, with underscores. The required-column check is stricter than the others and does not forgive a header written as “User Legacy ID”. Download the example CSV from the download icon on the step if you want the exact headers to copy.
If you have no identifiers from your old system
Make some. A row number will do, as long as it is unique and stays the same across every file you upload. What you must not do is renumber between files.
3. The join key holds your files together
user_legacy_id is more than a required column. It is how every later file says which member a row belongs to.
The same rule applies to the other steps. local_center_legacy_id, role_legacy_id, product_legacy_id and the rest are your old system’s identifiers stored on the Orgo record, and they are how a later file points at what an earlier one created.
Duplicate detection uses the same key. A row is a duplicate when its user_legacy_id already exists in your organisation, and failing that, when its email address already belongs to someone.
4. How dates get set
Dates are where imports quietly go wrong, because a bad date does not usually fail a row. It writes something else instead.
Use YYYY-MM-DD for every date column. It is unambiguous and it is read the same way everywhere.
| Column | What happens |
|---|---|
date_joined | Sets the member’s joined date. If the cell is empty or the date cannot be read, it is set to today |
date_joined_full_member | Sets the full member date. Same fallback to today |
birth_date | Sets date of birth. If the date cannot be read, the field is left empty and the row still imports |
The fallback to today on date_joined is worth stopping on. A file with a blank joined-date column imports cleanly and gives you an organisation where everybody joined on migration day, which quietly breaks every “members who joined in 2019” question you ask afterwards. Fill the column, or accept the answer.
What the import does not set
The Users import does not set fee validity. It can put a member on a fee tier with fee_tenant_product_price_legacy_id and it can record a joined date, but the date that decides whether a member currently counts as paid is written by the payment and checkout flows, not by a CSV column.
So after importing a historical membership list, expect members to read as unpaid until a payment exists for them. That is not the import failing. If you need historical payments in the platform, that is the Product Payments step, run after Users.
5. Run it and watch it
- Download the example CSV. The download icon on the step gives you a file with the exact headers that step reads. Build your file from it rather than guessing.
- Choose CSV. Orgo checks the file size, the encoding and the delimiter as it reads.
- Start Import. Validation and processing run in the background, in batches, so a large file keeps going after you close the tab.
- Watch the progress. A live percentage with running counts of successful, failed and skipped rows.
- Read the errors. Expand the row in Import History for per-row failures: row number, message and the raw row data.
Orgo does not email you when an import finishes. Keep the page open, or come back to the history table.
Validation runs before any row is written. Orgo looks for the header row in the first ten lines and checks the required columns. If they are missing, the import fails naming the columns it wanted and the ones it found, and nothing is created. A file that fails this way costs you nothing except the time to fix the header.
6. Reading the result: successful, skipped, failed
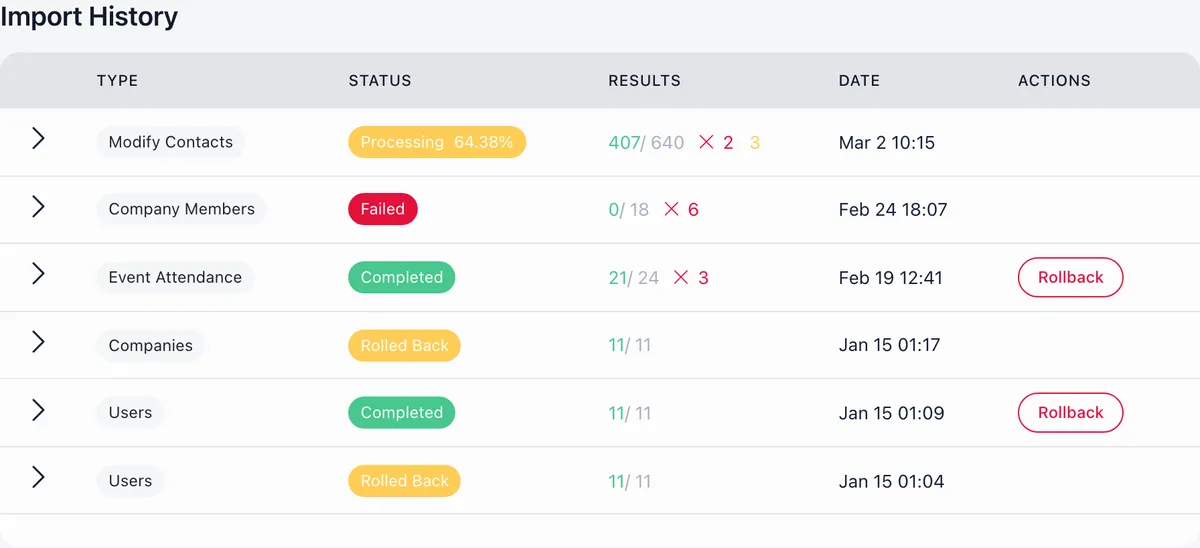
Three counts come back and they mean different things.
A failed row does not stop the import and does not undo the rows around it. Processing carries on, so you end up with a partly loaded file and a list of what did not make it. That is the design: fix the failed rows in a smaller file and run that file, rather than starting again.
The errors panel lists the first 20 failures with the total count underneath, so a file with hundreds of failures usually has one cause. Read three of them, find the pattern, fix it in the spreadsheet.
Fixing a failed row
The two failures you will actually meet on the Users step are an empty user_legacy_id, and a first or last name containing characters the platform does not accept. Both are cell-level problems, both are visible in the raw row data, and both are fixed in the spreadsheet.
7. Rolling back
Every completed import has a Rollback button in Import History, until you use it once. For the create steps it deletes the records that import made, in reverse dependency order, so nothing is left pointing at a missing parent. The whole rollback is one transaction, so it either completes or changes nothing.
Rollback is a migration tool, not an undo button for everyday use. Two things to know before you press it:
- It can reach people who already existed. When a row matches somebody already in your database by email and also carries a
user_legacy_idthat differs from what was stored, that existing account is stamped with this import, and rollback deletes accounts stamped with the import. If you are rolling back a file that overlapped with members you already had, check what you are about to lose first. - For a modify import, it restores the values as they were at import time. If another import or an administrator changed those records afterwards, those later changes are reverted too.
Statuses you will see in the history: Pending, Validating, Processing, Completed, Failed, Rolled Back. The history keeps the 50 most recent imports.
8. Changing people who already exist
The create steps never update. If you need to change members who are already in the platform, the last two steps on the page, under Modify existing records, are the ones that do it.
- Modify Users matches on
email, thenuser_legacy_id, thenphone_number, in that order. - An empty cell leaves that field unchanged. Only columns you fill in are written, so a correction file can carry two columns and nothing else.
- A row that matches nothing falls back to creating a contact, provided it carries at least an email or a name.
- Usernames, passwords, permissions and API tokens can never be written by an import.
9. What the imported members get
Nothing. Import sends no email at all, so tell people yourself that their account exists.
The password the import writes is a placeholder nobody knows, so an imported member signs in with the email one-time code from the login page, or through a password reset. A row with no usable email address gets a generated placeholder address that cannot receive mail, so those members cannot sign in until you correct the address.
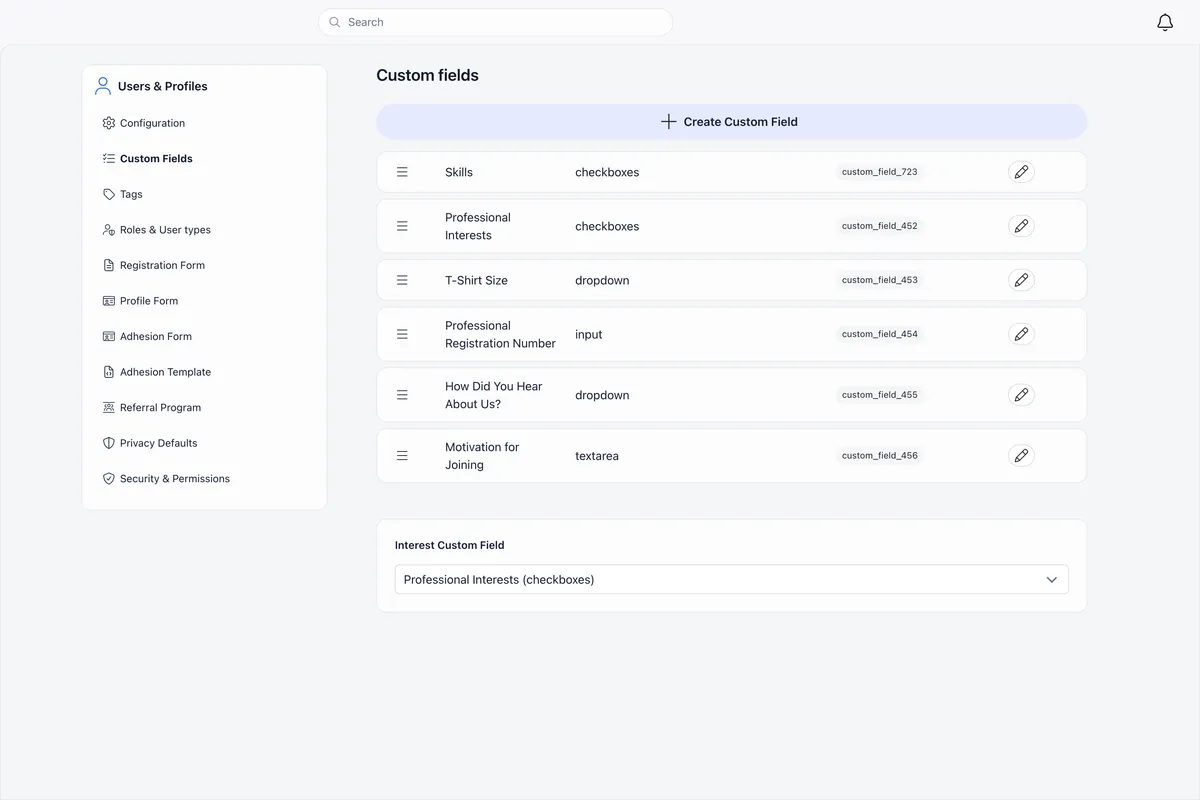
Any column Orgo did not recognise is now a profile custom field, created as a text field visible on the profile. This is worth checking after your first import: if you meant a column to land on a built-in field and it shows up here instead, the header was wrong. Roll the import back, fix the header, run it again.
If two of your fields share a label, a column named custom_field_123 writes to the existing custom field with that id instead of matching by name.
Duplicates afterwards
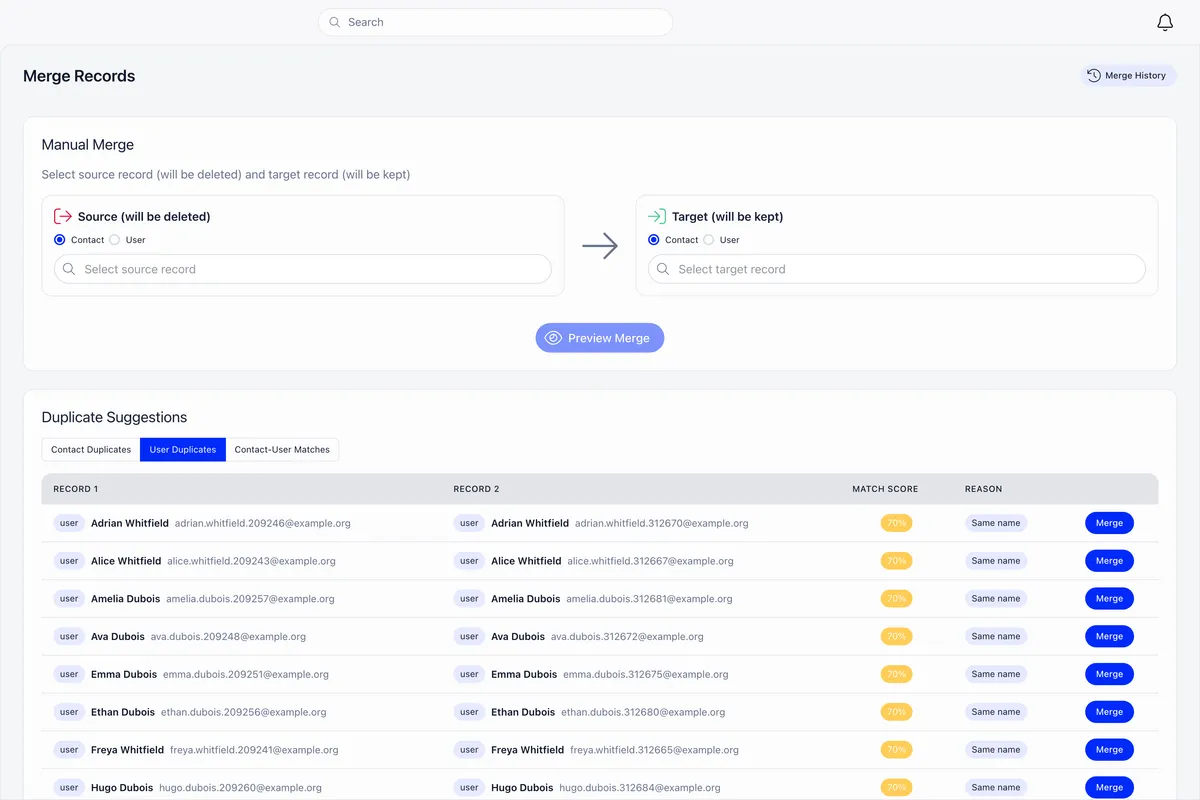
If the same person arrived twice, from two files or from an import plus a self-registration, merge them rather than deleting one. The Merge Records screen suggests likely pairs and shows you what will be kept before you commit. Once the file is in, the rows are ordinary records in your member database, searchable and filterable like any other.
Before you upload, check these six things
- Each sheet is saved as its own CSV file.
user_legacy_idis present, spelled with underscores, and unique.- The same person carries the same
user_legacy_idin every file. - Every date column is in
YYYY-MM-DDform. date_joinedis filled in, unless you are happy with today’s date.- Headers are lowercase with underscores, not camelCase, and match the example CSV.
Related
- How to add members to Orgo
- How to find and filter members
- Data import
- Merging duplicates
- Custom fields
Frequently asked questions
Why does my import say most rows were skipped?
Skipped means the person already exists. The create steps never update an existing record: a row is skipped when its user_legacy_id already exists in your organisation, or when its email address already belongs to someone. That is the expected result if you run the same file twice. To change people who already exist, use the Modify Users step instead.
Can I undo an import?
Yes, once. Every completed import has a Rollback button in Import History, and it disappears after you use it. For create steps it deletes the records the import made, in reverse order so nothing is left pointing at a missing parent. The whole rollback runs as one transaction, so it either completes or changes nothing.
My spreadsheet has several tabs. Do I upload the whole file?
No. Import reads one CSV at a time and a CSV holds exactly one sheet. Save each tab as its own CSV file and upload it on the step that matches what it contains. A workbook saved as CSV keeps only the sheet that was active when you saved it, which is how people lose half their data without any error appearing.