
To approve a membership application, open the adhesions queue, find the row and set its status to Adhesion success. That approves the application.
It does not let the person sign in. The account status is a separate field, only Active permits a sign-in, and approving an application never changes it. Almost every “they were approved and still cannot get in” message comes down to that one gap, so it is worth reading the next section before anything else.
Approving is two switches, not one
The application and the account are tracked separately, and nothing in the interface reminds you to move the second one.
Which queue are you actually in
Four different things get called “approving a member” and they are worked in four different places.
| Gate | What it is | Where you work it | What still needs doing after |
|---|---|---|---|
| Adhesion | A formal application with a form, an ID check and a signature | The adhesions queue | Set the account status to Active |
| Waitlist | Registrations queued per chapter with a position | The waitlist screen | Set the account status to Active |
| Manual Approval | New registrations parked on New request | The member directory | Nothing. Approve sets Active |
| Referral programme | Applicants collecting vouches from existing members | Member profiles, or the applicant’s link | Nothing, once the last vouch lands |
Manual Approval is the light one. Adhesion is the heavy one, and the rest of this guide leads with it. All four are optional parts of Orgo’s membership management tools: an organisation that admits anyone who signs up runs none of them.
You can usually tell which gate you are in from what the member says. “I filled in a long form and signed it” is adhesion. “I was given a number and told how many people are ahead of me” is the waitlist. “It says my account is waiting for approval” is Manual Approval. “It keeps sending me back to a page asking for referrals” is the referral programme. More than one can be switched on at once, and if a registration named a chapter, the waitlist takes it and Manual Approval never sees it.
Approve an adhesion application
The queue is at /adhesions, usually Adhesions in the main menu, and it needs HR_LOCAL. The menu is configured per organisation, so the entry may carry a different label or be hidden entirely on yours.
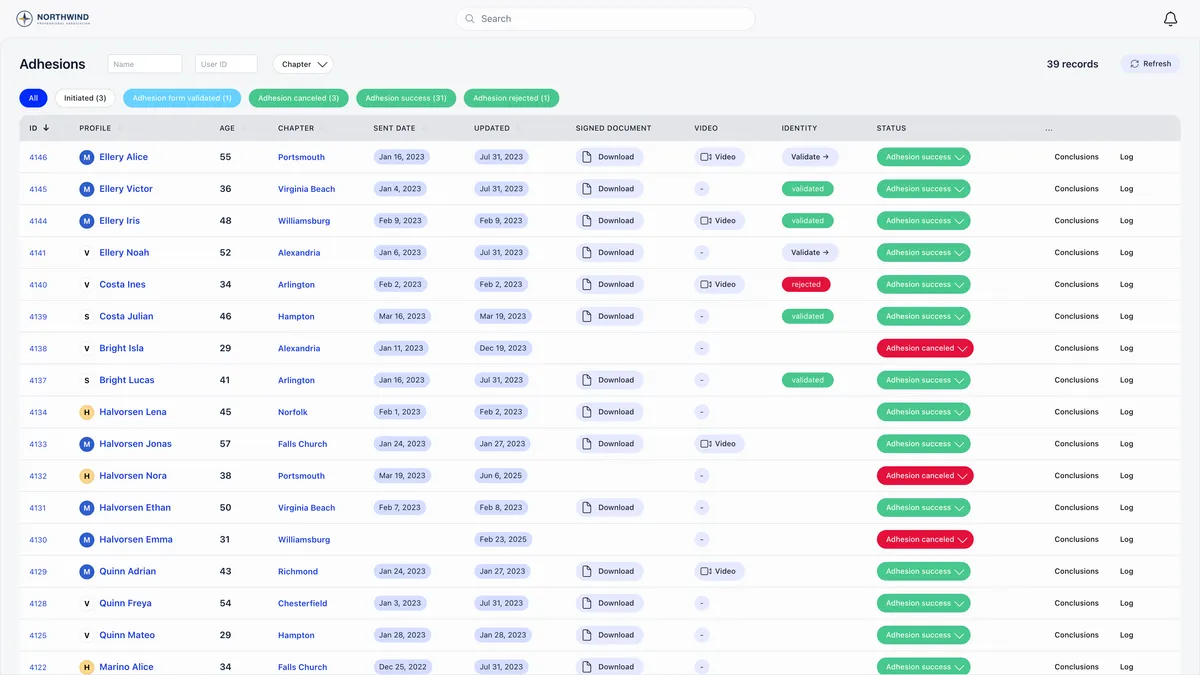
The chips across the top carry live counts, so Initiated (3) is your draft pile and the sent applications are the ones waiting on you. HR_TENANT sees the whole organisation. Everyone else sees only the chapters they hold HR_LOCAL on, and the Chapter filter appears from HR_PARENT_LOCAL upwards.
- Open the row and check the signed document downloads and, if you use them, that the video is there.
- In the Identity column, press Validate once you have looked at the ID document.
- Move the status to Adhesion form validated.
- Open Conclusions and save the Interview conclusion and the Background conclusion.
- Set the status to Adhesion success. Confirm the dialog.
- Open the member and set their account status to Active. This step is not part of the queue.
Every status change asks for confirmation and is written to the application log.
The gates that block a decision
Each move has a precondition, and the queue refuses rather than explaining much.
Review steps is the switch behind all of that, in the Adhesion & Membership block of your settings under Users & Profiles, at Configuration. Changing anything there needs ADMIN_TENANT.
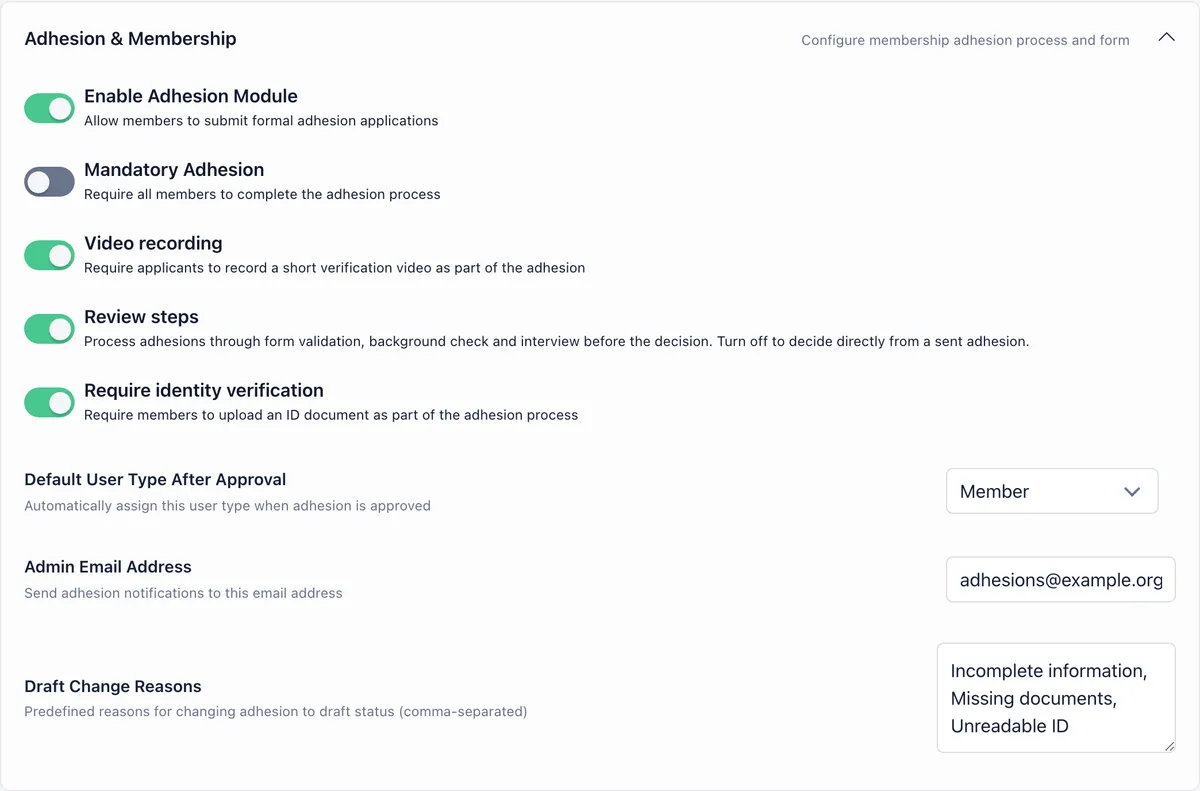
Two settings on that screen decide what approval is worth. Default User Type After Approval is the type the member receives when you approve, and with it empty approval assigns nothing and sends no email. Mandatory Adhesion opens an application on every new account and redirects those members to it on every page until it succeeds, so keep your turnaround short before switching it on.
The Draft Change Reasons trap
Draft Change Reasons fills the picker you choose from when you send an application back to the applicant. The help text under the box says comma-separated. It is not: the list is split on the pipe character |. Type Incomplete information|Missing documents|Unreadable ID and you get three options. Type them with commas and you get one long option.
What the applicant fills in
The form is built at Adhesion Form in your settings under Users & Profiles, with two checkboxes per row, one to include the field and one to make it required.
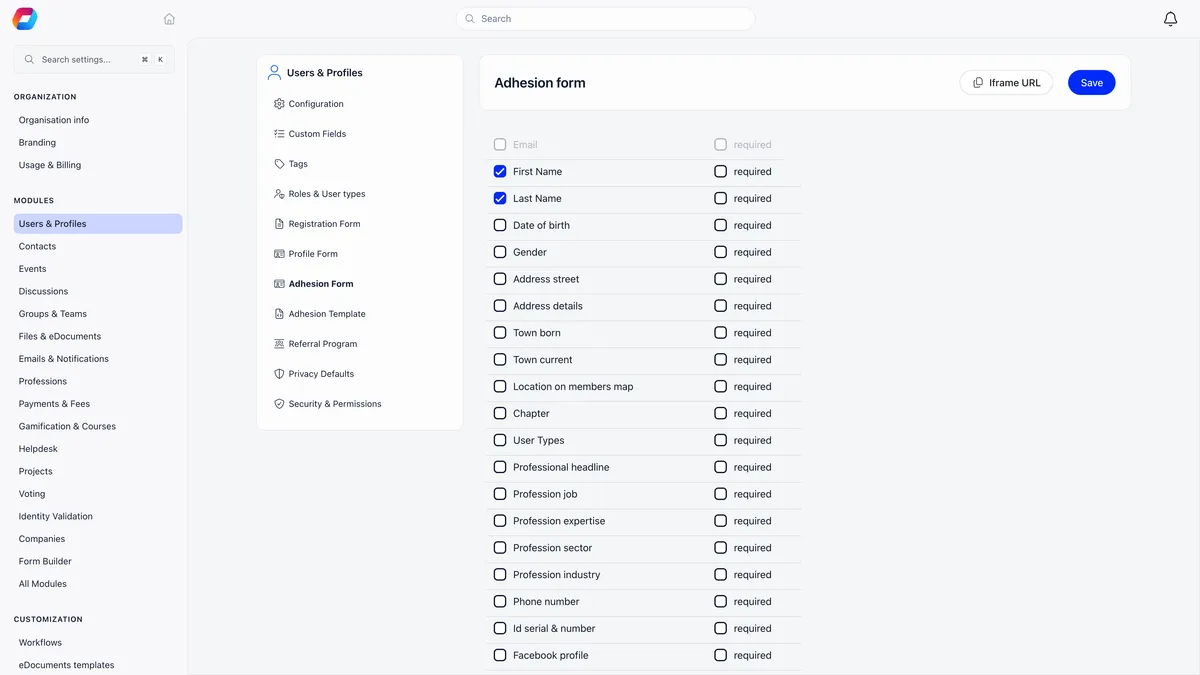
Email sits at the top greyed out because it is always included and always required. Every custom field you have defined is listed under the built-in fields and can be added the same way, and unlike the registration form, an adhesion form collects User visibility custom fields properly, because the applicant is signed in while filling it.
The member works through their own page at /adhesion, or lands on it automatically when adhesion is mandatory.
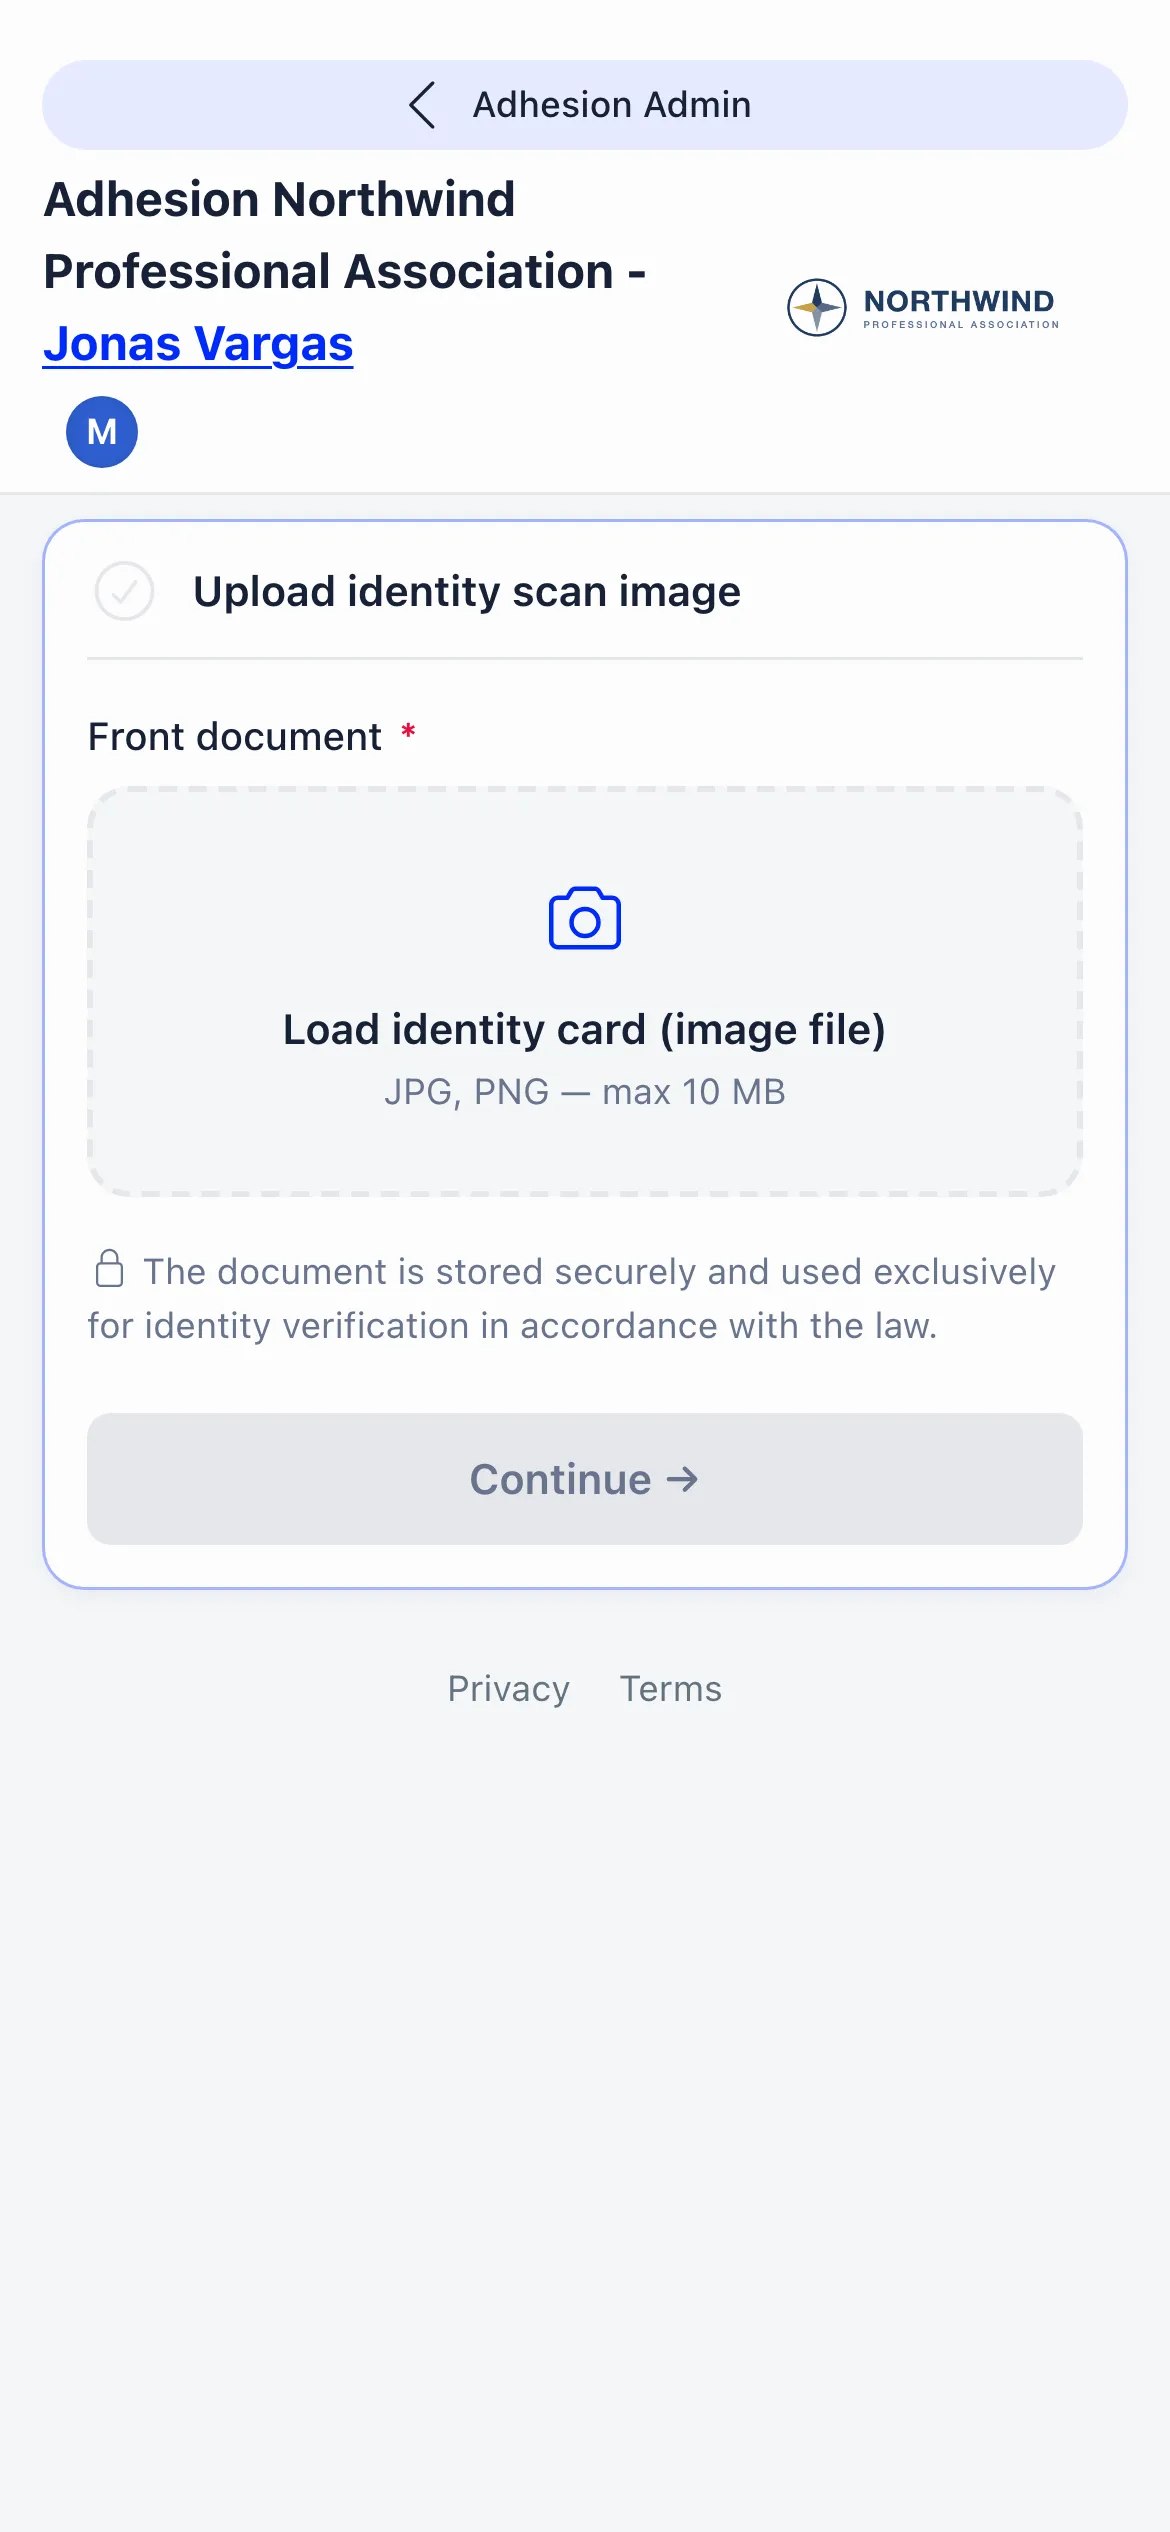
They cannot press Send until a signed document exists and, with identity verification on, an ID has been uploaded. Staff with HR_LOCAL can fill the form in on somebody’s behalf from that member’s profile, in which case there is no signature canvas and the signed file is uploaded instead.
Then set the account status to Active
The status lives on the Permissions tab of the member’s edit page.
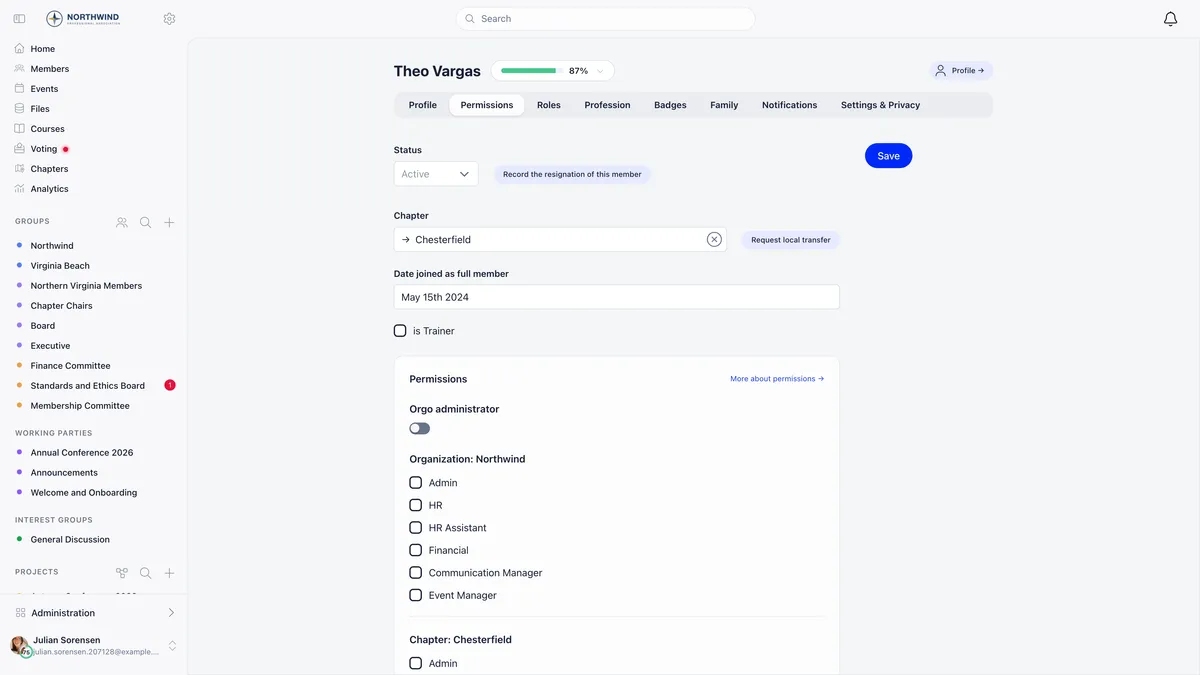
Changing it needs HR_LOCAL over that member’s chapter, and HR_TENANT or ADMIN_TENANT covers everybody. If a chapter administrator is refused with “Only tenant administrators can modify user status”, that is Allow Local Admins to Modify User Permissions switched off, not a permission missing from their account.
Two things to expect when you make somebody Active. Send Welcome Message fires on every transition into Active rather than only at registration, so a batch of approvals is a batch of welcome emails. And moving a member away from Active at any earlier point end-dated their roles, so check the Roles tab after reinstating anyone.
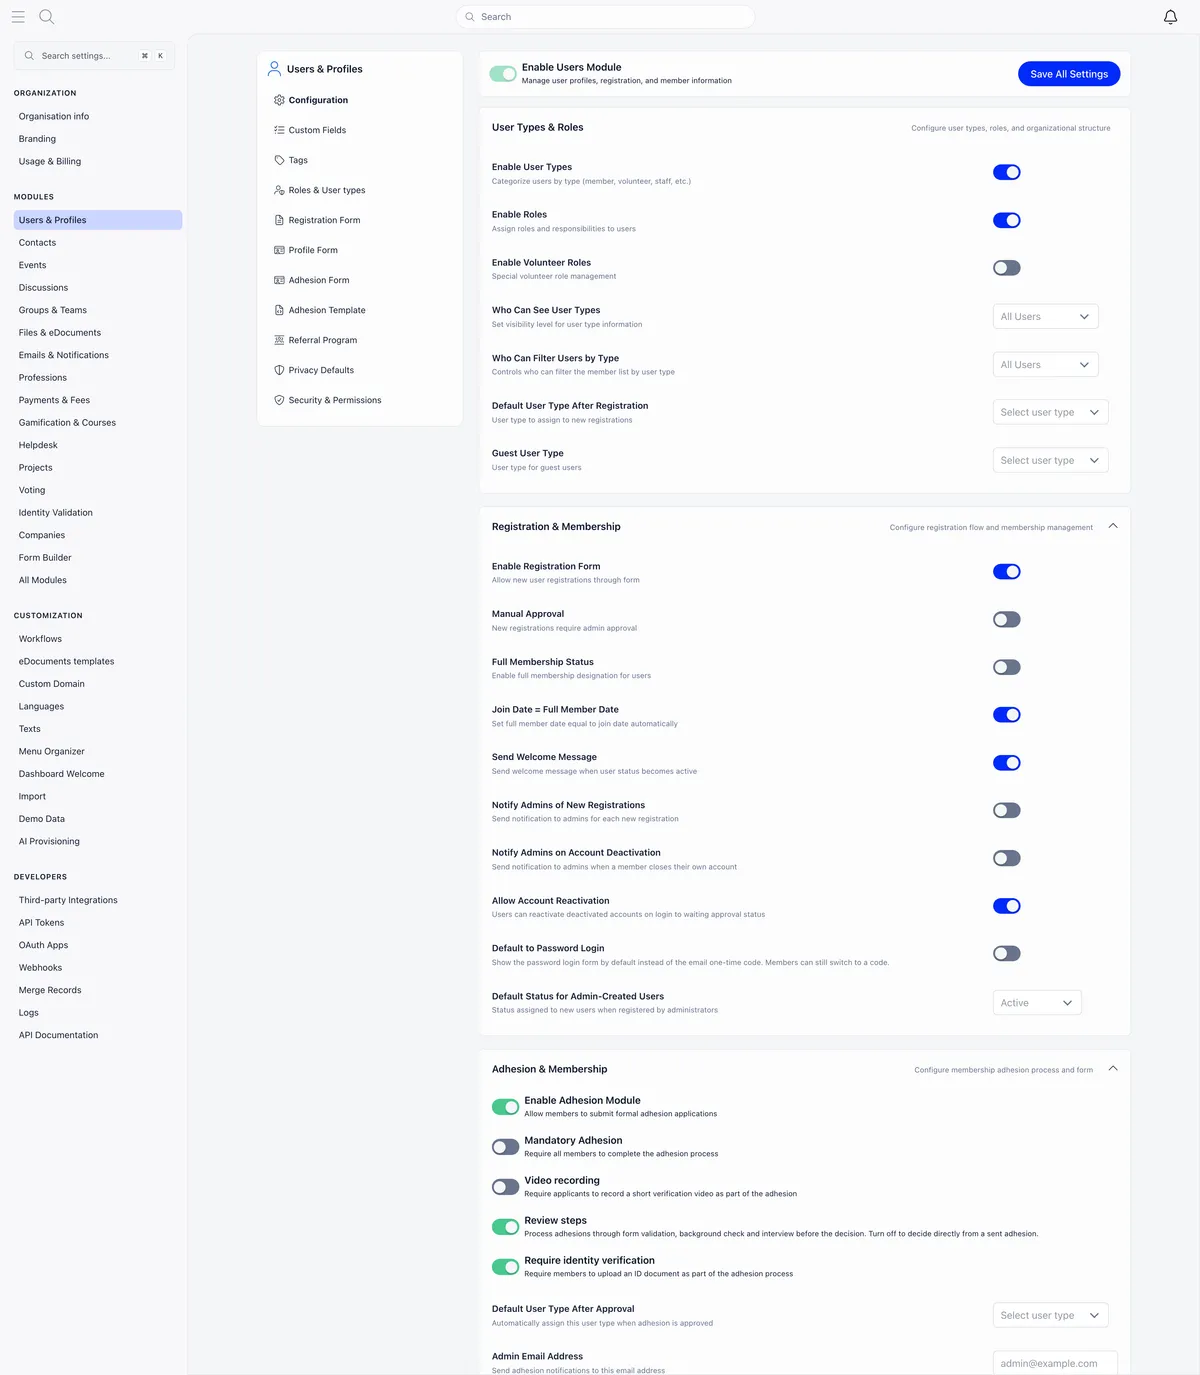
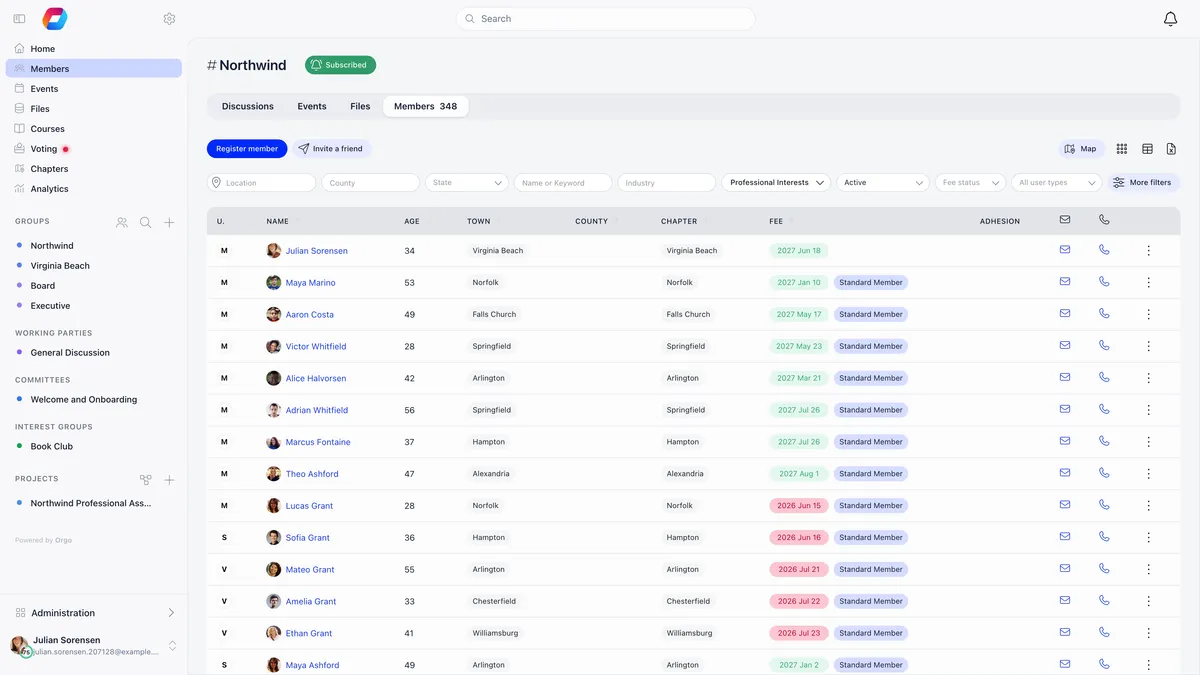
Manual Approval is on that same screen. With it on, new registrations land on New request instead of Active and the member directory grows a New requests button with the count. Those rows carry two inline actions, Approve, which sets Active, and Add to waiting list. That is the one approval route where a single press finishes the job.
Rejecting, and what the person is told
Rejection is not silent, and the wording matters because the person reads it.
- Adhesion rejected sends the applicant the rejection email, provided Adhesion Notifications is on under your system emails.
- Adhesion canceled requires a cancel reason. That reason is stored on the record for your own history rather than emailed.
- A waitlist rejection requires a reason, refuses to proceed without one, and emails it to the person word for word.
- Back to Initiated opens the Draft Change Reasons picker, deletes the documents attached to the application, and emails the applicant so they can redo it.
Rejected and Duplicated applications also show a Reopen button on the applicant’s own page for staff with HR_LOCAL, so a rejection is not a dead end.
The five emails this flow sends
All five are switched off together by Adhesion Notifications, under Emails in your settings at System Emails, and each can be rewritten from the email templates screen.
| Who receives it | When | |
|---|---|---|
| Application received | Your Admin Email Address, plus the chapter’s HR team | The applicant sends their application |
| Sent back to draft | The applicant | You move the application back to Initiated |
| Form validated | The applicant | You move it to Adhesion form validated |
| Rejected | The applicant | You reject it |
| Approved | The applicant | You approve it and their user type changes |
That last condition is why “they never got the approval email” is usually not a fault. Nothing goes out if the member already held the type set in Default User Type After Approval, because from Orgo’s point of view nothing about them changed.
Withdrawn has no button
Withdrawn appears in the waitlist status filter and on entry records, and there is nothing in the interface that sets it. It is reachable through the API only, by the person themselves, and only while their entry is still Waiting. If somebody asks to be taken off the list, reject their entry with a reason that says they asked to be removed. That reason is emailed, so write it as a message to them.
The waitlist queue
The waitlist is per chapter and applies to every registration that names one, full chapter or not. It opens at /waitlist with ADMIN_LOCAL.
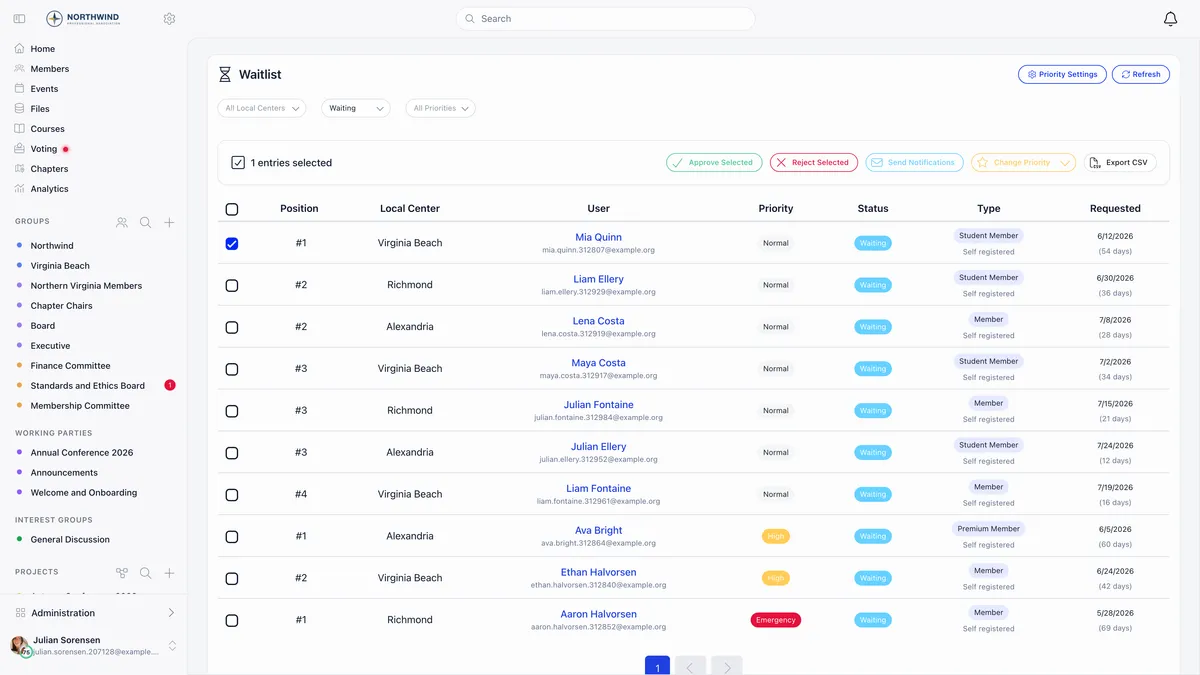
There is a permission split here that catches chapter administrators. Opening the screen needs ADMIN_LOCAL, and every bulk button needs HR_LOCAL. An administrator with one and not the other sees the whole queue, ticks the rows, presses Approve Selected and is refused.
Filter to one chapter, leave the status filter on Waiting, tick the entries and press Approve Selected. That marks the entries, renumbers the queue behind them, and emails everybody approved.
If somebody is missing from the queue, four filters hide people, in this order: the status filter defaults to Waiting, children below the minimum registration age sit on Underage until you filter for it, the chapter filter and your own permissions scope the list, and registrations that never named a chapter were never queued at all.
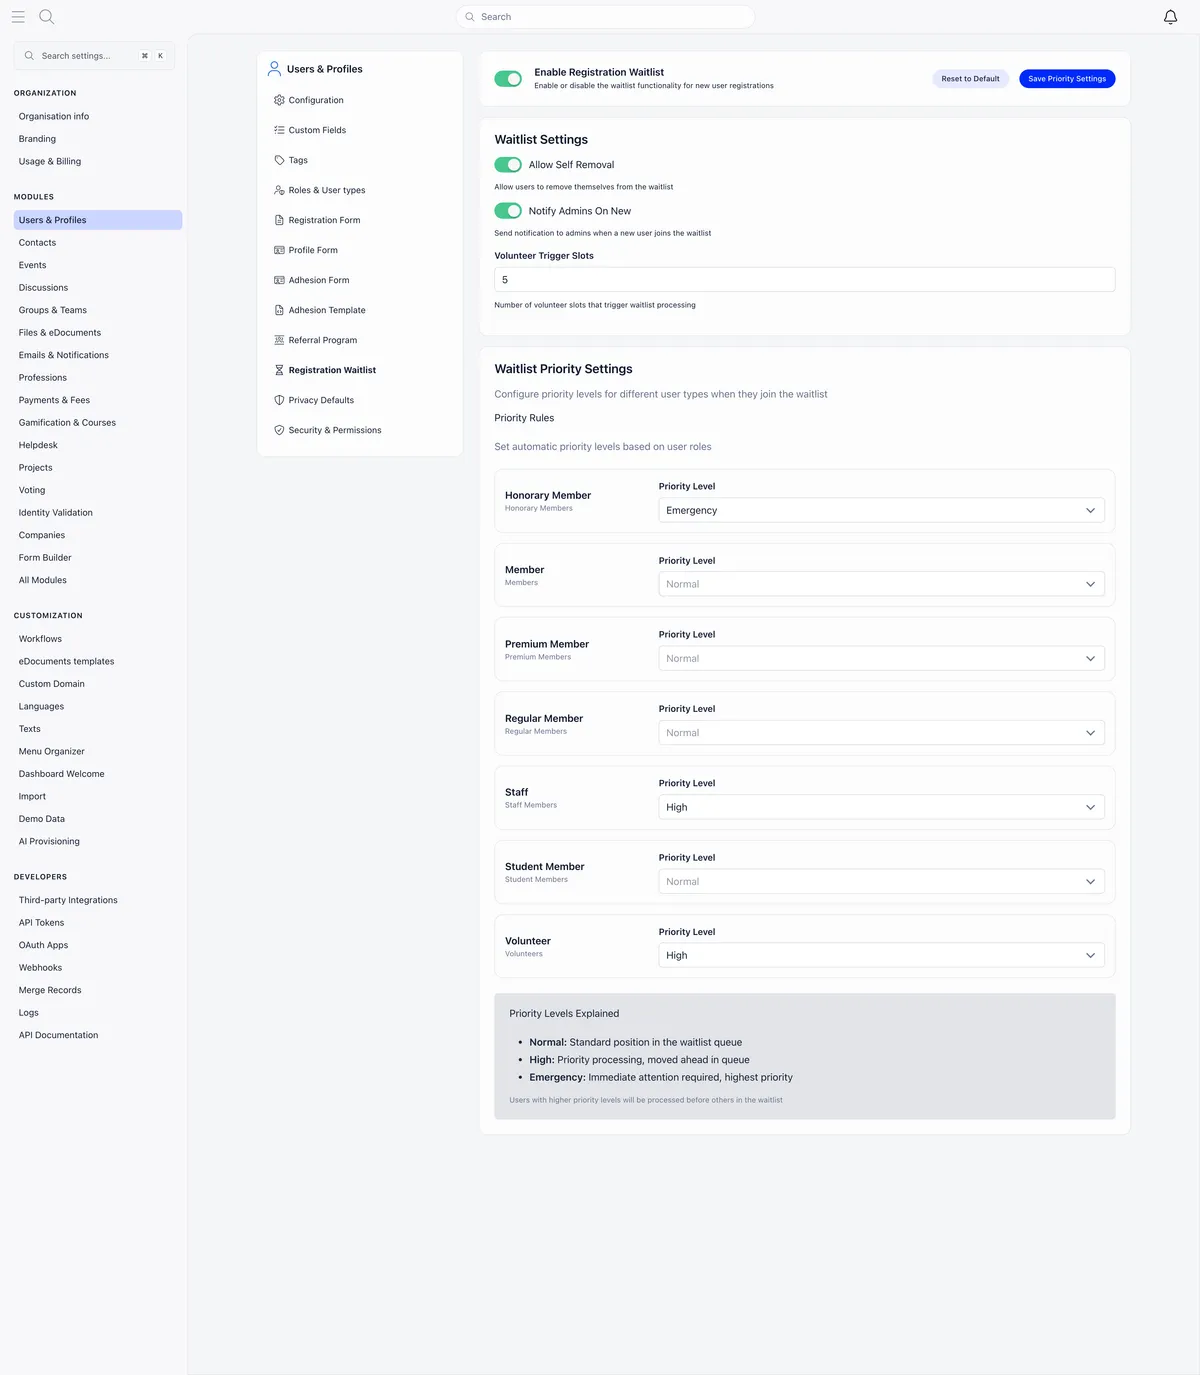
Priority does not reorder the queue. Positions are strictly the order people joined. Priority changes the estimated wait the person is shown, and gives you a filter for deciding who to admit first.
Clearing a stale queue
Queues collect people who signed up months ago and have moved on. Prune in one pass rather than entry by entry:
- Sort by the Requested column so the oldest surface first, and use the days-waited figure under each date to pick your cut-off.
- Select that block and Export CSV if you want a record first. The export is built from the rows on screen, so work page by page.
- Send Notifications to the same selection. Everybody gets their current position and how many people are ahead, which is usually enough to hear back from the ones still interested.
- Reject Selected for the rest. The reason is required and is emailed, so write it as a message to a person rather than a note to your files.
Rejected entries stay visible under the Rejected status filter with their reason, so you can always see what you did. The person has to register again, which is the part worth saying plainly in the reason you write.
Applicants held at Awaiting referral
If your organisation runs the referral programme, new registrations are held until enough existing members vouch for them.
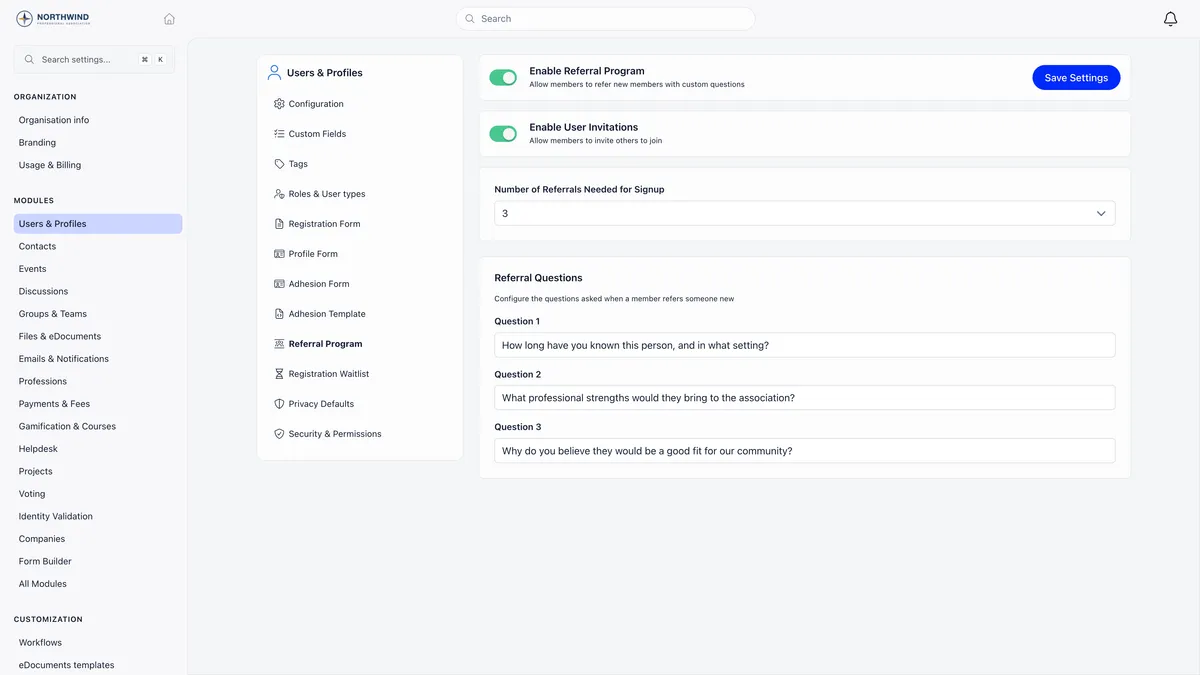
The gate is live when Enable Referral Program is on and the number is 1 or more. Until the applicant collects that many vouches they sit on Awaiting referral and cannot sign in. Members you create yourself and members you import are exempt.
Three things to know when the backlog builds up:
- Filter the member directory by the Awaiting referral status to see everybody waiting.
- Staff with
HR_LOCALcan vouch on somebody’s behalf from the Referrals tab of their profile. - Lowering the required number does not release the people already past it. The count is checked when a vouch is submitted, so activate those applicants by setting their status to Active.
Why you cannot delete the test account you made
This comes up in almost every rollout, because the first application anybody approves is their own test one.
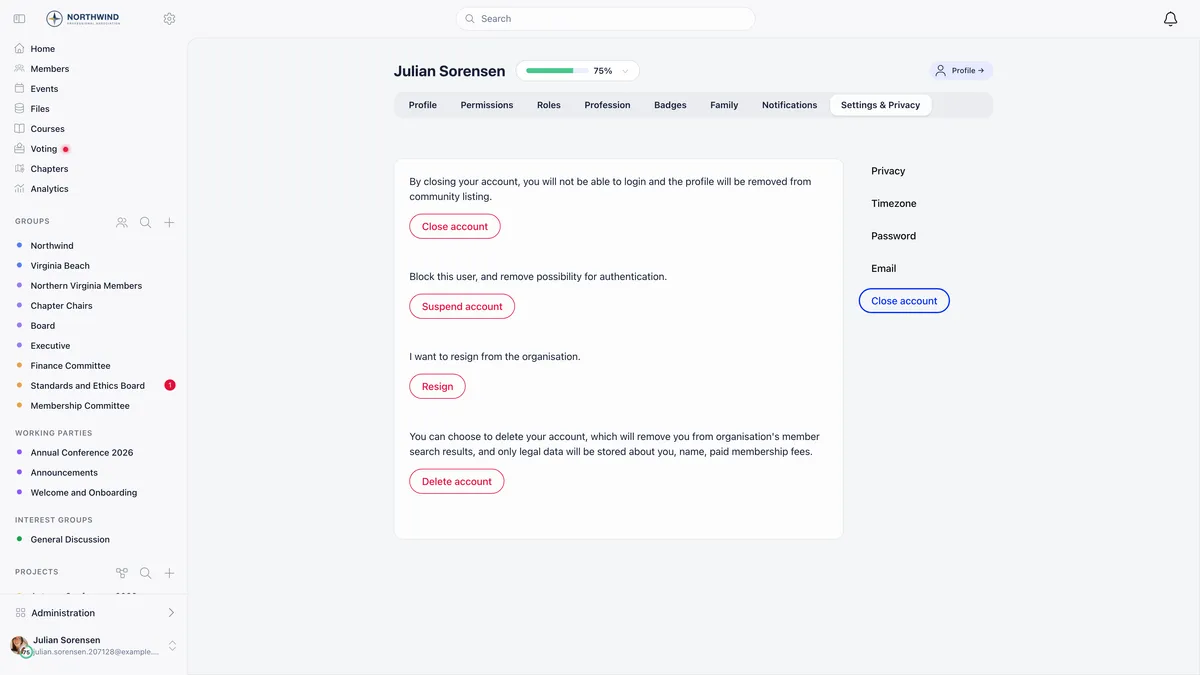
You cannot delete your own account unless it is on the guest user type. The attempt is refused with “You cannot delete your account, please contact the administrator.” An HR administrator looking at somebody else’s profile sees “This profile can be deleted permanently only by organization Admin” and a Request delete button that opens a support request. An organisation administrator can carry it out.
Deletion is also less than it sounds. It clears the email address, the phone number and the chapter, deletes role assignments outright and blocks sign-in permanently, while keeping the name, the profile fields, the custom field values, the payments and the adhesion record. It cannot be undone and it writes no audit entry.
For a test account, Close account or setting the status to Inactive is the better move: reversible, and it keeps your history readable. If you do delete, the email address is released, so you can register the same address again as a fresh member.
Who approved what
Each queue row has a Log button showing who sent, validated, interviewed and decided on the application, each with a timestamp and a link to the person. The member’s own Logs tab carries the same kind of history for the account, with an Email Logs view beside it that shows exactly what Orgo sent them.
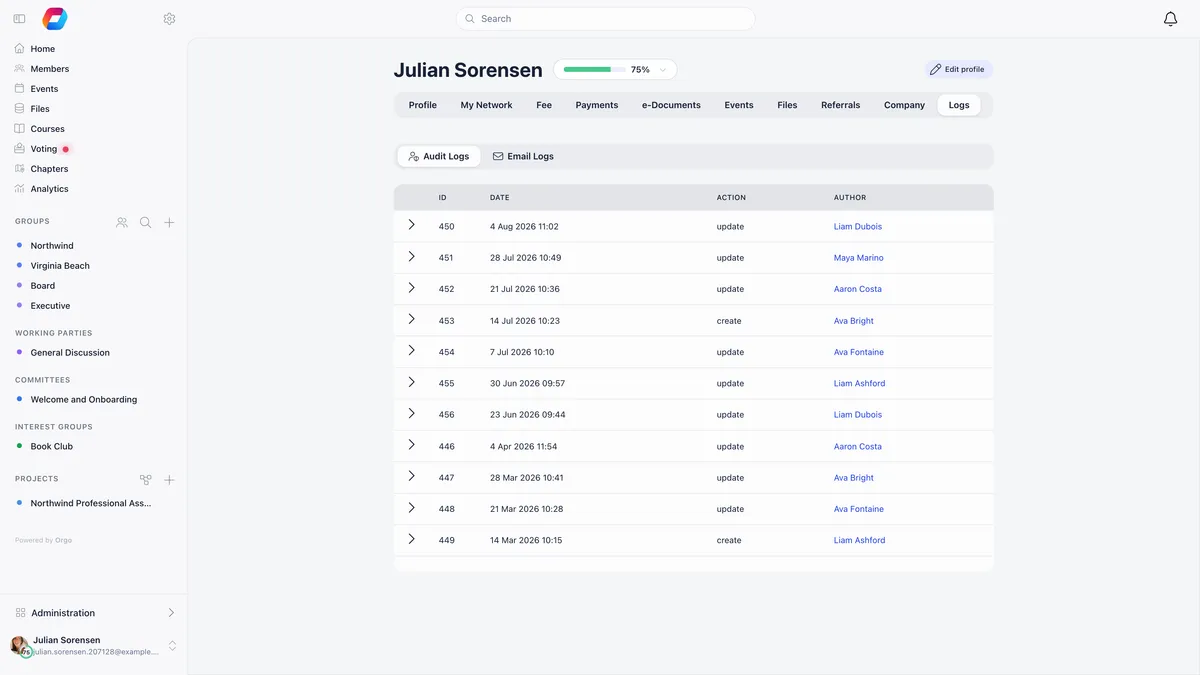
Email Logs is the fastest way to settle “we never received anything”, because it answers it without anybody guessing.
When someone still cannot sign in
Work down this list. The first item resolves most cases on its own.
That last one surprises people. The login page only offers workspaces for accounts on Active, Unconfirmed email, New request, Inactive or Awaiting referral. A member on Waiting list, Suspended or Excluded is not shown your organisation at all, which reads like a platform fault and is the status doing its job.
Related
- How to add members to Orgo
- How to set up your registration form
- How to add custom fields
- Adhesion, the membership application module
- Waitlist
- User statuses
- Troubleshooting member access
Frequently asked questions
I approved someone and they still cannot log in. What did I miss?
The account status. Approving an application, or approving a waitlist entry, marks the application and sends the person an email. Neither one touches the account status, and only Active permits a sign-in. Open the member, go to the Permissions tab of their edit page, set Status to Active and save. This is the single most common message we get about applications.
Does rejecting an application tell the person?
A rejected adhesion application sends the applicant the rejection email, as long as Adhesion Notifications is switched on. A rejected waitlist entry asks you for a reason, refuses to proceed without one, stores it and emails it to the person word for word. Write it for the person reading it. Cancelling an adhesion also asks for a reason, but that one stays on the record rather than going out by email.
Can I delete the test account I made?
Not from your own account, unless it is on the guest user type. Orgo refuses with 'You cannot delete your account, please contact the administrator.' An organisation administrator can delete it from that member's Close account page, and an HR administrator sees a Request delete button instead. Setting the test account to Inactive is usually the better answer, because deletion cannot be undone and keeps the name, the payments and the custom field values anyway.