

Before you start
Creating a chapter
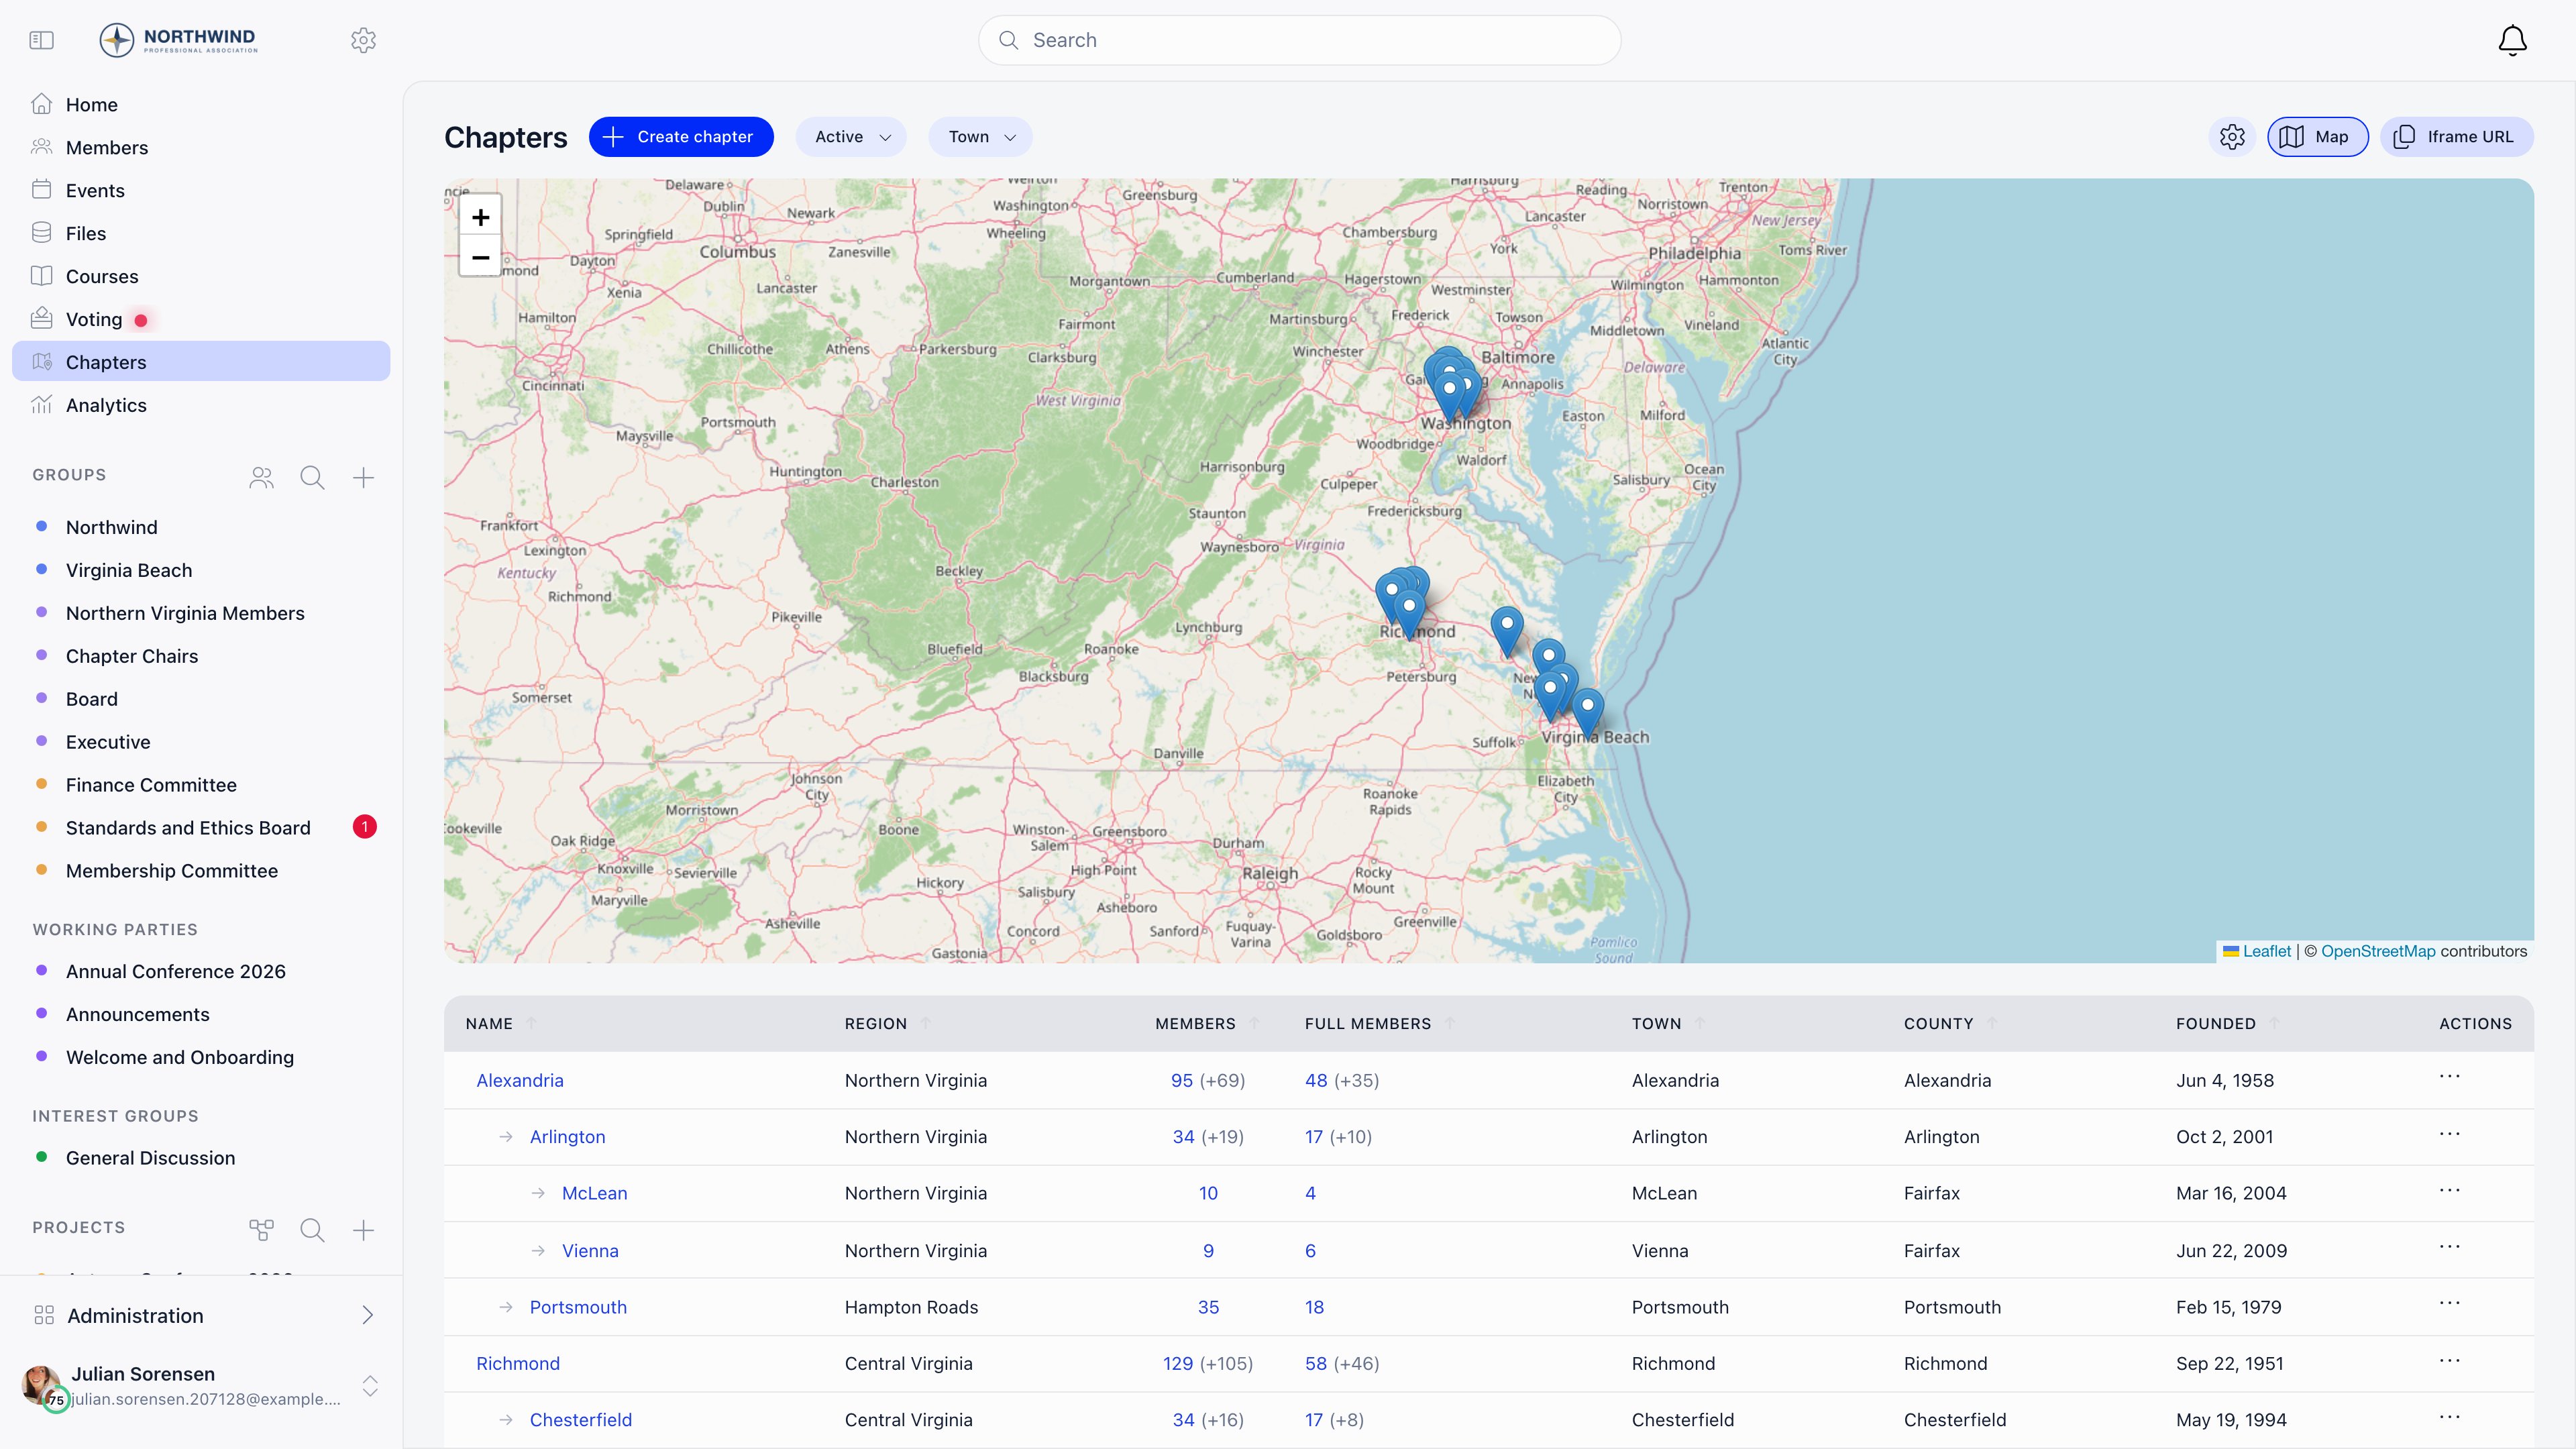
Chapters → Create chapter, six sections:
Who can create events in this chapter sets the bar for this chapter alone: Event managers (default) (
EVENT_LOCAL), Any member of this chapter (any signed-in member), or Chapter admins only (ADMIN_LOCAL). Organization admins clear all three. An organization-wide event manager (EVENT_TENANT) clears the first two but is refused by Chapter admins only, which only chapter admins and organization admins satisfy. Any chapter admin can change the setting, since editing the chapter is already theirs. The setting does not travel down the chapter tree, so opening one chapter to all its members never opens the chapters beneath it. Somebody below the bar can still open the event form and pick the chapter; the refusal comes when they save. See Create Event.
The chapters list
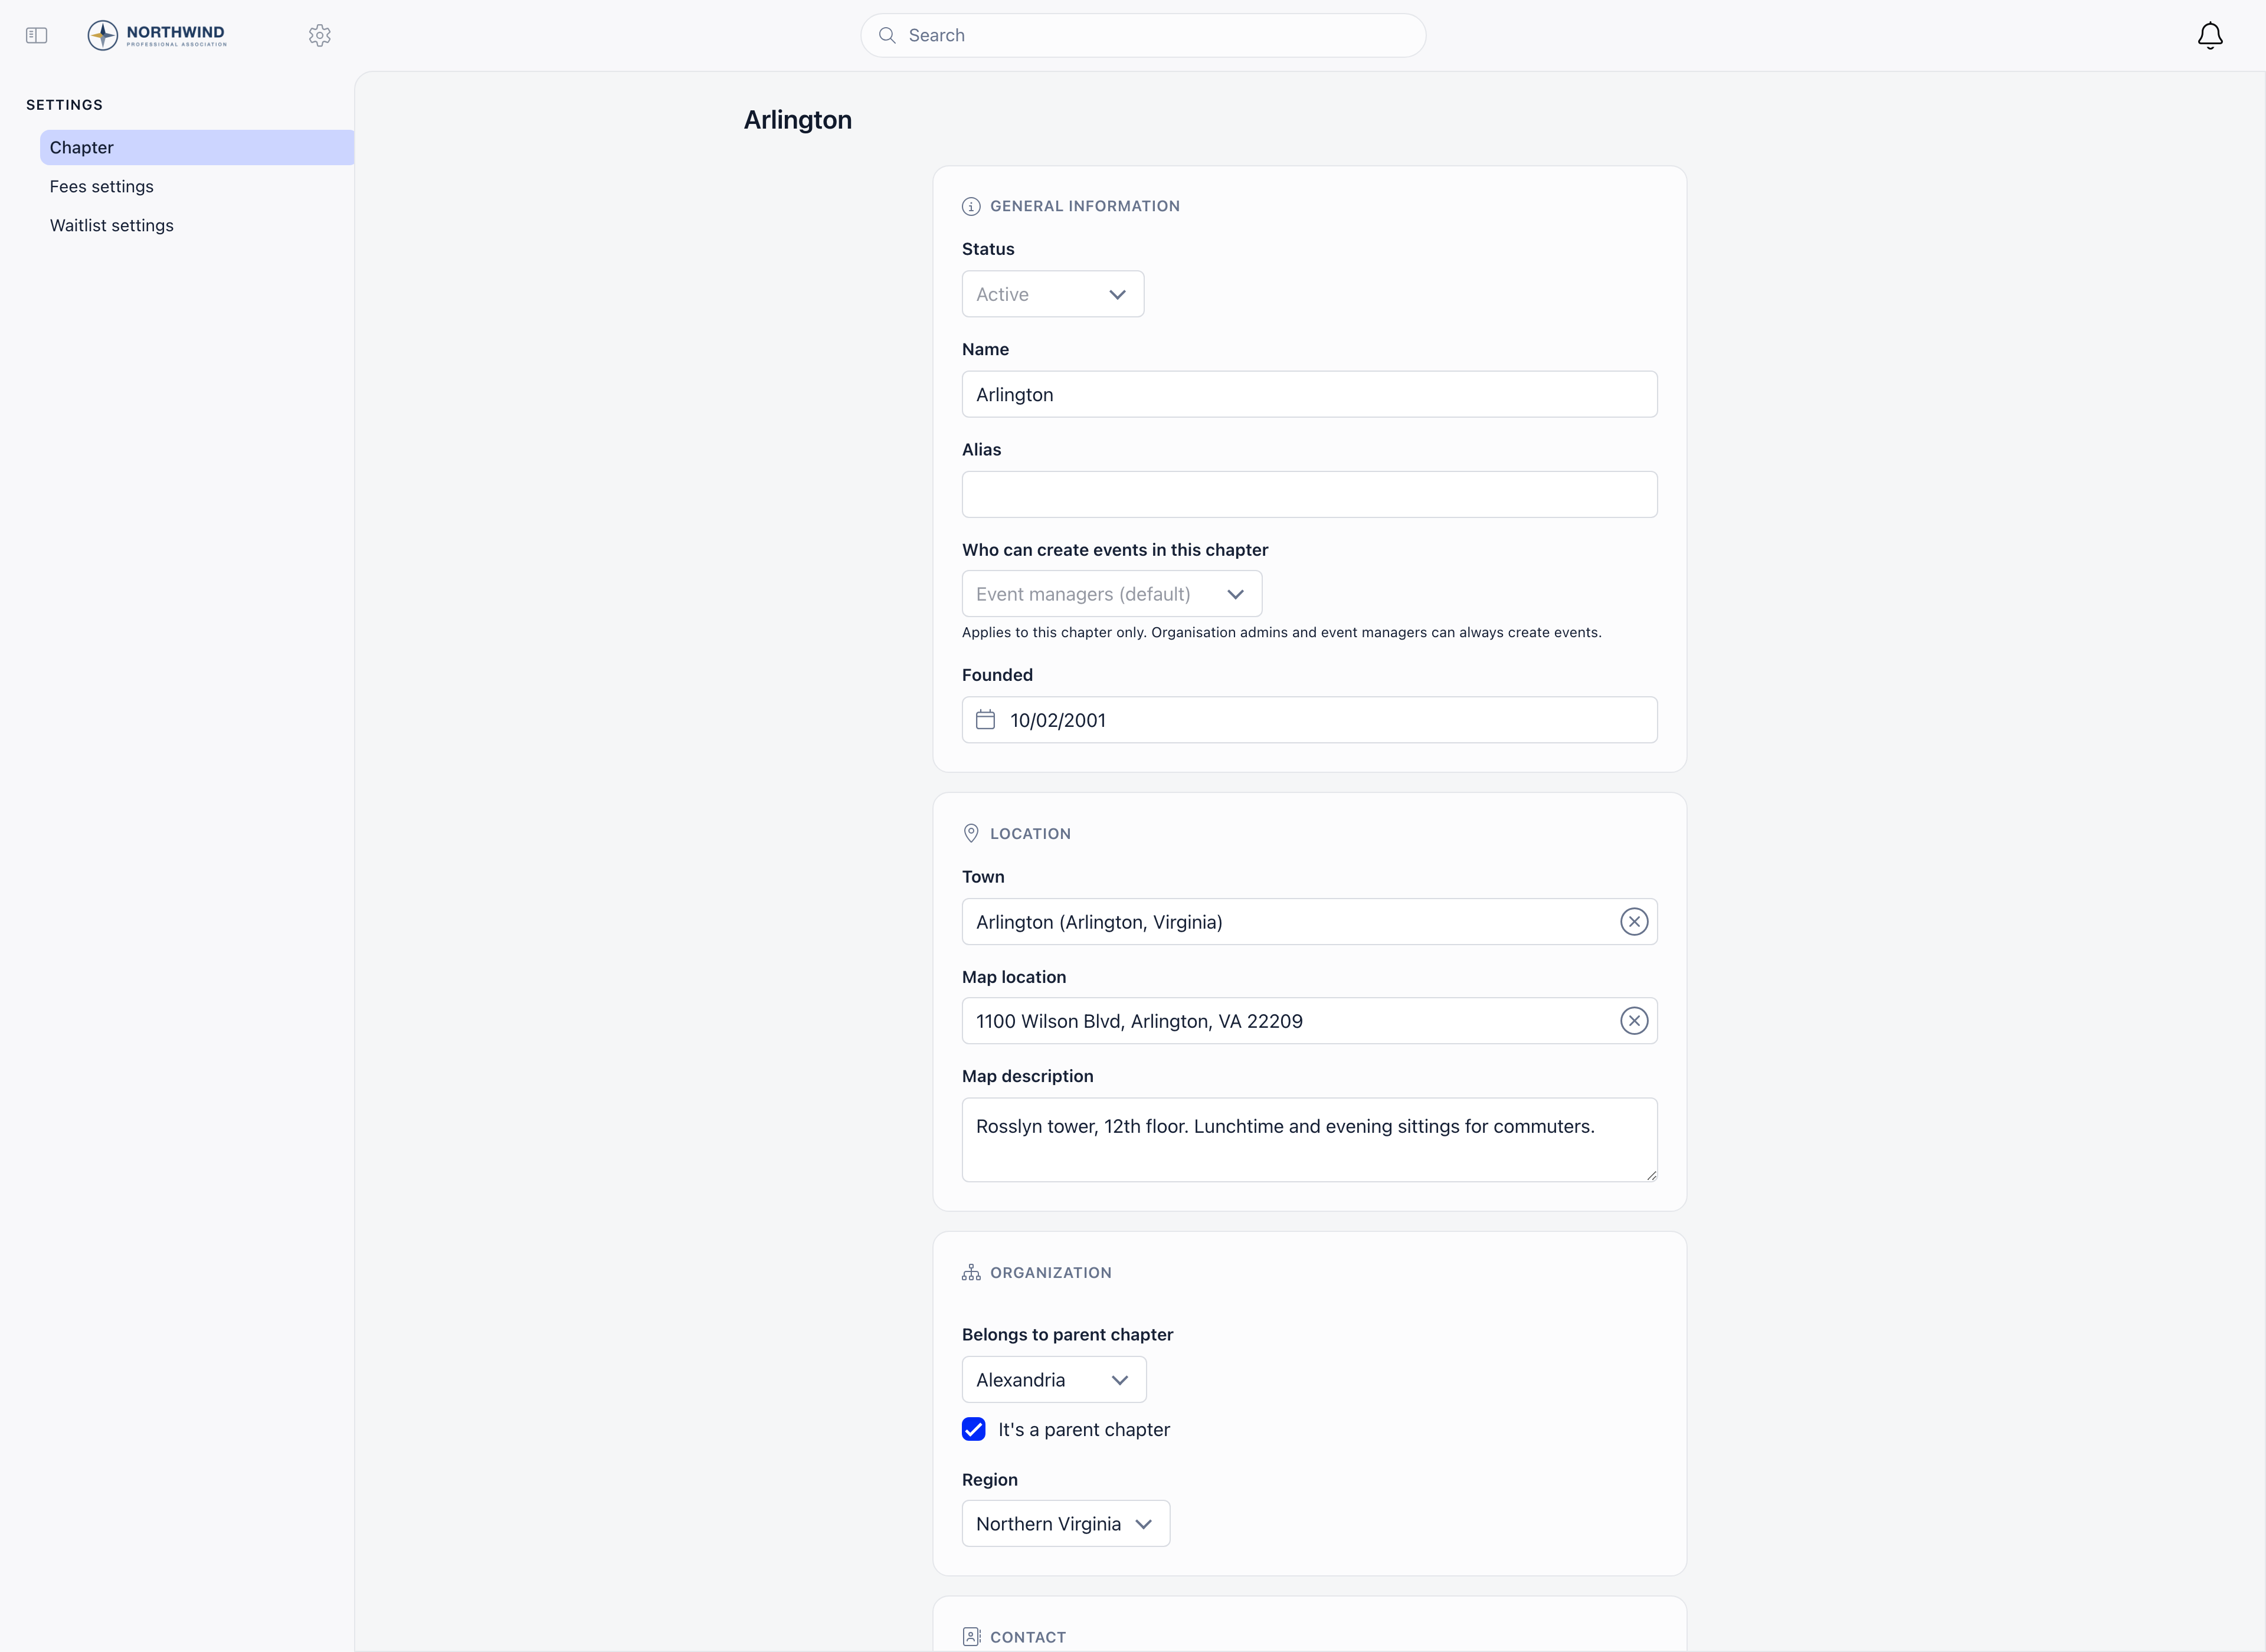
Filter by status (All statuses, active, pending close, suspended, closed; defaults to active) and by town (searchable). Remove sorting appears once you sort a column. Sortable columns: name, Region (when regions are on), status, members, Full members, town, county, founded, Stripe, Online fee activated. The last two appear only when the matching payment settings are active. Member counts link to a filtered member list forHR_TENANT.
With parent chapters on, the list arrives in tree order: each top-level chapter is followed by its whole branch, parents before the chapters under them, siblings alphabetical, and chapters with no family last. A chapter’s row is indented by how deep it sits, so the third layer is indented further than the second. A member count followed by (+N) is a branch total: the figure is that chapter plus everything under it, and N is how much of it came from the chapters beneath, counted through the whole branch rather than one layer down. Subtract N for the chapter’s own members, which is the number the Groups page shows on the chapter row.
Sorting a column with the header still flat-sorts the rows on the page you are looking at and breaks the tree grouping. Remove sorting restores it. That is unchanged, and it is why the tree order is the default.
ADMIN_TENANT, ADMIN_LOCAL on that chapter, and members of that chapter.
map plots every active chapter that has coordinates on an OpenStreetMap panel above the table; chapters with missing coordinates, or coordinates that are not valid numbers, are skipped rather than breaking the map. With the map open, ADMIN_LOCAL also gets Iframe URL, an embed link for your own website that renders the map alone and needs no login.
Parent chapters and regions
Two independent grouping mechanisms, both off by default, both in Settings → Modules → Groups & Teams → Local Centers:
Regions themselves are managed at Settings → Modules → Groups & Teams → Regions (
ROLE_ADMIN_TENANT): add, rename, remove. A region cannot be deleted while any chapter or role group still points at it; Orgo says how many of each and asks you to reassign them first.
Parent chapters and regions are not the same thing. Parent chapters affect permissions: the
*_PARENT_LOCAL roles apply across a parent chapter and everything beneath it, at any depth. Regions do not grant anything on their own, and a region is a flat label rather than a layer of the tree.How deep the chapter tree goes
There is no two-level limit. A chapter that has a parent can itself be a parent, so National → Region → District → Branch is a supported structure, and so is anything deeper. Two fields on the chapter form drive it:
Tick both on the same chapter and it sits in the middle of the chain: a child of the one above and a parent of the ones below. Such a chapter appears under the Parent chapters bucket of the chapters list, because it is one.
Four rules are checked when you save, and a refused save says which one you hit:
- The chosen parent must be flagged It’s a parent chapter.
- A chapter cannot be its own parent.
- A chapter cannot be placed under one of its own descendants.
- The parent must belong to the same organization.
What a chapter owns
The chapter header carries tabs, each scoped to that chapter: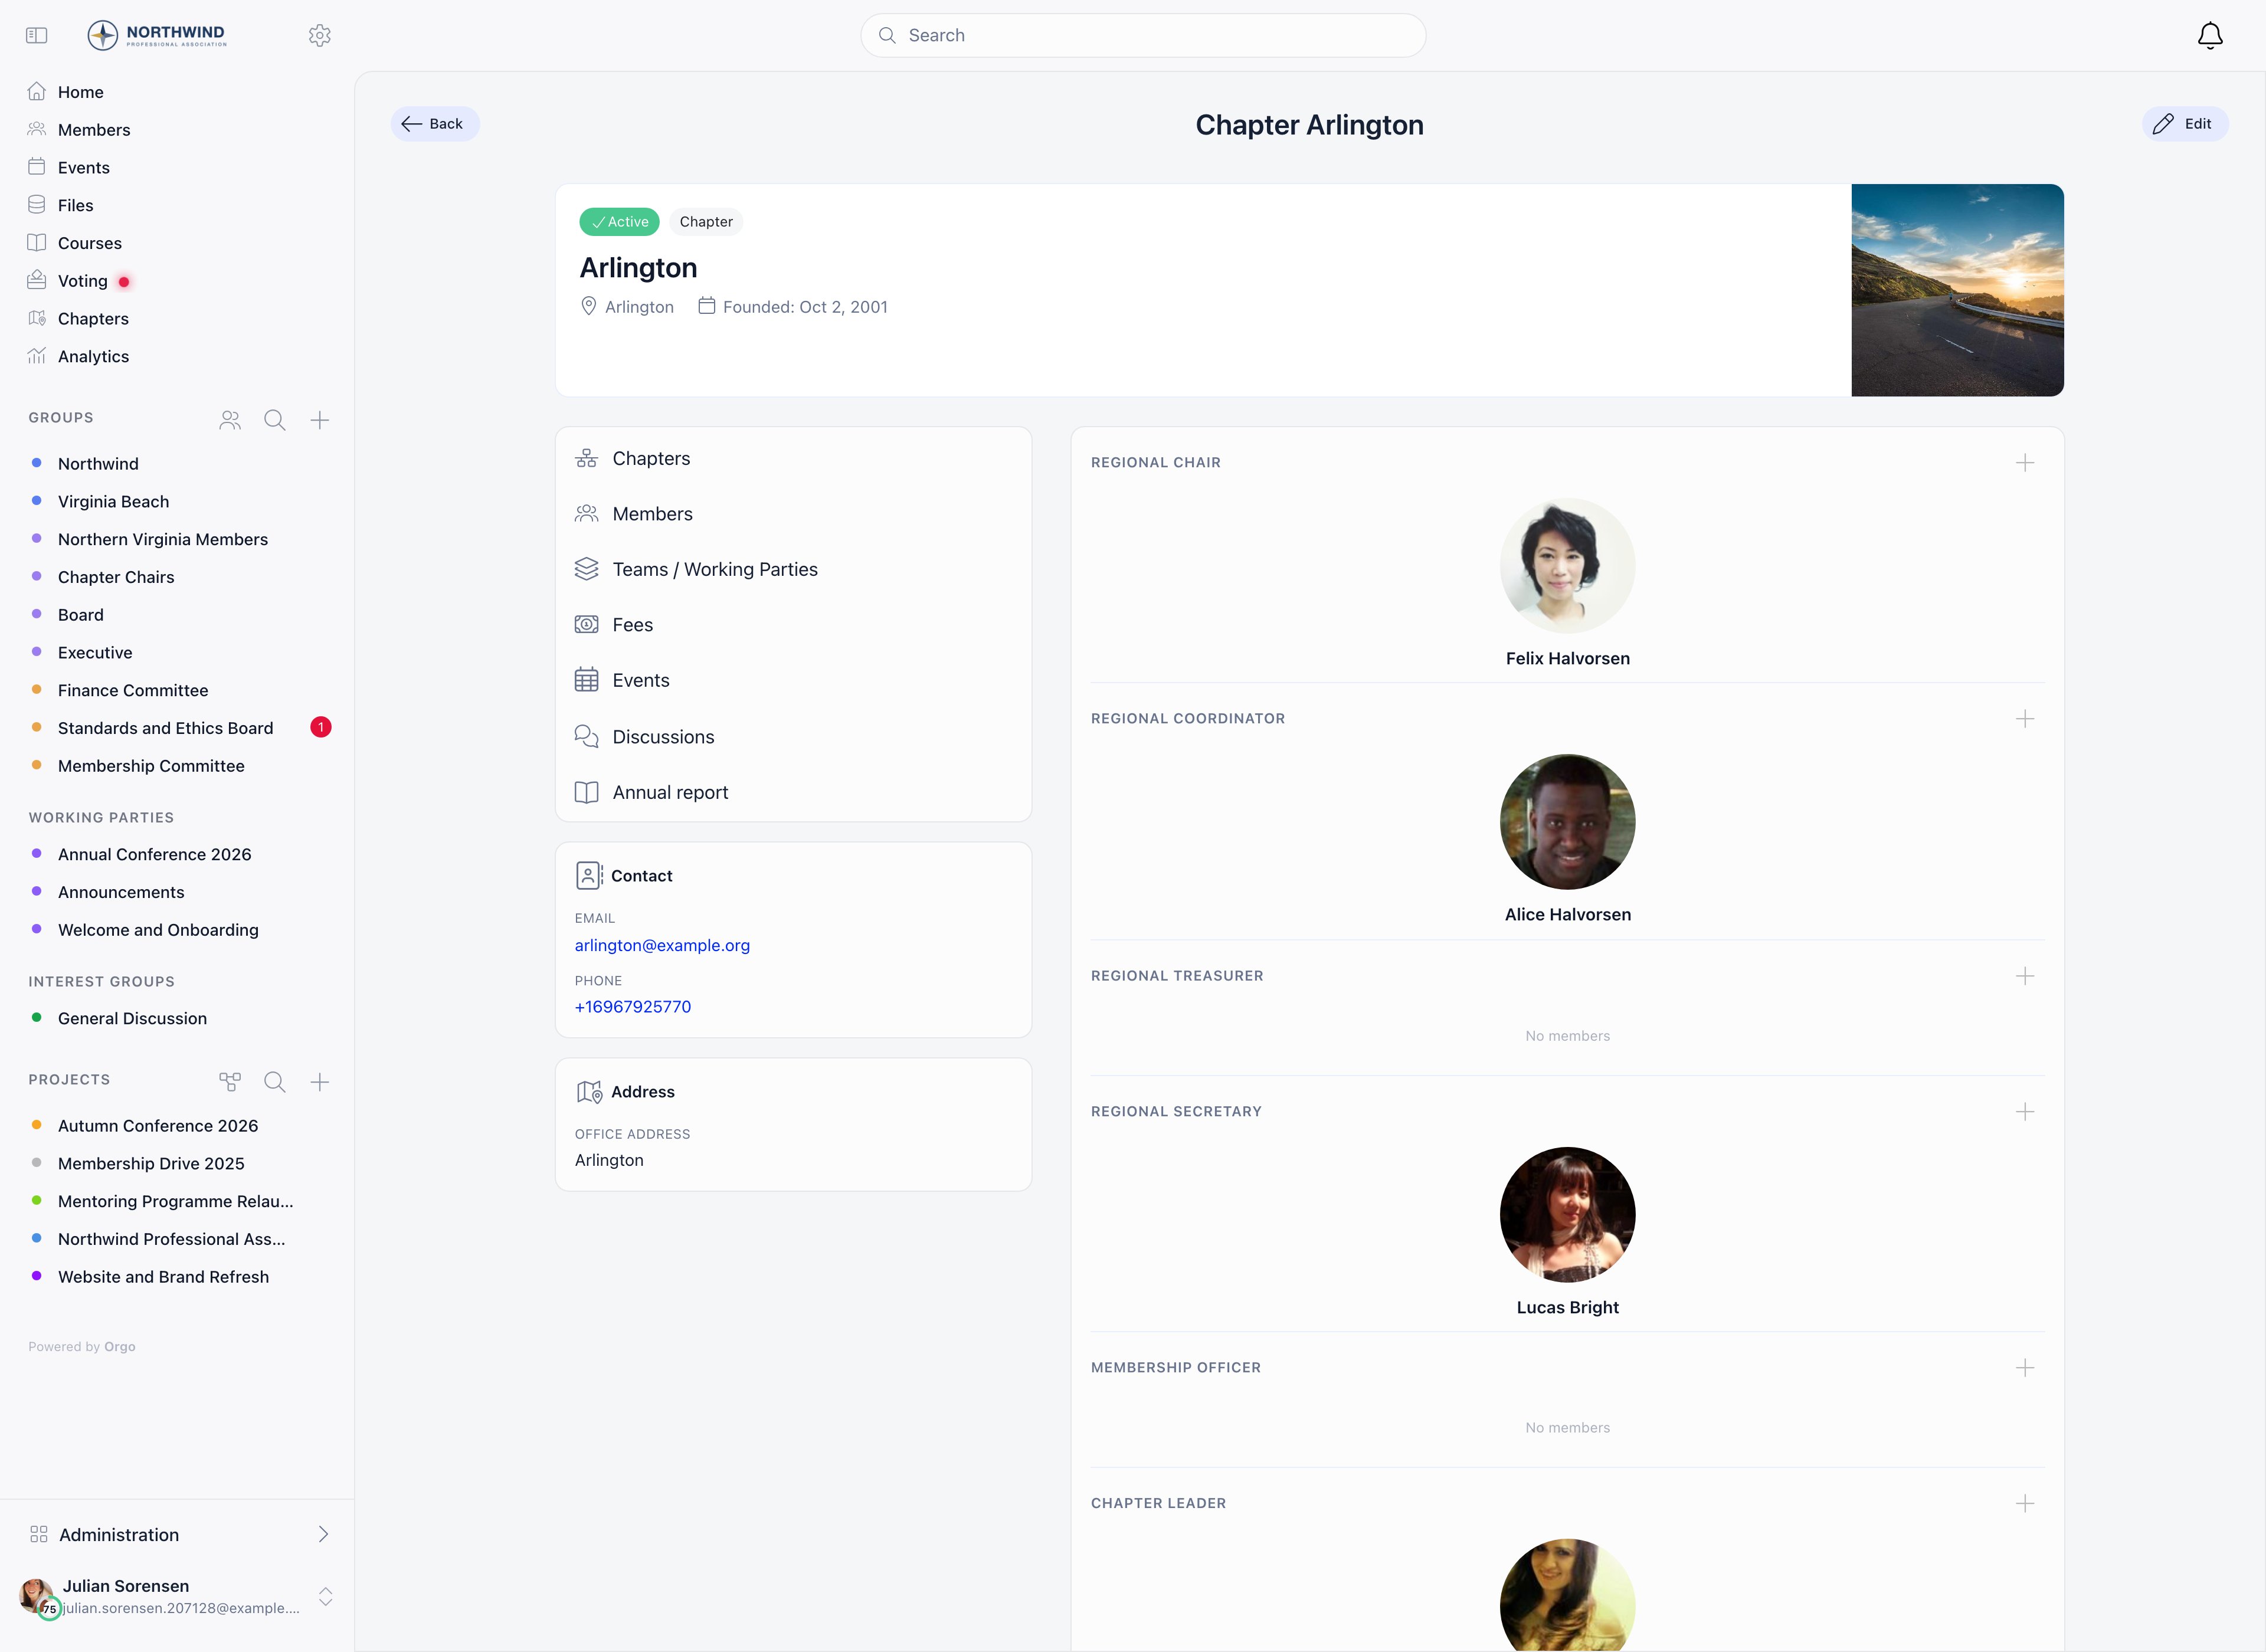
The Team panel only lists roles marked as chapter roles in Settings → Users & Profiles → Roles, and a parent chapter reads a different flag from an ordinary one. A top-level parent chapter shows only roles flagged for parent chapters, so a role that appears on a branch page can be absent from its parent. A chapter that is both a parent and a child shows both sets, because it holds both kinds of post.
HR_TENANT shows here with HR_LOCAL. Finance also needs online payments active.
Chapter-level tasks do not exist, and the issues tab is limited to project groups.
Local administration
Local permissions sit on a member’s profile, in the Permissions panel, under three headings that show each checkbox’s scope: Organization (your org name), Chapter (the member’s chapter), and Parent chapter.
The
_PARENT_LOCAL variants only mean something when Enable Parent Centers is on, and local permissions are hidden entirely when the Local Centers module is off.
What a parent-scope permission reaches
A_PARENT_LOCAL permission is anchored to one chapter, and the anchor is worked out from the holder’s own primary chapter. You do not choose it.
The permission then covers the anchor and every chapter below the anchor, however many layers down. It never reaches upward or sideways: not the chapter above the anchor, and not another branch of the tree.
Worked example. National holds North Region; North Region holds Riverside and Hillside; Riverside is itself flagged as a parent and holds Riverside East.
Hillside surprises people: an ordinary chapter anchors to the chapter above it, so the grant reads as “everything under the same parent as this person”, and at three layers that includes cousins further down. Flagging a chapter as a parent is what pins the anchor to the chapter itself and stops the grant climbing.
ADMIN_LOCAL and the other _LOCAL permissions are unchanged: exactly the holder’s own chapter, never a chapter beneath it.
Wherever a parent chapter is the filter, the results now cover its whole branch rather than one layer: members, fee and product payments, subscriptions, adhesions, transfer requests, resignation requests, waitlist entries, chapter analytics, and the member counts on the chapters list.
Filtering payments or subscriptions by a chapter now requires
FINANCIAL_LOCAL over that chapter and refuses with an access error otherwise. The check existed before but its result was not applied, so the filter answered for anyone who could open the screen.HR_TENANT and ADMIN_TENANT grant additional chapters from the profile, each with its own permission level and optional end date; without that setting, extra chapters are unavailable. These are access grants, not a second home chapter, so for cross-chapter work use a Private Group or a Role Group, and to move someone for good raise a transfer request.
Statuses and closing a chapter
Deleting a chapter (
ADMIN_TENANT) first checks for local Stripe customers, pending invitations, and transfer requests still pointing at it. If any exist, Orgo sets the status to Closed and stamps an end date instead; if none exist, the record is removed outright.
Chapter settings
A chapter has its own settings sidebar, shown toFINANCIAL_LOCAL and, for the first entry, to HR_LOCAL:
A chapter can carry its own fee product, default price, and connected Stripe account, so local dues are collected and reported separately from national ones. See Local Group Fees.
Waitlist settings applies per member type, not per chapter: enable each type and give it a Maximum Capacity (blank means unlimited). The panel shows Current Count and Available Spots per type, and warns before you disable a type that still has registered members.
Public chapter finder
/local-center-map/ is a separate, member-facing finder built on Google Maps, and it opens without a login. Visitors search by postal code or address, filter by age group, cost range, meeting nights and languages, sort by cost, save favorites, and go from a result card into registration. The filter is labelled Night(s) available and reads the chapter’s days of the week. Chapters supply the data through their coordinates, map description, languages, days of the week, and fee price.
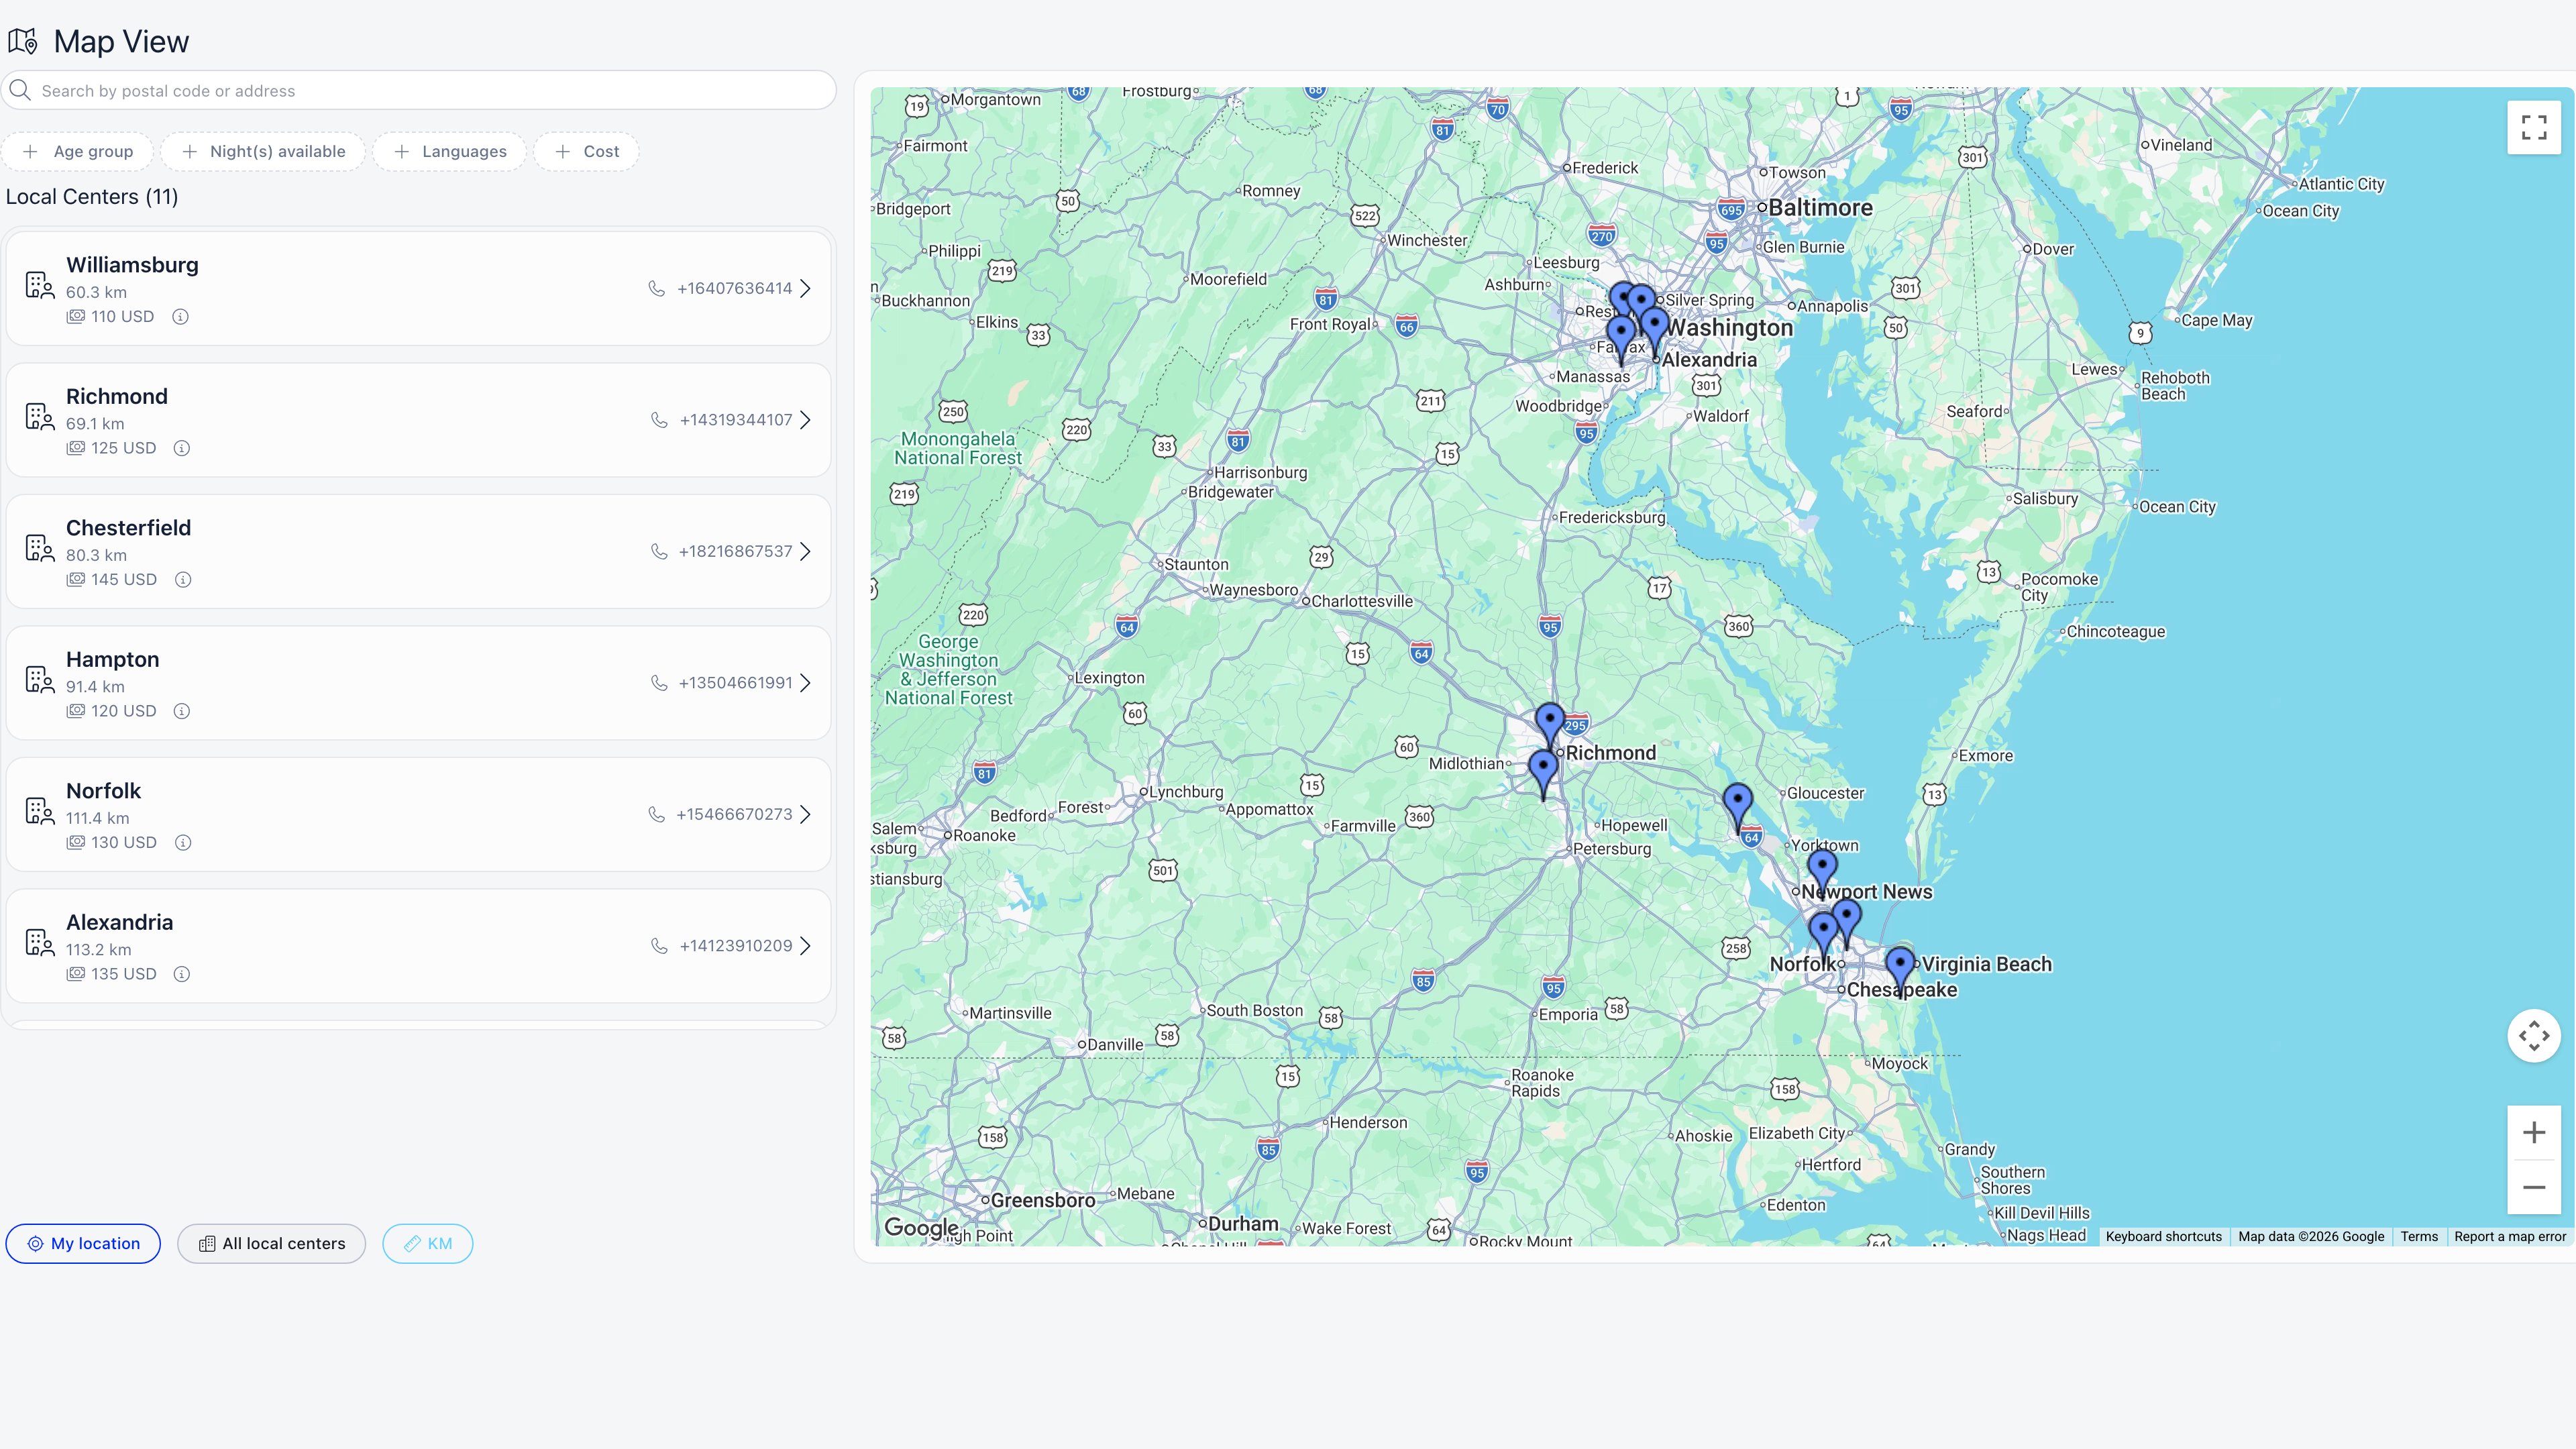
The finder opens on the visitor’s own location. If the browser refuses to share it, the map falls back to the centre of your own chapters and the results panel lists the ones nearest to that point. A chapter with no coordinates is invisible to both the pins and the results, so give every chapter coordinates; if none of them has any, the map has nothing to centre on and the panel reports no chapters within 200km until the visitor searches an address or presses All local centers.
/chapters and /chapter/:id as public pages.
Troubleshooting
Can one person administer several chapters?
Can one person administer several chapters?
Three ways: a
_PARENT_LOCAL permission covers the holder’s anchor chapter and every chapter beneath it at any depth, Multi local center access grants them named chapters on their profile, or a tenant-level role covers everything.Members only see their own chapter. Can I open that up?
Members only see their own chapter. Can I open that up?
Turn on Open Access Local Centers. Every member then sees content from every chapter and receives its notifications, and can mute individual chapters from the chapter header.The opposite setting, Isolate Local Center Access, hides the chapters above a member. It is applied one layer at a time: a chapter higher up the chain is visible to them only when their own
HR_PARENT_LOCAL reach covers that particular chapter, and the same test now hides role groups scoped to a chapter they cannot see. Previously those role groups slipped through the isolation setting. The two settings are mutually exclusive.Why do chapter names show as 'Town - Name'?
Why do chapter names show as 'Town - Name'?
That is Center Name Format under Settings → Modules → Groups & Teams → Local Centers, which defaults to
%town% - %name%. The LC and LP prefixes come from a separate switch, Show LC/LP prefix, and apply only when parent chapters are enabled.A chapter has disappeared from the list and from the transfer picker
A chapter has disappeared from the list and from the transfer picker
Check its status. The list opens on the active filter, and that filter means
the exact Active status, not the three statuses that count as active. A
chapter set to Pending close or Suspended drops out of the default
view while still being counted as active in member counts and reports.
Switch the status filter to All statuses to see it, which is also the
only setting under which the status column itself appears.The same rule reaches past the list. The map, the destination picker on a
transfer request and the extra-chapter picker under Multi local center
access all read the unfiltered chapter feed, which serves exactly-Active
chapters. So suspending a chapter also stops anyone transferring a member
into it, which is usually more than was intended. Lists that filter on
“active” rather than reading that feed, such as the chapter filters on member
and fee screens, do include Pending close and Suspended.Use Pending close to signal a wind-down you still need to work with, and
Closed when you mean the chapter to leave.
I deleted a chapter and it is still there, marked Closed
I deleted a chapter and it is still there, marked Closed
That is the designed fallback and it is silent: both outcomes report success
the same way, so the list is the only place you find out which one happened.Orgo hard-deletes a chapter only when nothing points at it. Three things
block that: a member with a local Stripe customer record for the chapter, a
pending invitation, and any transfer request naming it as the origin or the
destination. Transfer requests are kept as history rather than cleared, so a
chapter that has ever exchanged a member, or ever taken one local online
payment, can only ever be closed and not removed. In practice that is most
chapters that have run for a season.When a hard delete does go through, the members are not deleted with it.
Their chapter field is emptied, which leaves them with no chapter until
somebody reassigns them. A member in that state fails any check that compares
their chapter with the chapter of the thing they are looking at, so local
fees and local permissions stop resolving for them. Move the members first,
then delete.
ADMIN_PARENT_LOCAL is not reaching the chapters I expected
ADMIN_PARENT_LOCAL is not reaching the chapters I expected
The reach of a
_PARENT_LOCAL permission is worked out from the holder’s own
primary chapter, and it only ever travels downward. You are not choosing which
branch it covers when you tick the box. The full rule is in
What a parent-scope permission reaches.Worked example: Riverside and Hillside are both children of North Region.
Give ADMIN_PARENT_LOCAL to a member whose primary chapter is Riverside and
they administer North Region, Riverside, Hillside and anything below those.
Give the same permission to a member of a chapter under South Region and it
covers South Region instead. Nothing you do on the permissions panel points
it at another branch.Two rules catch people out:- With Enable Parent Centers on, a chapter that has no parent of its own
is treated as its own anchor. So
ADMIN_PARENT_LOCALon a member of a stand-alone top-level chapter is effectivelyADMIN_LOCALover that chapter, widening only as chapters appear beneath it. - A chapter flagged It’s a parent chapter is also its own anchor, even when it sits in the middle of the chain. A district officer therefore administers the district and its branches but never the region above it. That is deliberate: it stops a mid-level grant climbing to the top of the organization.
A parent chapter's member list only shows its own members
A parent chapter's member list only shows its own members
That was a real defect and it is fixed. Filtering the member directory by a
parent chapter returned only the members filed directly against that chapter,
silently dropping everyone in the chapters below it, from December 2025 until
this release. The filter now returns the whole branch.If you built reports or saved links against the old behaviour, the numbers
they produce will be larger now, and the larger figure is the correct one.
To get only a chapter’s own members, filter on that chapter without its
parent flag, or take the member count on the chapters list and subtract the
(+N) beside it, which is the part contributed by the branch below.Extra chapter access stopped working and nobody changed the profile
Extra chapter access stopped working and nobody changed the profile
Check whether Multi local center access is still on. Every extra chapter
grant is stored on the member’s profile, but permission checks only consult
those rows while the setting is enabled. Turn it off and the grants stop
counting immediately, the panel disappears from the profile, and nothing
reports that anything was withdrawn. Turn it back on and every grant returns
exactly as it was, because the rows were never deleted.Two quieter reasons for the same symptom: a grant with an end date in the
past no longer appears or applies, and a grant pointing at a chapter that is
no longer Active drops out of the panel, since it lists Active chapters only.
A chapter is missing a pin, or the map opens over the ocean
A chapter is missing a pin, or the map opens over the ocean
A pin is drawn from Map location when it is set, and from the chapter’s
town coordinates when it is not, so a chapter with a town usually appears
without anyone entering coordinates. It is skipped only when it has neither,
or when what is stored is not a pair of numbers, which happens when a name
lands in the latitude box. Only exactly-Active chapters are plotted, so a
suspended chapter has no pin either.Where the map opens is a separate setting. It uses International Map
Center and International Map Zoom Level if they are filled in, then the
coordinates of your organisation’s country. With neither, it centres on
latitude 0, longitude 0, which is open water in the Gulf of Guinea and looks
like a broken map. Setting the two international values fixes it, and they
are the right place to control the opening view for an organisation that
spans several countries.
Saving a chapter is refused when I change its parent
Saving a chapter is refused when I change its parent
Two different refusals, with two different causes.“Changing chapter hierarchy requires tenant-level permission” means you hold
ADMIN_LOCAL rather than HR_TENANT. Only organization-level HR can move a
chapter in the tree. Nothing else on the form is affected: save the same
edit without touching the parent selector or the It’s a parent chapter
checkbox and it goes through.A message about the parent being invalid, a chapter being its own parent, a
descendant being chosen, or parent status not being removable means one of
the structural rules under How deep the chapter tree goes
was broken. The most common one is picking a chapter that is not itself
flagged It’s a parent chapter: flag it first, then set the link.A local admin opens the chapter edit page and sees a blank screen
A local admin opens the chapter edit page and sees a blank screen
Two checks disagree, and the failure lands between them. The route asks only
whether you hold
ADMIN_LOCAL somewhere, without looking at which chapter is
in the address, so the page loads. The form then renders only for
ADMIN_TENANT or for your own primary chapter, so for anyone else the page
stays empty. No permission message is shown.So a chapter admin who follows a link to a different chapter’s edit page gets
a blank screen rather than “you cannot edit this”. This includes somebody
holding Multi local center access on that chapter, even where the save
itself would be accepted, because the form checks the primary chapter only.A member who holds no ADMIN_LOCAL at all fails the route check instead and
is sent to the login screen, which looks like a session that has expired and
is not one. That behaviour is the same on any page they lack the role for.Related
- Groups Overview - all group types and when to use each
- Units - smaller teams inside a chapter
- Member Transfers - moving a member between chapters
- Local Group Fees - collecting dues at chapter level
- Permissions - how the local and parent-local roles are evaluated