

The member directory
Members in the sidebar lists everyone in your organisation. Settings → Modules → Users & Profiles → Who Can See Members in General Groups decides who sees it at all: All Users, HR Local, HR Tenant, Admin Local or Admin Tenant. At an admin level, ordinary members never see the directory.Always reach the directory from the sidebar rather than by typing a URL. The
organisation-wide list lives at
/users?generalUnit=true; a bare /users has no
scope to show and renders an empty page. The same screen shows a single group’s
members at /users?unit={id}.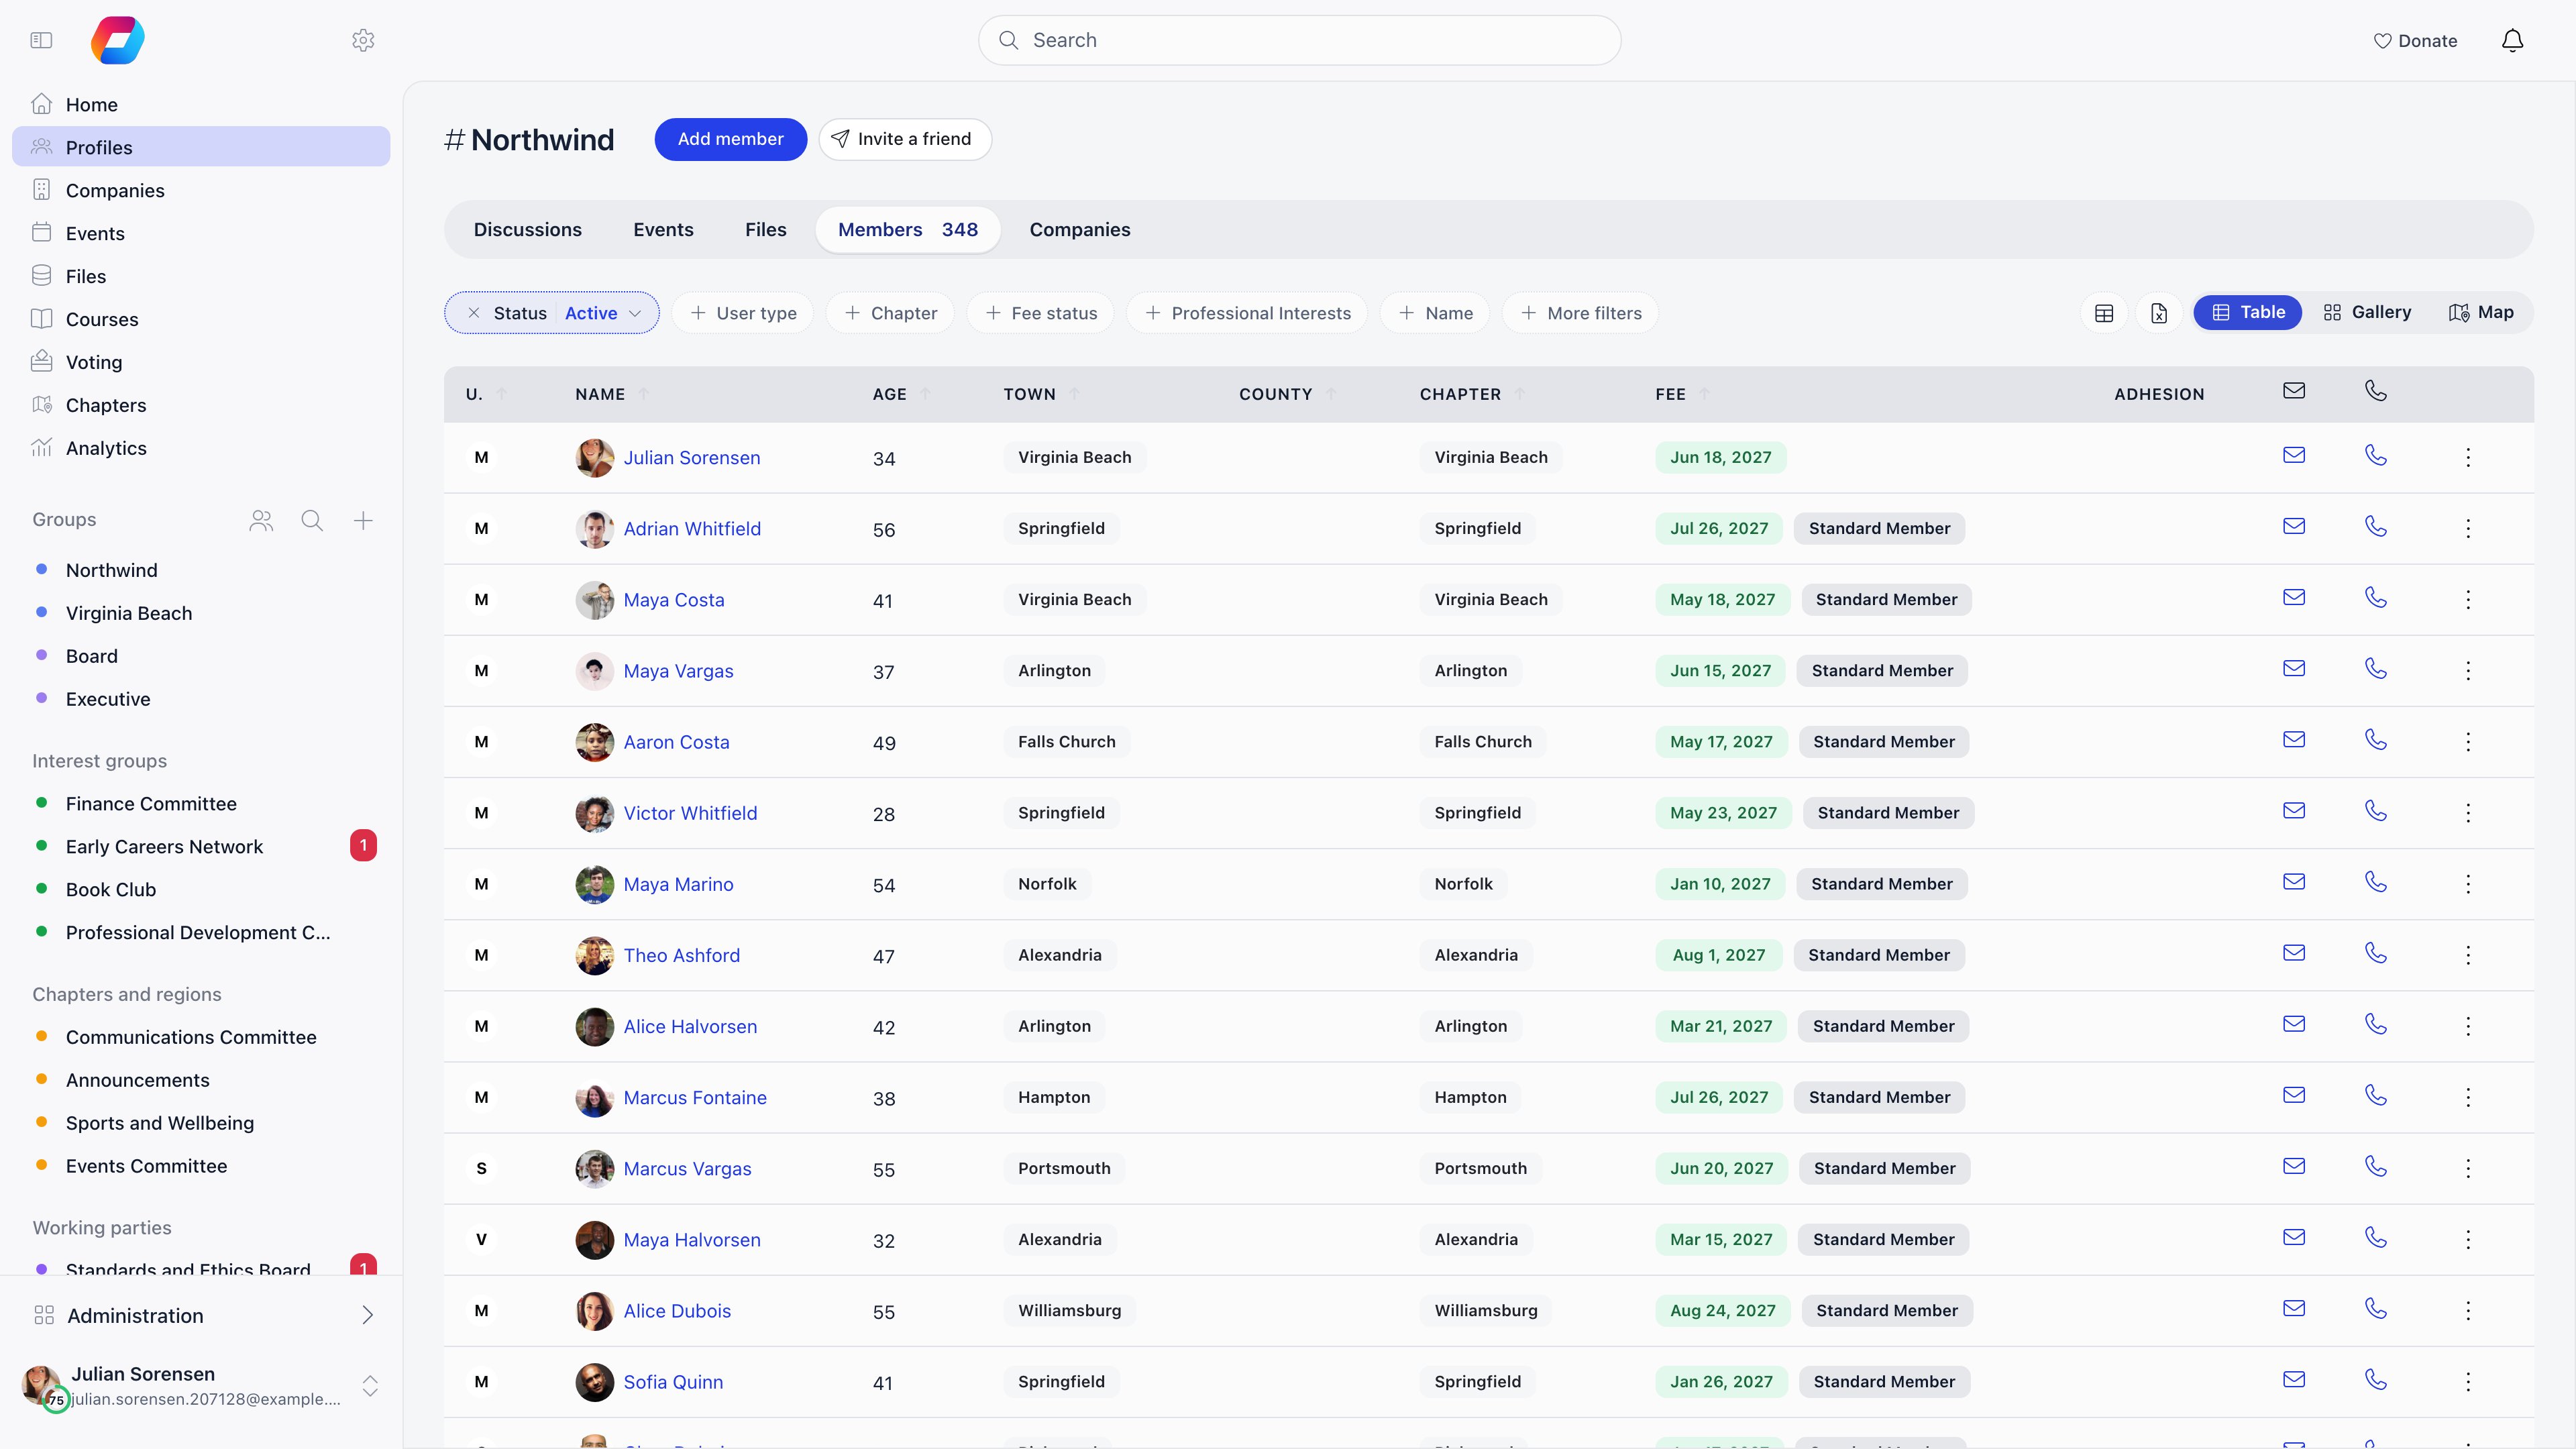
Filters
The filter row shows a handful of filters and keeps the rest under More filters; a filter you pick from there stays on the row for the session. Which ones exist depends on your permissions and on what is switched on. The list opens filtered to Active members, so people with another status stay out of sight until you change Status. Clear filters puts everything back.Grace period only appears when the fee is mandatory, auto deactivation on
expiry is on, and the deactivation delay is more than zero days. It finds members
whose fee has expired but who are still inside that delay.
Columns, sorting and row actions
Sortable headers: name, age, card ID, town, country or county, chapter, fee date, status and date joined. Sorting applies to the whole result set, not just the current page. Columns are permission-gated rather than chosen:
The column menu itself (View columns, the table icon at the right of the filter
row) needs organization HR permission, or chapter admin permission on your own chapter’s list, and it only appears
in the table view, never in Gallery or Map.
Each row’s menu holds View Profile, Modify Profile and Modify Roles
(ADMIN_LOCAL and above), plus making or removing a unit admin inside a unit.
Modify Profile opens the member’s Edit view on the Info pane and Modify
Roles opens it on the Roles pane (see Member profile).
Members pending approval (New request) or waitlisted get Approve and Add
to waiting list shortcuts next to the name, and a New requests (N) button
jumps to that queue. There is no multi-select: actions apply one member at a
time.
Export and adding members
The Excel icon (Export CSV) exports the current filtered, sorted list as CSV. Exports are paged at 500 profiles: below that you confirm and download, above it you pick which page, so a large organisation needs several exports. Export needs Organization HR permission, or chapter HR permission with a chapter selected, and each export is written to the audit log with the exact query used. A Members report in Reports has no such paging: the download holds every matching member in one file, however many there are. It needs organization admin permission and it is built from its own column and filter picker rather than from the list you are looking at, so the directory export stays the quicker route for a chapter admin or for the list already on screen. Add member creates an account directly; it needs organization HR permission, or chapter HR permission for your own local center (and the parent-level permission on a parent chapter’s list). The status comes from Default Status for Admin-Created Users, and with an email address supplied the member gets a welcome message with a login link. For many people at once, use Import. Invite a friend, next to it, opens the invitation tools: a registration link to share or addresses to email. All four routes side by side: Adding Members.Worked example: what a chapter treasurer sees
Permission names on their own do not tell you what lands on screen, because the directory gates the filters, the columns and the export separately. Here is the same person, a chapter treasurer holding only chapter financial permission on their own Chapter, walking through the list.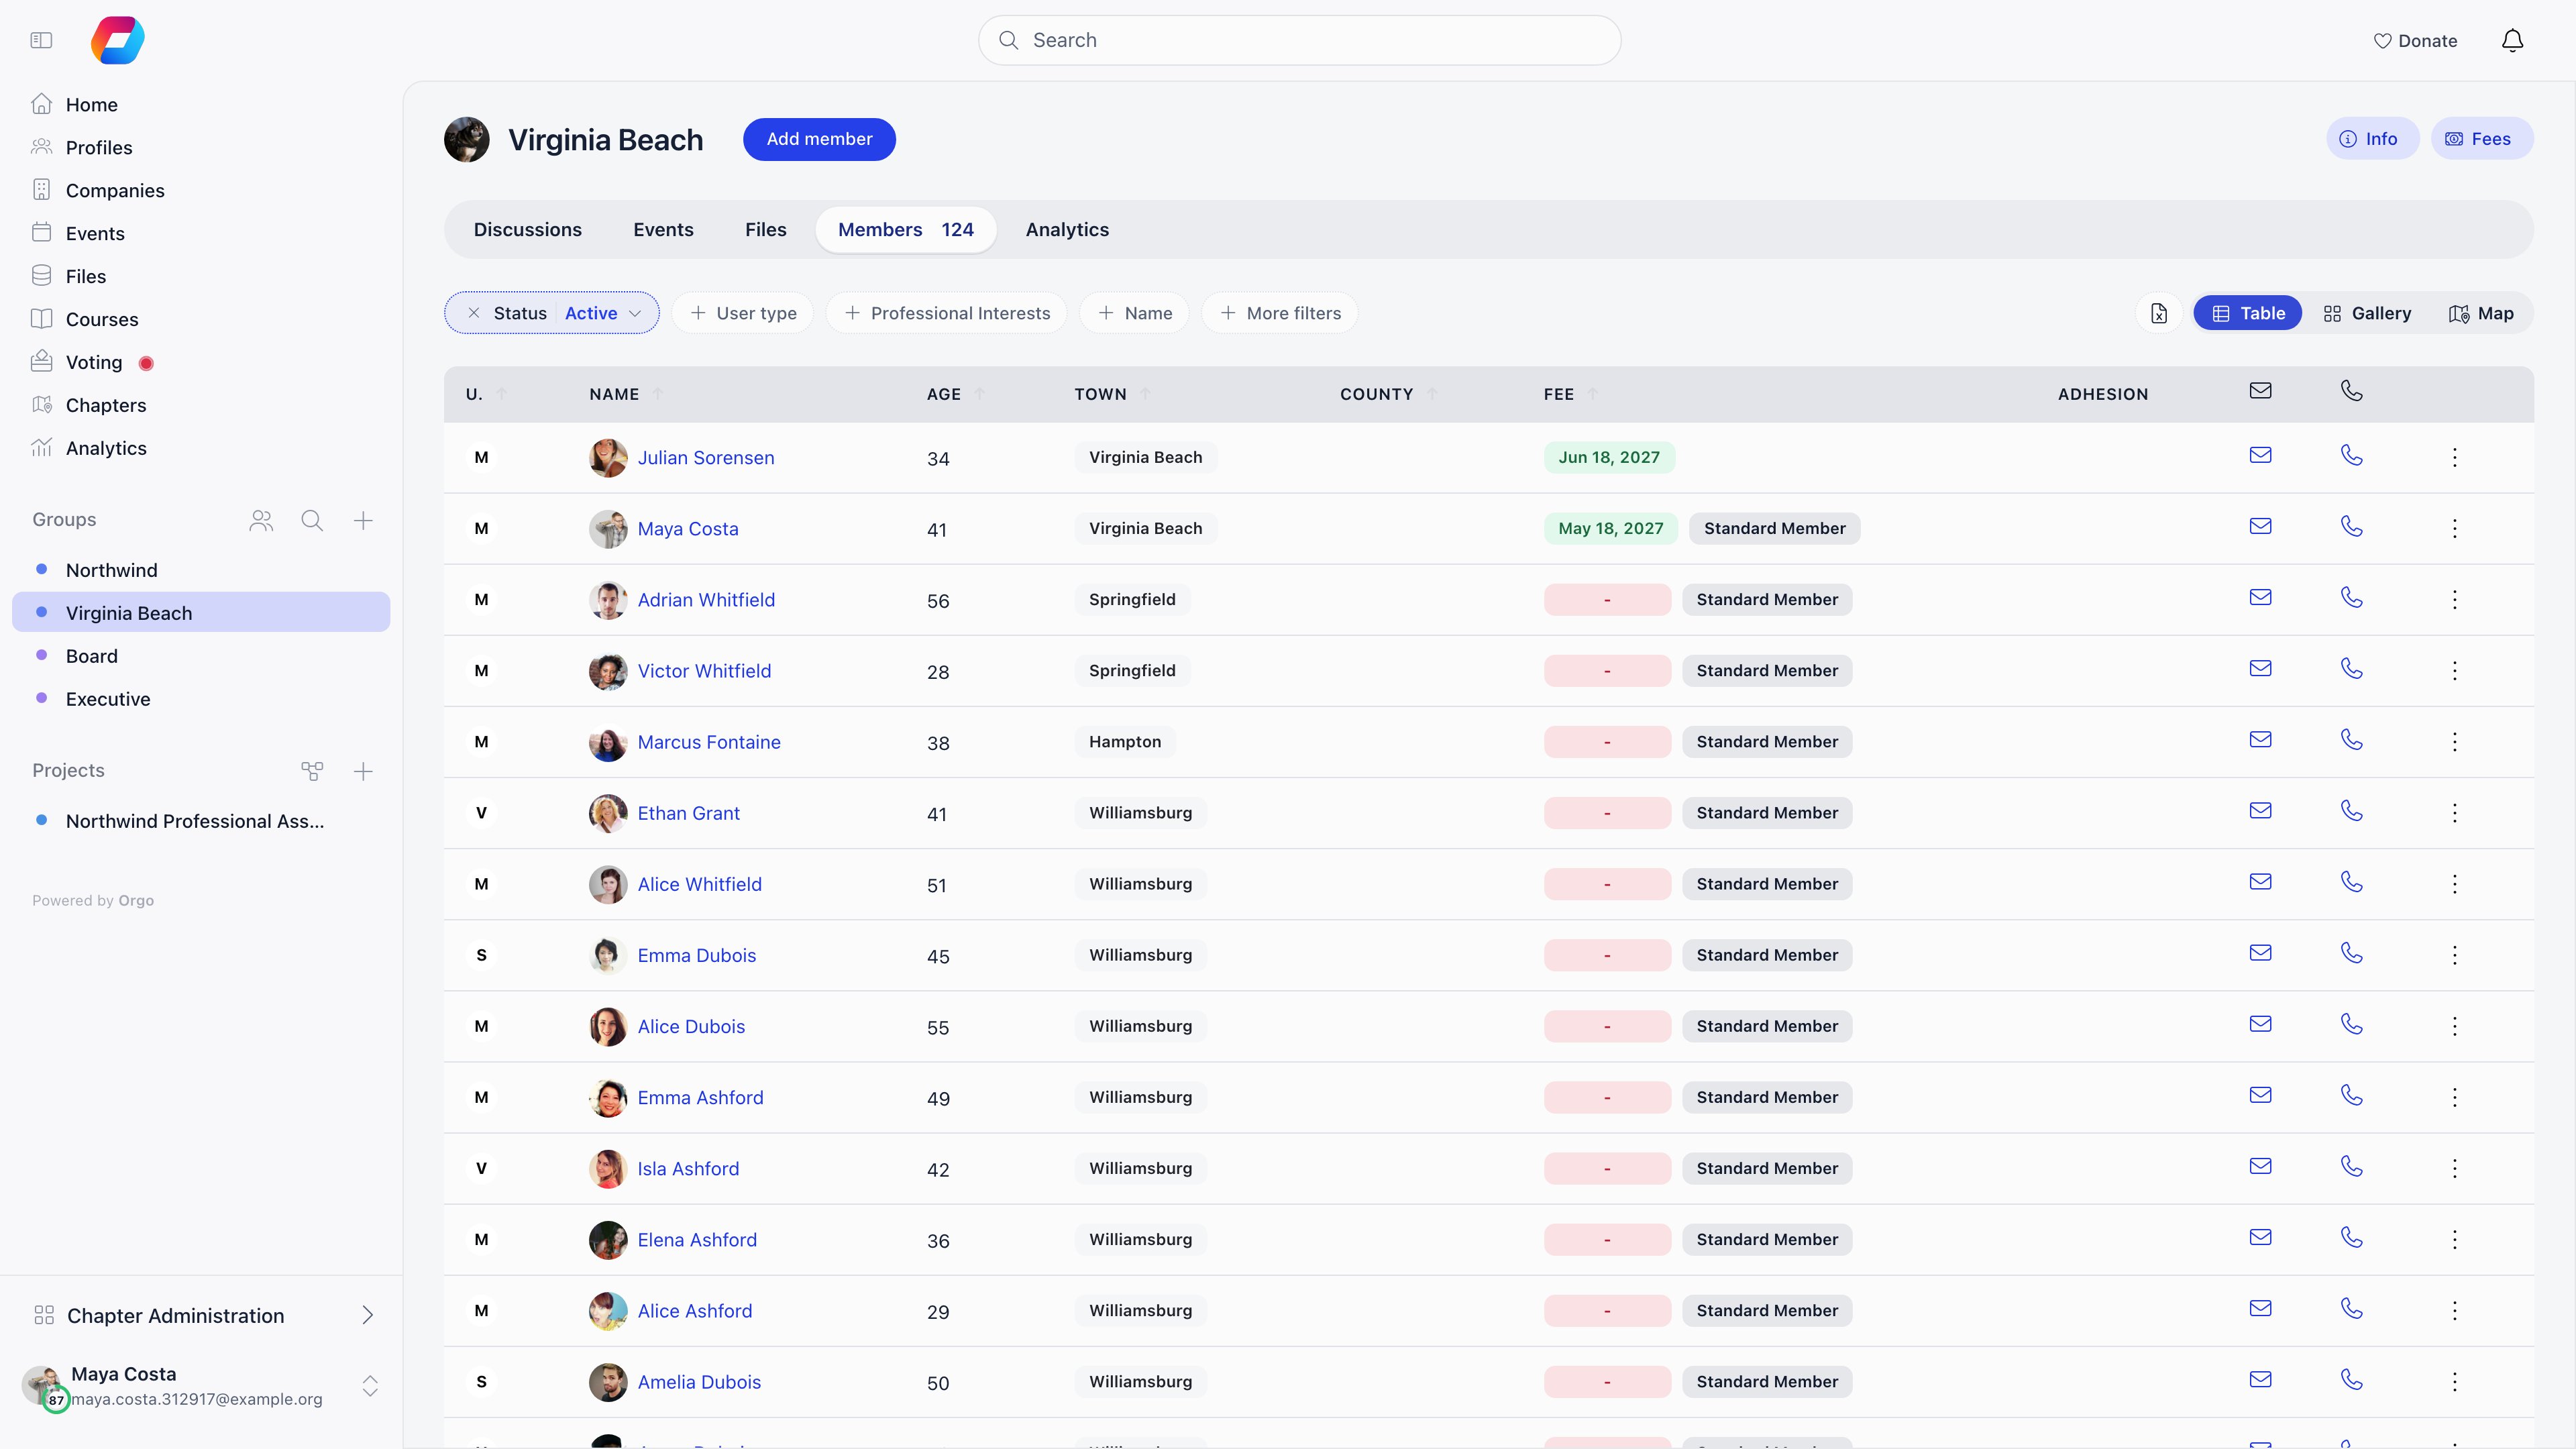
So a treasurer who needs to work through unpaid members chapter by chapter needs
Chapter financial permission and Chapter HR permission on that chapter: Chapter financial permission for the
money, chapter HR permission for the export and the status column. The fee filters are a
bigger step: Organization financial permission unlocks Fee type but not Fee status, which
only organization HR permission opens, and both reach every chapter in the organisation. Before
widening someone’s scope that far, check whether the chapter-scoped screens in
Local group fees already answer the
question they are asking.
Two implications worth remembering for any permission you hand out:
- Chapter financial permission, chapter HR permission and parent-chapter HR permission all imply Chapter HR assistant permission, so any of them unlocks contact details. Chapter event manager permission and Chapter communication manager permission do not.
- Filters and columns are not the same gate. Seeing a value in a column does not mean you can filter or sort a list by it, and being able to read the list does not mean you can export it.
The member profile
Clicking a name opens the profile in a modal you can expand to a full page (/user/{id}). The profile is made of cards you read, an Edit view where
details, status, roles and permissions are changed, and a Settings view for
the member’s own account. Everything is documented on one page:
Member profile.
Clicking a name opens the profile in a window you can expand to a full page
(/user/{id}).
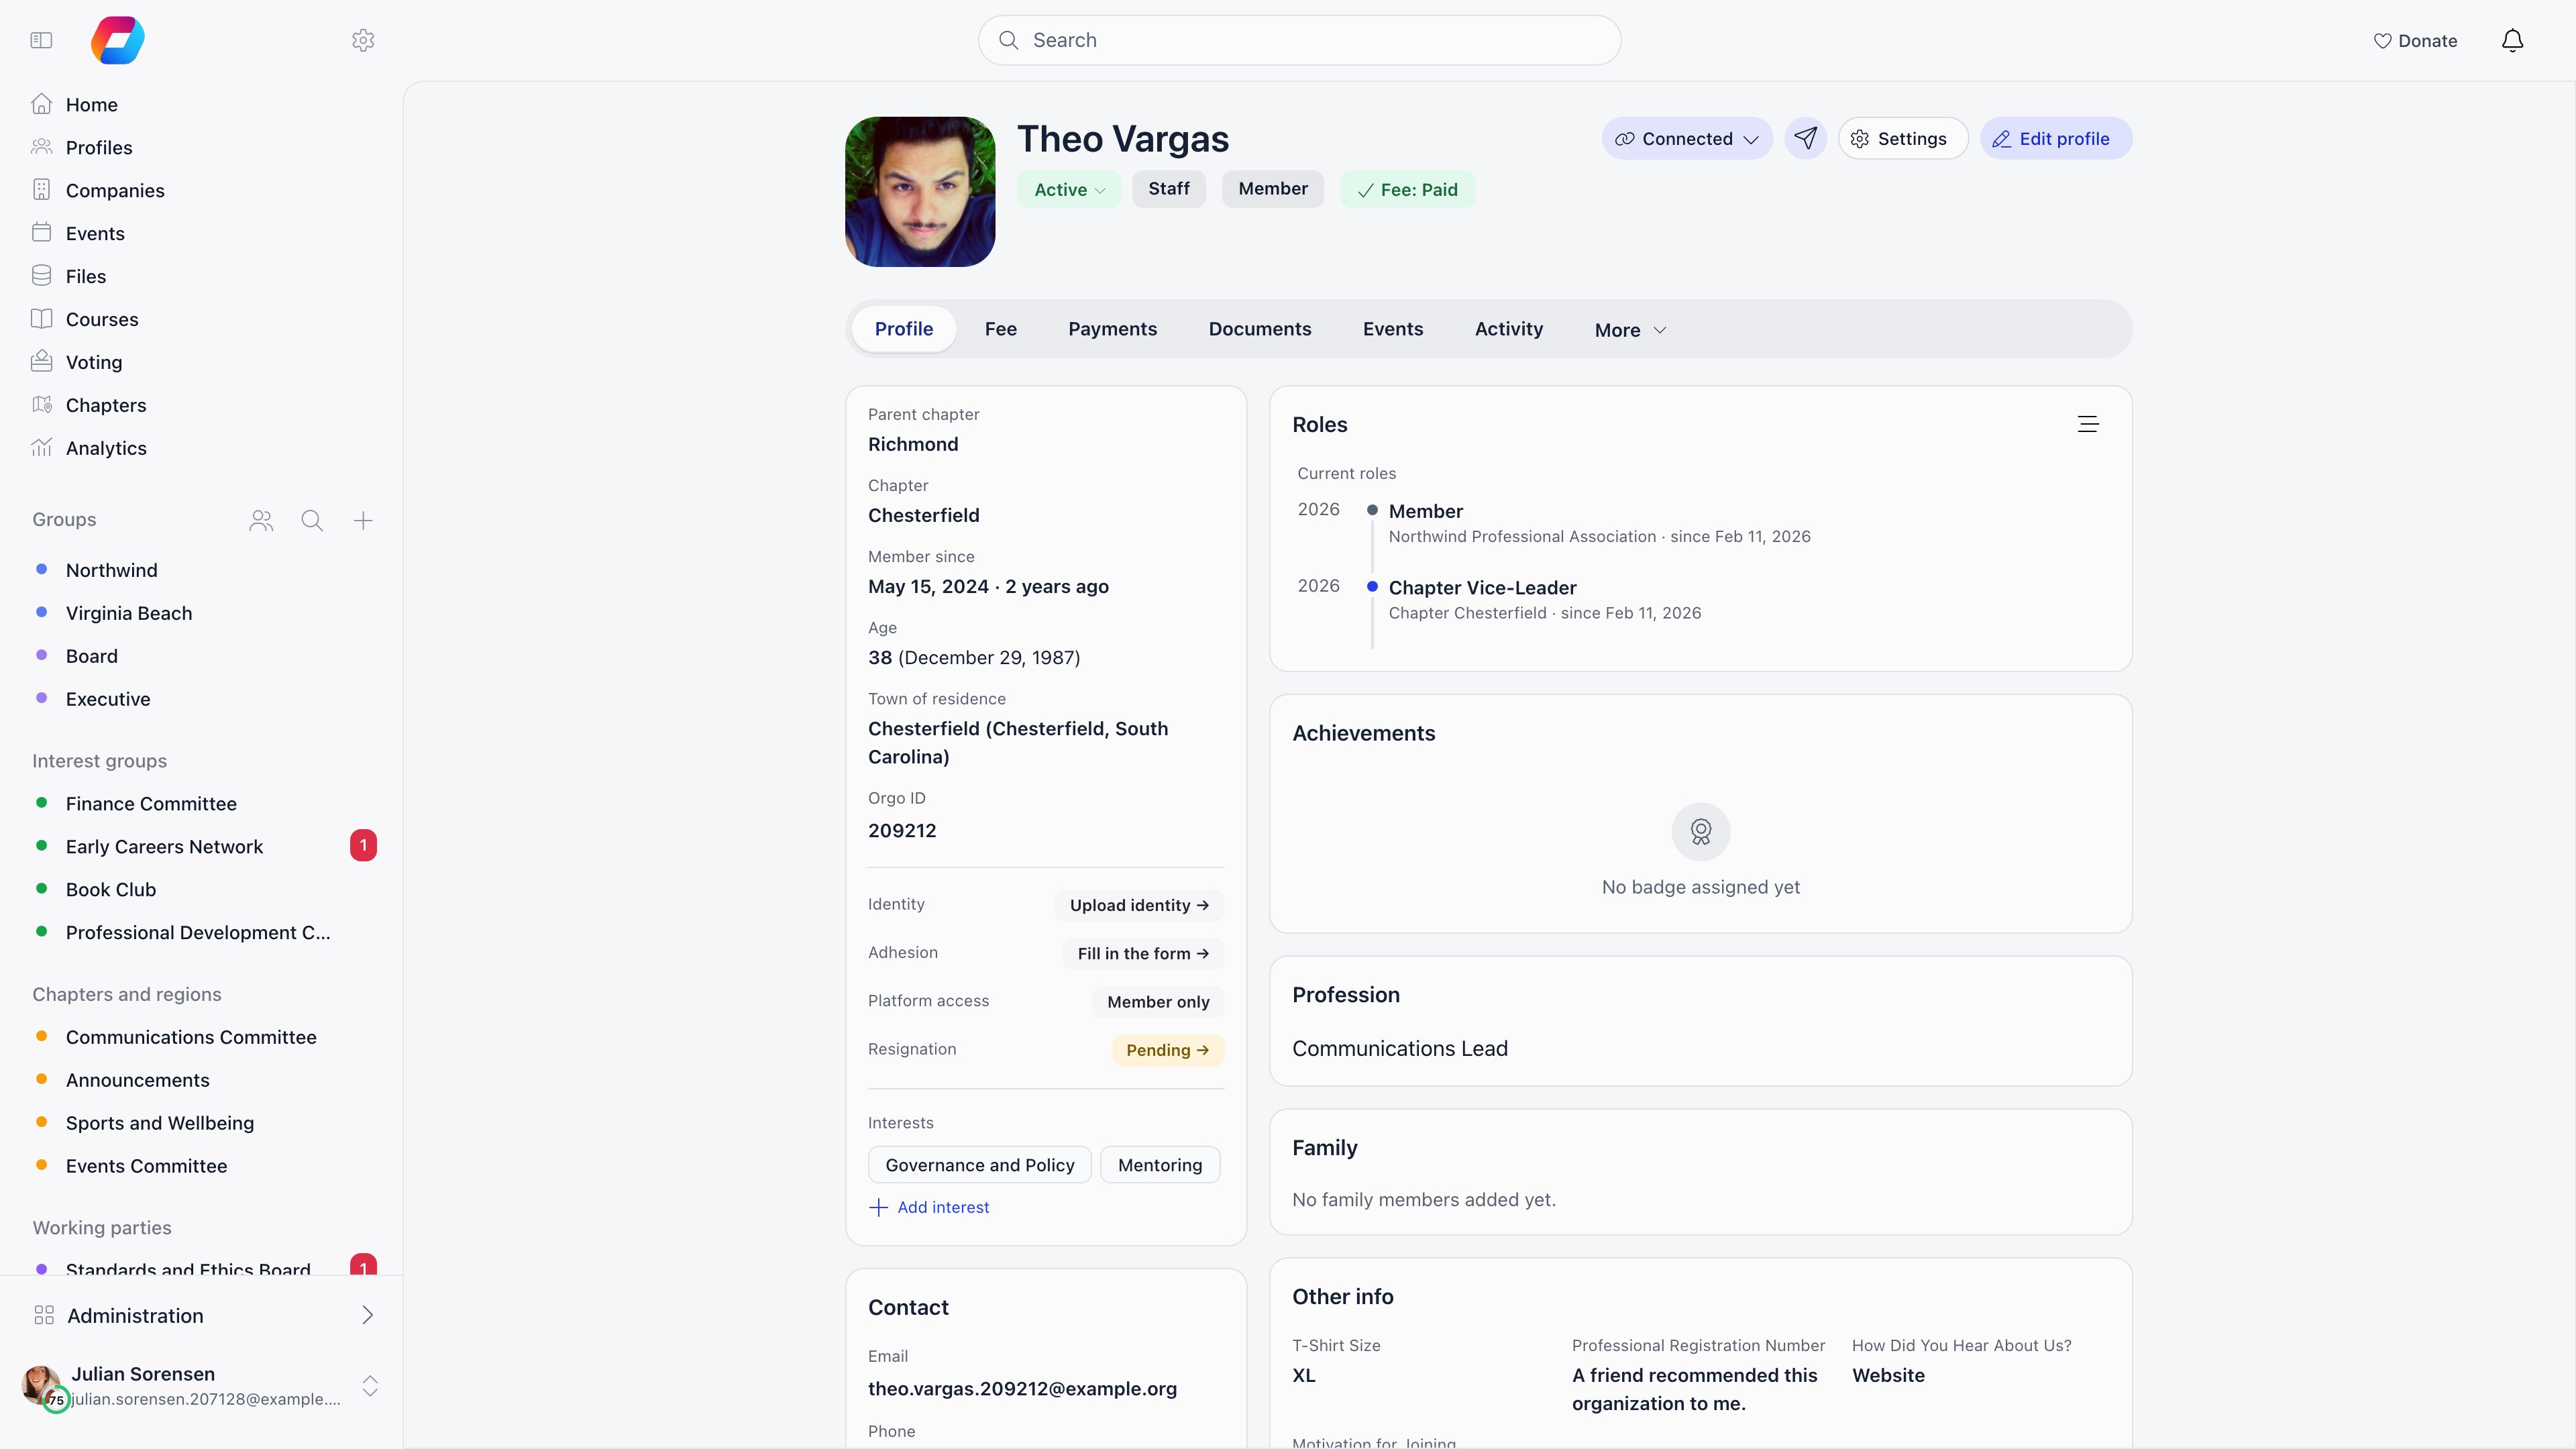
The header
Under the photo and name, a row of chips shows where the member stands:- Status. Whoever may manage the member’s access can click it to open the Permissions pane of the editor. Members waiting for a decision also get Approve and, for new requests, Add to waiting list buttons next to it.
- User type, when user types are on.
- Fee: Paid or Fee: Unpaid, which jumps to the Fee tab.
- A completion percentage, on your own profile only, while Profile Completion Enabled is on and you are below 100%. Open it to see which fields are missing and click one to go to it.
- Supporter, for members on your supporter plan.
The Profile tab
The Profile tab is a set of cards. The pencil on a card opens the editor at the matching section.Tabs
Which tabs appear depends on modules, permissions and whose profile it is. Which tabs appear depends on modules, permissions and whether the profile is your own:
There is no separate edit page and no separate Company or e-Documents
tab any more: the company is a card on the Profile tab, and the documents live in
the Documents tab. A link to the old
/users/edit/{id} address redirects to
the matching pane of Edit or Settings.
Setting up
1
Design your registration form
Start minimal: you can collect more later.
Registration form
2
Create user types, if you need them
Use these when members fall into categories that behave differently, such as
Scout and Leader. Each type can have its own registration form.
User types
3
Decide whether signups need approval
Turn on Manual Approval to review each one from the directory.
Statuses
4
Configure profile and custom fields
5
Set privacy defaults
Members can restrict themselves further, never less.
Privacy settings
6
Assign permissions before you open registration
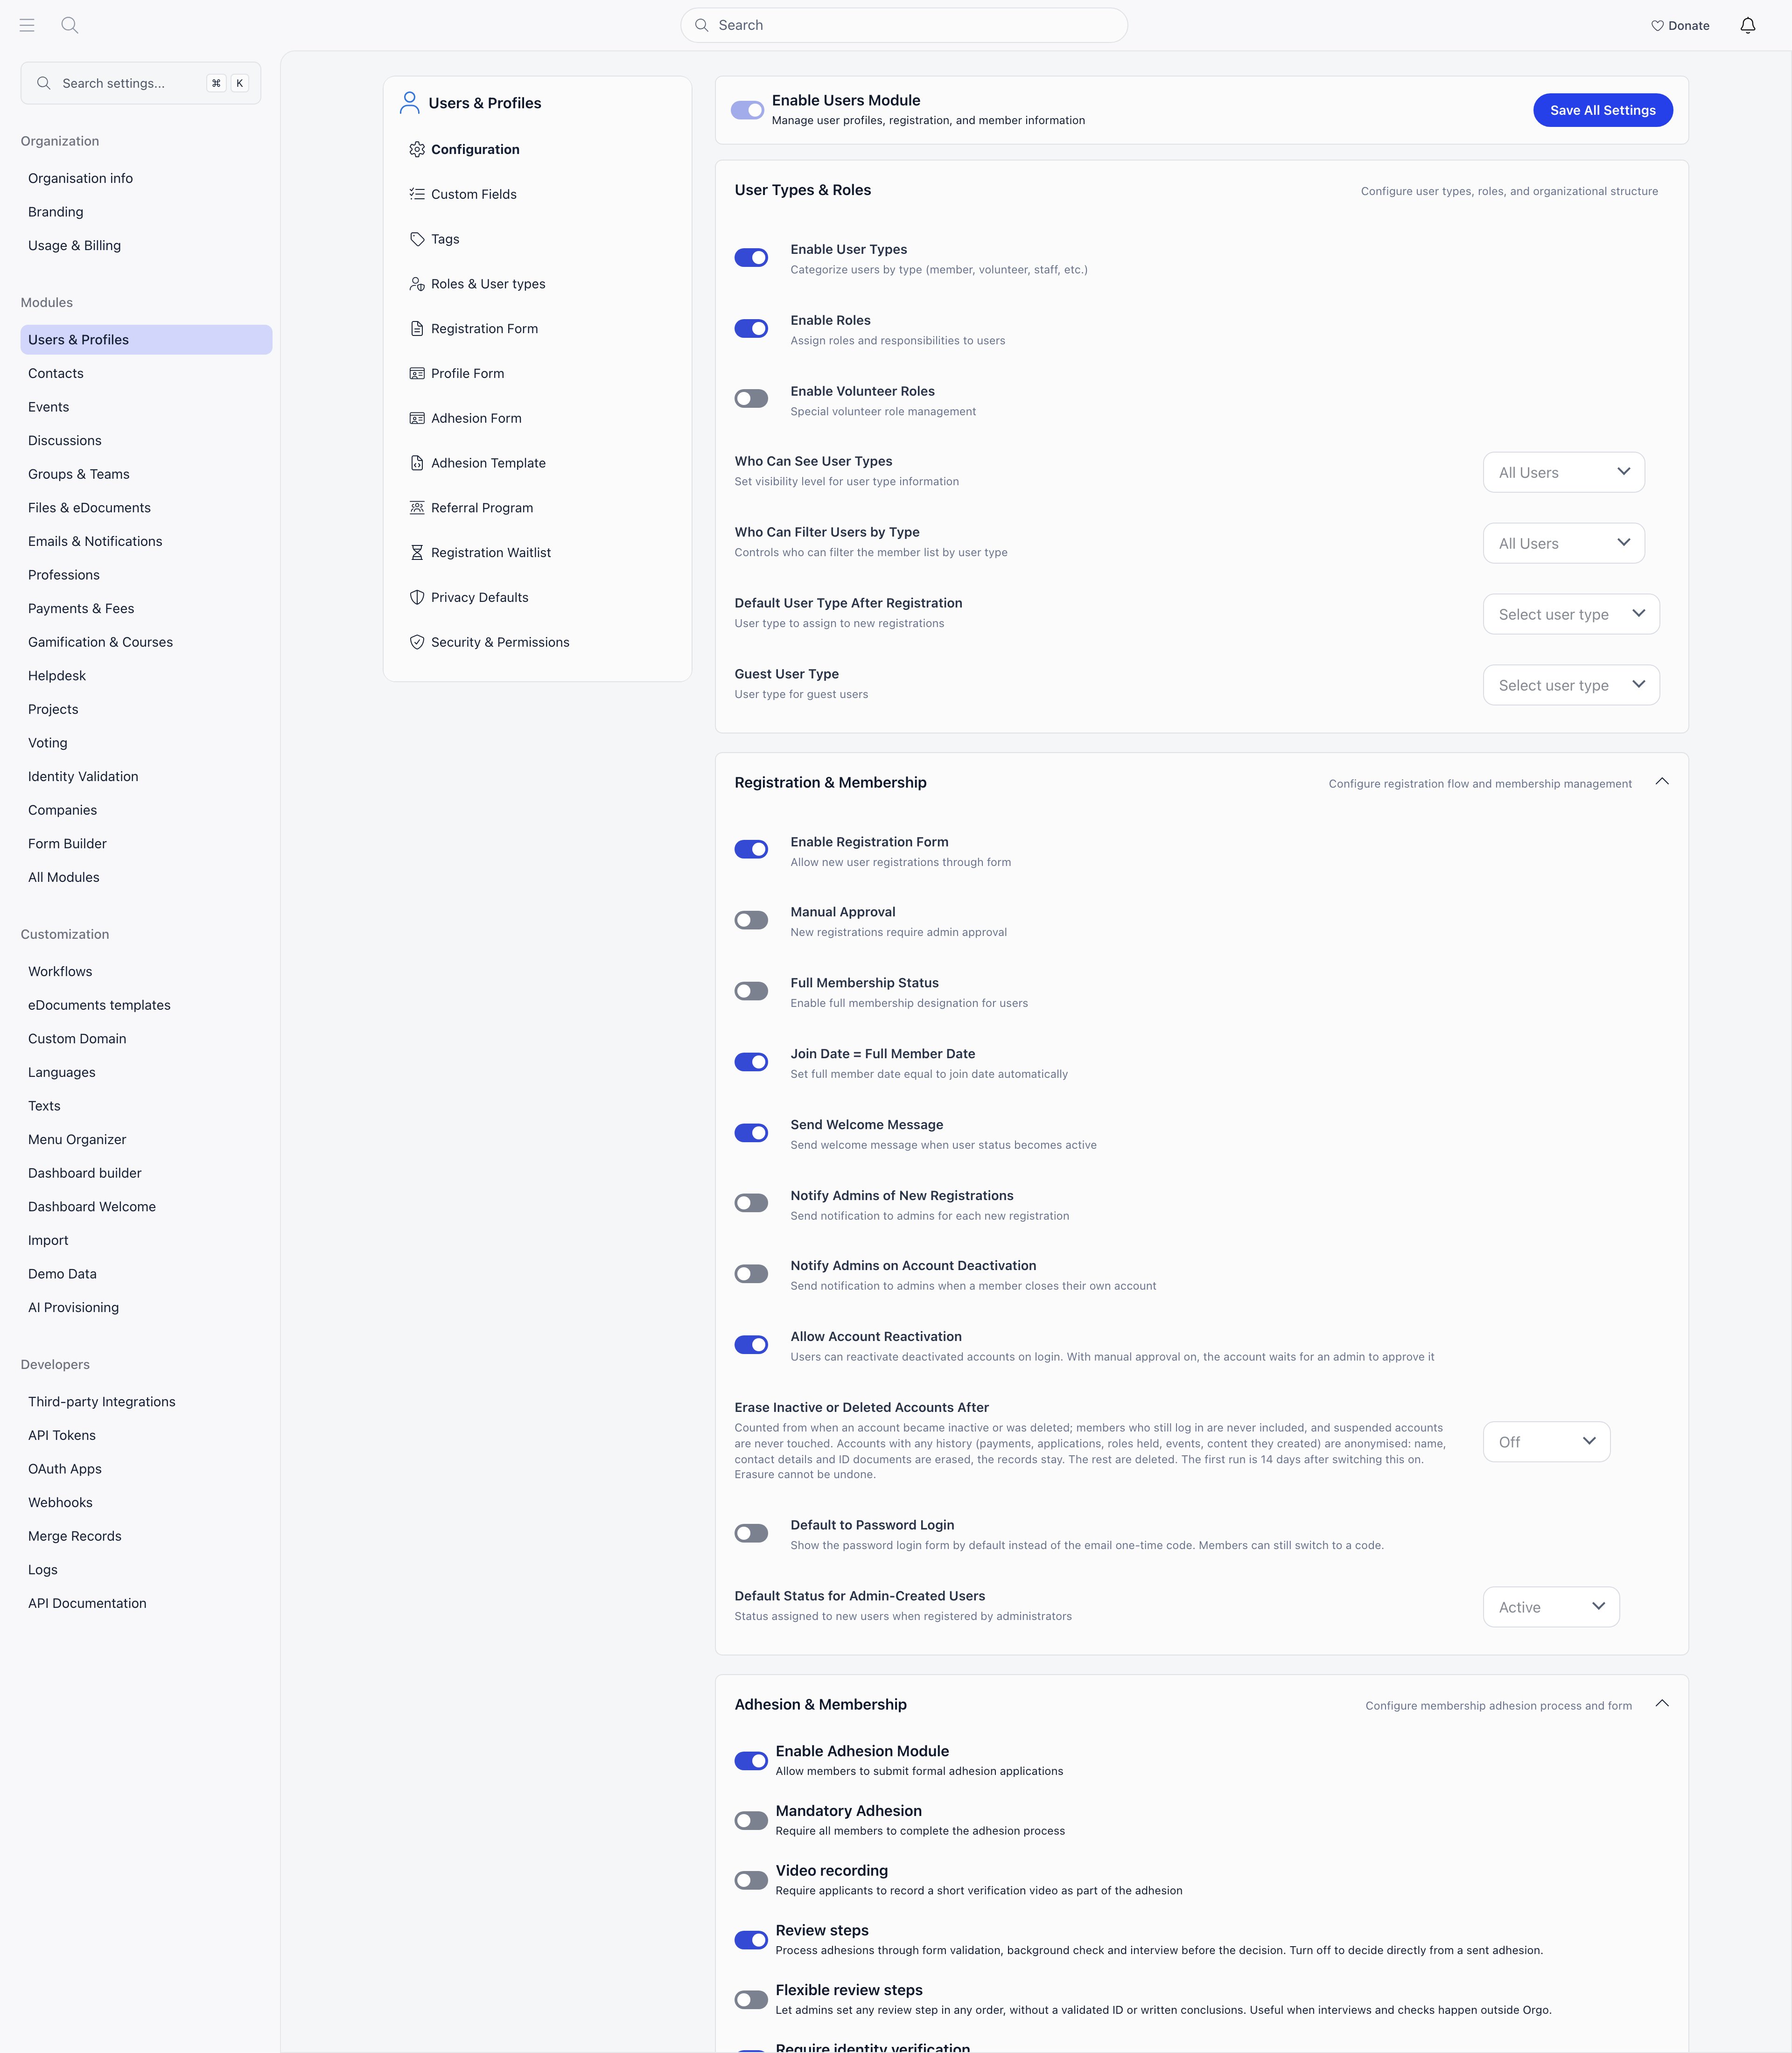
Choosing what to turn on
Troubleshooting
A member cannot log in
A member cannot log in
Start with their status: Inactive, Suspended, New request (still awaiting
approval) and Unconfirmed email all block access. Full elimination sequence in
Troubleshooting member access.
I need new information from existing members
I need new information from existing members
Add the field in Profile Fields and mark it
required. On their next visit, members with missing required fields are
redirected to an onboarding screen that lists exactly what is missing.That redirect only knows about a fixed set of fields: first name, middle name,
last name, date of birth, gender, phone, address, town born, town current, and the
Facebook, Twitter, LinkedIn, Instagram, Telegram and TikTok links, plus any
custom field. Marking anything else required, in particular Bio,
Personal identification number, Postal code, Website, Location on members map, the three
Profession fields or any of the company fields, still marks it required
on the profile form, so a member who opens that form cannot save without it.
What it does not do is trigger the prompt, so nobody is ever sent there and
the field quietly stays empty for everyone who does not edit their profile.
If one of those is what you actually need, collect it with a
custom field instead, which the prompt does
check.
Members see photo cards or a map instead of the table
Members see photo cards or a map instead of the table
Nothing is missing. The view switch at the right end of the filter row moves
between Table, Gallery and Map, and the browser remembers the
last one you picked. On a computer the organisation-wide directory opens on
the map the first time, and chapter or group lists open on the table. On a
phone the first view is Gallery for everyone except Orgo administrators. If a
colleague says a column is missing, first check that they are looking at the
table, since View columns is only offered there.
A colleague sees fewer columns than I do
A colleague sees fewer columns than I do
Columns are not a shared setting. Each one is gated on the permission in the
table above, evaluated per person and, for chapter permissions, per chapter.
Turning a column on from the column menu changes what you see, not what your
colleagues see.The two that surprise people most: email, phone and age need
Chapter HR assistant permission, which chapter HR permission, parent-chapter HR permission and
Chapter financial permission all imply but chapter event manager permission and chapter communication manager permission do
not; and the custom-field columns need organization HR permission, or chapter admin permission while
looking at their own chapter’s list, so a chapter secretary holding only
Chapter HR permission does not get them.
Someone can see the Members link but the page is empty or refuses them
Someone can see the Members link but the page is empty or refuses them
Sidebar entries and page permissions are configured in two different places
and can disagree. Each entry in the sidebar carries its own permission, set
in Settings → Customization →
Menu Organizer, while what the
Members page shows is decided by Settings → Modules → Users & Profiles →
Configuration → Who Can See Members in General Groups. Set the menu
entry more generously than that setting and people see a link that leads to
an empty page.Fix it at whichever end reflects your intent: raise the menu entry’s
permission to match the visibility setting, or lower the visibility setting
if the members really should see the directory. Do not assume a hidden link
means a protected page, or that a visible link means an accessible one.
Where did the Edit member page go?
Where did the Edit member page go?
Editing happens on the profile itself. Open the member, press Edit profile
(or the pencil on any card) and pick a pane: Info, Membership status,
Roles, Permissions, Badges, Profession or Family. The
member’s own account (password, email, privacy, closing the account) is the
Settings view. Old
/users/edit/{id} links still work and redirect.
Details and the old-tab-to-new-pane table are in
Member profile.Where do I end a role or change a member's status?
Where do I end a role or change a member's status?
Both are in the Edit view: Edit profile → Roles → End role, and
Edit profile → Membership status → Status. See
Member profile.
Related
- Member profile - the header, cards, Edit view, Settings view and role timeline
- Adding Members - the four ways people get an account
- Lists & Segments - reusable audiences built from member criteria
- User Statuses - what each status blocks
- Permissions - who can do what
- Custom Fields - data Orgo does not ship with
- Contacts - people who are not members